Web アプリケーションを保護するための OpenID Connect 認可コードフローメカニズム
Quarkus OIDC エクステンションが提供する業界標準の OpenID Connect (OIDC) 認可コードフローメカニズムを使用して、Web アプリケーションを保護することができます。
OIDC 認可コードフローメカニズムの概要
Quarkus OpenID Connect (OIDC) エクステンションは、Keycloak などの OIDC 準拠の認可サーバーでサポートされている OIDC 認可コードフローメカニズムを使用して、アプリケーション HTTP エンドポイントを保護できます。
認可コードフローメカニズムは、Web アプリケーションのユーザーを Keycloak などの OIDC プロバイダーにリダイレクトしてログインさせることで、ユーザーを認証します。 認証後、OIDC プロバイダーは、認証が成功したことを確認する認可コードを使用してユーザーをアプリケーションにリダイレクトします。 次に、アプリケーションは、このコードを OIDC プロバイダーと交換して、ID トークン (認証されたユーザーを表す)、アクセストークン、およびリフレッシュトークンを取得し、ユーザーのアプリケーションへのアクセスを認可します。
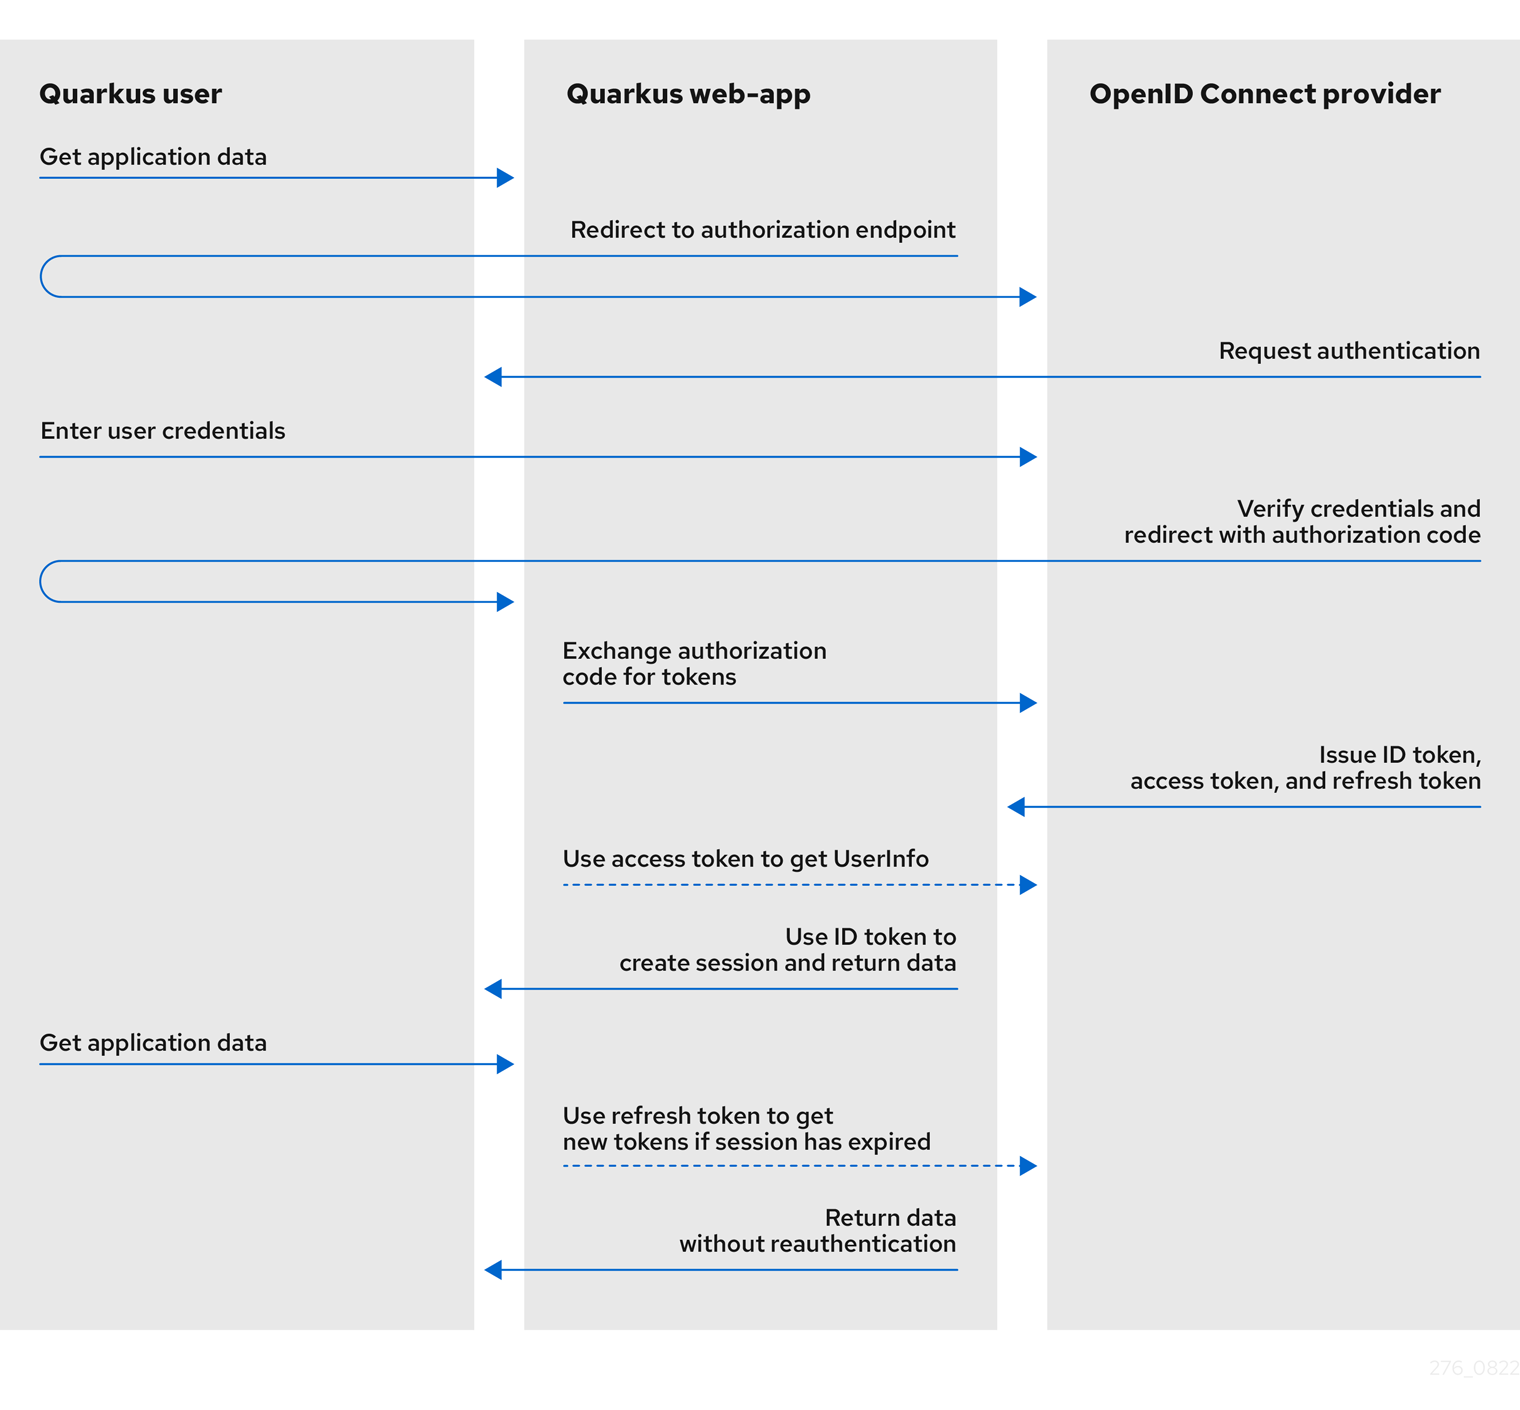
次の図は、Quarkus における認可コードフローメカニズムの概要を示しています。
-
Quarkus ユーザーは、Quarkus
web-appアプリケーションへのアクセスをリクエストします。 -
Quarkus web-app は、ユーザーを認可エンドポイント、つまり認証用の OIDC プロバイダーにリダイレクトします。
-
OIDC プロバイダーは、ユーザーをログインと認証のプロンプトにリダイレクトします。
-
プロンプトで、ユーザーは自分のユーザークレデンシャルを入力します。
-
OIDC プロバイダーは、入力されたユーザーのクレデンシャルを認証し、認証に成功すると認可コードを発行し、そのコードをクエリーパラメーターとして含めて Quarkus web-app にユーザーをリダイレクトします。
-
Quarkus web-app は、この認可コードを OIDC プロバイダーと交換し、ID、アクセス、およびリフレッシュの各トークンを取得します。
認可コードフローが完了し、Quarkus web-app は発行されたトークンを使用してユーザーに関する情報にアクセスし、そのユーザーに関連するロールベースの認可を付与します。 発行されるトークンは以下のとおりです。
-
IDトークン: Quarkus
web-appアプリケーションは、ID トークンのユーザー情報を使用して、認証されたユーザーが安全にログインできるようにし、Web アプリケーションにロールベースのアクセスを提供します。 -
アクセストークン: Quarkus web-app は、アクセストークンを使用して UserInfo API にアクセスし、認証されたユーザーに関する追加情報を取得したり、別のエンドポイントに伝播したりすることがあります。
-
リフレッシュトークン: (オプション) ID およびアクセストークンの有効期限が切れた場合、Quarkus web-app はリフレッシュトークンを使用して新しい ID およびアクセストークンを取得できます。
OIDC設定プロパティ のリファレンスガイドもご参照ください。
OIDC 認可コードフローメカニズムを使用して Web アプリケーションを保護する方法については、OIDC 認可コードフローを使用した Web アプリケーションの保護 を参照してください。
OIDC ベアラートークン認証を使用してサービスアプリケーションを保護したい場合は、OIDC ベアラートークン認証 を参照してください。
マルチテナントへの対応方法については、OpenID Connect (OIDC) マルチテナンシーの使用 ガイドをお読みください。
If you are a Vert.x OIDC user, learn about migration options in the Migrate from Vert.x OIDC to Quarkus OIDC guide.
認可コードフローメカニズムの利用について
認証コードフローをサポートするためのQuarkusの設定
認証コードフロー認証を有効にするには、 quarkus.oidc.application-type プロパティを web-app に設定する必要があります。
通常、Quarkus OIDC web-app アプリケーションタイプは、Quarkus アプリケーションが HTML ページを提供するフロントエンドアプリケーションで、OIDC シングルサインオンログインが必要な場合に設定する必要があります。
Quarkus OIDC web-app アプリケーションでは、認可コードフローがユーザー認証の優先方法として定義されています。
アプリケーションが HTML ページを提供すると同時に REST API を提供し、認証コードフロー認証と ベアラアクセストークン認証の 両方が必要な場合、代わりに quarkus.oidc.application-type プロパティを hybrid に設定できます。この場合、ベアラ・アクセストークンを含む Bearer 認証スキームを持つ HTTP Authorization リクエスト・ヘッダが設定されていない場合にのみ、認可コード・フローがトリガされます。
OIDC プロバイダーエンドポイントへのアクセス設定
OIDC web-app アプリケーションは、OIDC プロバイダーの認可、トークン、 JsonWebKey (JWK) セット、そして場合によっては UserInfo、イントロスペクション、セッション終了 (RP-initiated logout) エンドポイントの URL を必要とします。
規約により、 quarkus.oidc.auth-server-url で設定することで /.well-known/openid-configuration のパスを追加することで検出されます。
また、ディスカバリーエンドポイントが利用できない場合や、ディスカバリーエンドポイントのラウンドトリップを減らしたい場合は、エンドポイントのディスカバリーを無効にし、相対パス値を設定することもできます。 例:
quarkus.oidc.auth-server-url=http://localhost:8180/realms/quarkus
quarkus.oidc.discovery-enabled=false
# Authorization endpoint: http://localhost:8180/realms/quarkus/protocol/openid-connect/auth
quarkus.oidc.authorization-path=/protocol/openid-connect/auth
# Token endpoint: http://localhost:8180/realms/quarkus/protocol/openid-connect/token
quarkus.oidc.token-path=/protocol/openid-connect/token
# JWK set endpoint: http://localhost:8180/realms/quarkus/protocol/openid-connect/certs
quarkus.oidc.jwks-path=/protocol/openid-connect/certs
# UserInfo endpoint: http://localhost:8180/realms/quarkus/protocol/openid-connect/userinfo
quarkus.oidc.user-info-path=/protocol/openid-connect/userinfo
# Token Introspection endpoint: http://localhost:8180/realms/quarkus/protocol/openid-connect/token/introspect
quarkus.oidc.introspection-path=/protocol/openid-connect/token/introspect
# End-session endpoint: http://localhost:8180/realms/quarkus/protocol/openid-connect/logout
quarkus.oidc.end-session-path=/protocol/openid-connect/logout
一部の OIDC プロバイダーは、メタデータディスカバリーをサポートしていますが、認可コードフローを完了したり、ユーザーログアウトなどのアプリケーション機能をサポートしたりするために必要なすべてのエンドポイント URL 値は返しません。 この制限を回避するには、次の例に示すように、不足しているエンドポイント URL 値をローカルで設定します。
# Metadata is auto-discovered but it does not return an end-session endpoint URL

quarkus.oidc.auth-server-url=http://localhost:8180/oidcprovider/account

# Configure the end-session URL locally.
# It can be an absolute or relative (to 'quarkus.oidc.auth-server-url') address
quarkus.oidc.end-session-path=logout
検出されたエンドポイント URL がローカルの Quarkus エンドポイントで機能せず、より具体的な値が必要な場合は、この同じ設定を使用して、エンドポイント URL をオーバーライドできます。
たとえば、グローバルエンドセッションエンドポイントとアプリケーション固有のエンドセッションエンドポイントの両方をサポートするプロバイダーは、 http://localhost:8180/oidcprovider/account/global-logout のようなグローバルエンドセッション URL を返します。
この URL は、ユーザーが現在ログインしているすべてのアプリケーションからユーザーをログアウトします。
ただし、現在のアプリケーションで特定のアプリケーションのみからユーザーをログアウトさせる必要がある場合は、 quarkus.oidc.end-session-path=logout パラメーターを設定することで、グローバルエンドセッション URL をオーバーライドできます。
OIDC プロバイダーのクライアント認証
OIDC プロバイダーは通常、OIDC エンドポイントとやり取りする際に、アプリケーションの識別と認証を行う必要があります。
Quarkus OIDC、特に quarkus.oidc.runtime.OidcProviderClient クラスは、認可コードを ID、アクセス、リフレッシュトークンと交換する必要がある場合、または ID やアクセストークンをリフレッシュまたはイントロスペクトする必要がある場合に、OIDC プロバイダーで認証します。
通常、クライアント ID とクライアントシークレットは、アプリケーションが OIDC プロバイダーに登録する際に定義されます。 すべての OIDC クライアント認証 オプションがサポートされています。 例:
client_secret_basic の例:quarkus.oidc.auth-server-url=http://localhost:8180/realms/quarkus/
quarkus.oidc.client-id=quarkus-app
quarkus.oidc.credentials.secret=mysecretあるいは:
quarkus.oidc.auth-server-url=http://localhost:8180/realms/quarkus/
quarkus.oidc.client-id=quarkus-app
quarkus.oidc.credentials.client-secret.value=mysecret次の例は、クレデンシャルプロバイダー から取得したシークレットを示しています。
quarkus.oidc.auth-server-url=http://localhost:8180/realms/quarkus/
quarkus.oidc.client-id=quarkus-app

# This is a key which will be used to retrieve a secret from the map of credentials returned from CredentialsProvider
quarkus.oidc.credentials.client-secret.provider.key=mysecret-key
# This is the keyring provided to the CredentialsProvider when looking up the secret, set only if required by the CredentialsProvider implementation
quarkus.oidc.credentials.client-secret.provider.keyring-name=oidc
# Set it only if more than one CredentialsProvider can be registered
quarkus.oidc.credentials.client-secret.provider.name=oidc-credentials-provider
client_secret_post の例quarkus.oidc.auth-server-url=http://localhost:8180/realms/quarkus/
quarkus.oidc.client-id=quarkus-app
quarkus.oidc.credentials.client-secret.value=mysecret
quarkus.oidc.credentials.client-secret.method=postclient_secret_jwt の例。署名アルゴリズムは HS256:quarkus.oidc.auth-server-url=http://localhost:8180/realms/quarkus/
quarkus.oidc.client-id=quarkus-app
quarkus.oidc.credentials.jwt.secret=AyM1SysPpbyDfgZld3umj1qzKObwVMkoqQ-EstJQLr_T-1qS0gZH75aKtMN3Yj0iPS4hcgUuTwjAzZr1Z9CAowclient_secret_jwt の例。この場合、シークレットは クレデンシャルプロバイダー から取得されます。quarkus.oidc.auth-server-url=http://localhost:8180/realms/quarkus/
quarkus.oidc.client-id=quarkus-app
# This is a key which will be used to retrieve a secret from the map of credentials returned from CredentialsProvider
quarkus.oidc.credentials.jwt.secret-provider.key=mysecret-key
# This is the keyring provided to the CredentialsProvider when looking up the secret, set only if required by the CredentialsProvider implementation
quarkus.oidc.credentials.client-secret.provider.keyring-name=oidc
# Set it only if more than one CredentialsProvider can be registered
quarkus.oidc.credentials.jwt.secret-provider.name=oidc-credentials-providerRS256 である private_key_jwt の例:quarkus.oidc.auth-server-url=http://localhost:8180/realms/quarkus/
quarkus.oidc.client-id=quarkus-app
quarkus.oidc.credentials.jwt.key=Base64-encoded private key representationprivate_key_jwt の例。署名アルゴリズムは RS256:quarkus.oidc.auth-server-url=http://localhost:8180/realms/quarkus/
quarkus.oidc.client-id=quarkus-app
quarkus.oidc.credentials.jwt.key-file=privateKey.pemprivate_key_jwt の例。署名アルゴリズムはRS256:quarkus.oidc.auth-server-url=http://localhost:8180/realms/quarkus/
quarkus.oidc.client-id=quarkus-app
quarkus.oidc.credentials.jwt.key-store-file=keystore.pkcs12
quarkus.oidc.credentials.jwt.key-store-password=mypassword
quarkus.oidc.credentials.jwt.key-password=mykeypassword
# Private key alias inside the keystore
quarkus.oidc.credentials.jwt.key-id=mykeyAliasclient_secret_jwt、または private_key_jwt 認証方法を使用することで、クライアントシークレットが OIDC プロバイダーに送信されないため、「中間者」攻撃によってシークレットが傍受されるリスクを回避できます。
quarkus.oidc.auth-server-url=http://localhost:8180/realms/quarkus/
quarkus.oidc.client-id=quarkus-app
quarkus.oidc.credentials.jwt.source=bearer (1)
quarkus.oidc.credentials.jwt.token-path=/var/run/secrets/tokens (2)| 1 | JWT ベアラートークンを使用して OIDC プロバイダークライアントを認証します。詳細は、JWT を使用したクライアント認証 セクションを参照してください。 |
| 2 | JWT ベアラートークンへのパス。Quarkus はファイルシステムから新しいトークンをロードし、トークンの有効期限が切れると再ロードします。 |
JWT 認証の追加オプション
client_secret_jwt、 private_key_jwt、または Apple の post_jwt 認証方法が使用されている場合、JWT 署名アルゴリズム、キー識別子、audience、subject、および issuer をカスタマイズすることができます。
例:
# private_key_jwt client authentication
quarkus.oidc.auth-server-url=http://localhost:8180/realms/quarkus/
quarkus.oidc.client-id=quarkus-app
quarkus.oidc.credentials.jwt.key-file=privateKey.pem
# This is a token key identifier 'kid' header - set it if your OIDC provider requires it:
# Note if the key is represented in a JSON Web Key (JWK) format with a `kid` property, then
# using 'quarkus.oidc.credentials.jwt.token-key-id' is not necessary.
quarkus.oidc.credentials.jwt.token-key-id=mykey
# Use RS512 signature algorithm instead of the default RS256
quarkus.oidc.credentials.jwt.signature-algorithm=RS512
# The token endpoint URL is the default audience value, use the base address URL instead:
quarkus.oidc.credentials.jwt.audience=${quarkus.oidc-client.auth-server-url}
# custom subject instead of the client id:
quarkus.oidc.credentials.jwt.subject=custom-subject
# custom issuer instead of the client id:
quarkus.oidc.credentials.jwt.issuer=custom-issuerApple POST JWT
Apple OIDC プロバイダーは、 private_key_jwt 認証方式で生成された JWT をシークレットとする client_secret_post 方式を使用していますが、Apple アカウント固有の issuer と subject のクレームを使用しています。
Quarkus Security では、 quarkus-oidc は、非標準の client_secret_post_jwt 認証方法をサポートされています。この認証方法は、以下のように設定できます。
# Apple provider configuration sets a 'client_secret_post_jwt' authentication method
quarkus.oidc.provider=apple

quarkus.oidc.client-id=${apple.client-id}
quarkus.oidc.credentials.jwt.key-file=ecPrivateKey.pem
quarkus.oidc.credentials.jwt.token-key-id=${apple.key-id}
# Apple provider configuration sets ES256 signature algorithm

quarkus.oidc.credentials.jwt.subject=${apple.subject}
quarkus.oidc.credentials.jwt.issuer=${apple.issuer}
相互 TLS (mTLS)
OIDC プロバイダーによっては、相互 TLS 認証プロセスの一部としてクライアントの認証を要求する場合があります。
次の例は、 mTLS をサポートするように quarkus-oidc を設定する方法を示しています。
quarkus.oidc.tls.tls-configuration-name=oidc

# configure hostname verification if necessary
#quarkus.tls.oidc.hostname-verification-algorithm=NONE

# Keystore configuration
quarkus.tls.oidc.key-store.p12.path=client-keystore.p12
quarkus.tls.oidc.key-store.p12.password=${key-store-password}

# Add more keystore properties if needed:
#quarkus.tls.oidc.key-store.p12.alias=keyAlias
#quarkus.tls.oidc.key-store.p12.alias-password=keyAliasPassword

# Truststore configuration
quarkus.tls.oidc.trust-store.p12.path=client-truststore.p12
quarkus.tls.oidc.trust-store.p12.password=${trust-store-password}
# Add more truststore properties if needed:
#quarkus.tls.oidc.trust-store.p12.alias=certAlias
POST クエリー
Strava OAuth2 プロバイダー などの一部のプロバイダーでは、クライアントクレデンシャルを HTTP POST クエリーパラメーターとして送信する必要があります。
quarkus.oidc.provider=strava
quarkus.oidc.client-id=quarkus-app
quarkus.oidc.credentials.client-secret.value=mysecret
quarkus.oidc.credentials.client-secret.method=query
イントロスペクションエンドポイント認証
一部の OIDC プロバイダーでは、Basic 認証と client_id および client_secret とは異なるクレデンシャルを使用して、イントロスペクションエンドポイントへの認証を行う必要があります。
OIDC provider client authentication セクションに記載されているように、以前にセキュリティー認証を設定して、 client_secret_basic または client_secret_post クライアント認証メソッドをサポートしていた場合は、次のように追加の設定を適用することを推奨します。
トークンをイントロスペクションする必要があり、イントロスペクションエンドポイント固有の認証メカニズムが必要な場合は、 quarkus-oidc を以下のように設定できます。
quarkus.oidc.introspection-credentials.name=introspection-user-name
quarkus.oidc.introspection-credentials.secret=introspection-user-secret
OIDC リクエストフィルター
You can filter OIDC requests made by Quarkus to the OIDC provider by registering one or more OidcRequestFilter implementations, which can update or add new request headers, customize a request body and can also log requests.
例:
package io.quarkus.it.keycloak;

import io.quarkus.oidc.OidcConfigurationMetadata;
import jakarta.enterprise.context.ApplicationScoped;

import io.quarkus.arc.Unremovable;
import io.quarkus.oidc.common.OidcRequestFilter;
import io.smallrye.mutiny.Uni;

@ApplicationScoped
@Unremovable
public class OidcTokenRequestCustomizer implements OidcRequestFilter {
    @Override
    public Uni<Void> filter(OidcRequestFilterContext requestContext) {
        OidcConfigurationMetadata metadata = requestContext.contextProperties().get(OidcConfigurationMetadata.class.getName()); (1)
        // Metadata URI is absolute, request URI value is relative
        if (metadata.getTokenUri().endsWith(requestContext.request().uri())) { (2)
            requestContext.request().putHeader("TokenGrantDigest", calculateDigest(requestContext.requestBody().toString()));
        }
        return Uni.createFrom().voidItem();
    }
    private String calculateDigest(String bodyString) {
        // Apply the required digest algorithm to the body string
    }
}| 1 | サポートされているすべての OIDC エンドポイントアドレスが含まれる OidcConfigurationMetadata を取得します。 |
| 2 | OidcConfigurationMetadata を使用して、OIDC トークンエンドポイントへのリクエストのみをフィルターします。 |
または、 @OidcEndpoint アノテーションを使用して、このフィルターを OIDC 検出エンドポイントからのレスポンスにのみ適用することもできます。
package io.quarkus.it.keycloak;

import jakarta.enterprise.context.ApplicationScoped;

import io.quarkus.arc.Unremovable;
import io.quarkus.oidc.common.OidcEndpoint;
import io.quarkus.oidc.common.OidcEndpoint.Type;
import io.quarkus.oidc.common.OidcRequestContext;
import io.quarkus.oidc.common.OidcRequestFilter;
import io.smallrye.mutiny.Uni;

@ApplicationScoped
@Unremovable
@OidcEndpoint(value = Type.DISCOVERY) (1)
public class OidcDiscoveryRequestCustomizer implements OidcRequestFilter {

    @Override
    public Uni<Void> filter(OidcRequestFilterContext requestContext) {
        requestContext.request().putHeader("Discovery", "OK");
        return Uni.createFrom().voidItem();
    }
}| 1 | このフィルターを、OIDC 検出エンドポイントのみを対象とするリクエストに制限します。 |
OidcRequestContextProperties を使用して、リクエストプロパティーにアクセスできます。
現在、 tenand_id キーを使用して OIDC テナント ID にアクセスし、 grant_type キーを使用して OIDC プロバイダーがトークンを取得するために使用するグラントタイプにアクセスできます。
トークンエンドポイントにリクエストする場合、 grant_type は authorization_code または refresh_token グラントタイプのいずれかにのみ設定できます。それ以外の場合は null になります。
OidcRequestFilter can customize a request body by preparing an instance of io.vertx.mutiny.core.buffer.Buffer
and setting it on a request context, for example:
package io.quarkus.it.keycloak;

import jakarta.enterprise.context.ApplicationScoped;

import io.quarkus.arc.Unremovable;
import io.quarkus.oidc.common.OidcEndpoint;
import io.quarkus.oidc.common.OidcEndpoint.Type;
import io.quarkus.oidc.common.OidcRequestContextProperties;
import io.quarkus.oidc.common.OidcRequestFilter;
import io.smallrye.mutiny.Uni;
import io.vertx.mutiny.core.buffer.Buffer;

@ApplicationScoped
@Unremovable
@OidcEndpoint(value = Type.TOKEN)
public class TokenRequestFilter implements OidcRequestFilter {

    @Override
    public Uni<Void> filter(OidcRequestFilterContext rc) {
        // Add more required properties to the token request
        rc.requestBody(Buffer.buffer(rc.requestBody().toString() + "&opaque_token_param=opaque_token_value"));
        return Uni.createFrom().voidItem();
    }
}
OIDC レスポンスフィルター
1 つ以上の OidcResponseFilter 実装を登録することで、OIDC プロバイダーからのレスポンスをフィルタリングできます。これにより、レスポンスのステータス、ヘッダー、本文をチェックして、ログに記録したり、その他のアクションを実行したりできます。
すべての OIDC レスポンスをインターセプトする単一のフィルターを使用することも、 @OidcEndpoint アノテーションを使用してこのフィルターを特定のエンドポイントレスポンスにのみ適用することもできます。例:
package io.quarkus.it.keycloak;

import jakarta.enterprise.context.ApplicationScoped;

import io.quarkus.arc.Unremovable;
import io.quarkus.logging.Log;
import io.quarkus.oidc.common.OidcEndpoint;
import io.quarkus.oidc.common.OidcEndpoint.Type;
import io.quarkus.oidc.common.OidcResponseFilter;
import io.smallrye.mutiny.Uni;
import io.quarkus.oidc.common.runtime.OidcConstants;
import io.quarkus.oidc.runtime.OidcUtils;

@ApplicationScoped
@Unremovable
@OidcEndpoint(value = Type.TOKEN) (1)
public class TokenEndpointResponseFilter implements OidcResponseFilter {

    @Override
    public Uni<Void> filter(OidcResponseFilterContext rc) {
        String contentType = rc.responseHeaders().get("Content-Type"); (2)
        if (contentType.equals("application/json")
                && OidcConstants.AUTHORIZATION_CODE.equals(rc.requestProperties().get(OidcConstants.GRANT_TYPE)) (3)
                && "code-flow-user-info-cached-in-idtoken".equals(rc.requestProperties().get(OidcUtils.TENANT_ID_ATTRIBUTE)) (3)
                && rc.responseBody().toJsonObject().containsKey("id_token")) { (4)
            Log.debug("Authorization code completed for tenant 'code-flow-user-info-cached-in-idtoken'");
        }
        return Uni.createFrom().voidItem();
    }
}| 1 | このフィルターを、OIDC トークンエンドポイントのみを対象とするリクエストに制限します。 |
| 2 | レスポンスの Content-Type ヘッダーを確認します。 |
| 3 | OidcRequestContextProperties リクエストプロパティーを使用して、 code-flow-user-info-cached-in-idtoken テナントの authorization_code トークングラントレスポンスのみをチェックします。 |
| 4 | レスポンス JSON に id_token プロパティーが含まれていることを確認します。 |
OidcResponseFilter can customize a response body by preparing an instance of io.vertx.mutiny.core.buffer.Buffer
and setting it on a response context, for example:
package io.quarkus.it.keycloak;

import jakarta.enterprise.context.ApplicationScoped;

import io.quarkus.arc.Unremovable;
import io.quarkus.oidc.common.OidcEndpoint;
import io.quarkus.oidc.common.OidcEndpoint.Type;
import io.quarkus.oidc.common.OidcRequestContextProperties;
import io.quarkus.oidc.common.OidcResponseFilter;
import io.smallrye.mutiny.Uni;
import io.vertx.core.json.JsonObject;
import io.vertx.mutiny.core.buffer.Buffer;

@ApplicationScoped
@Unremovable
@OidcEndpoint(value = Type.TOKEN)
public class TokenResponseFilter implements OidcResponseFilter {

    @Override
    public Uni<Void> filter(OidcResponseFilterContext rc) {
        JsonObject body = rc.responseBody().toJsonObject();
        // JSON `scope` property has multiple values separated by a comma character.
        // It must be replaced with a space character.
        String scope = body.getString("scope");
        body.put("scope", scope.replace(",", " "));
        rc.responseBody(Buffer.buffer(body.toString()));
        return Uni.createFrom().voidItem();
    }
}
Restricting OIDC request and response filters to authorization code flow
When you have both the authorization code and bearer access token flows supported by multiple OIDC tenants and the filters have to deal with a flow specific logic, you can instead have them restricted to the authorization code flow with the io.quarkus.oidc.AuthorizationCodeFlow annotation and the bearer access token flow with the 'io.quarkus.oidc.BearerTokenAuthentication' annotation.
例:
package io.quarkus.it.keycloak;

import io.quarkus.arc.Unremovable;
import io.quarkus.oidc.AuthorizationCodeFlow;
import io.quarkus.oidc.common.OidcRequestFilter;
import io.smallrye.mutiny.Uni;
import jakarta.enterprise.context.ApplicationScoped;

@AuthorizationCodeFlow
@ApplicationScoped
@Unremovable
public class CustomOidcRequestFilter implements OidcRequestFilter {

    @Override
    public Uni<Void> filter(OidcRequestFilterContext requestContext) {
        requestContext.request().putHeader("custom-header-name", "custom-header-value");
        return Uni.createFrom().voidItem();
    }
}
OIDC プロバイダーへのリダイレクトと OIDC プロバイダーからのリダイレクト
ユーザーが認証のために OIDC プロバイダーにリダイレクトされる場合、リダイレクト URL には redirect_uri クエリーパラメーターが含まれます。このパラメーターは、認証完了後のユーザーのリダイレクト先をプロバイダーに示します。
ここでのリダイレクト先は Quarkus アプリケーションになります。
Quarkus は、デフォルトでこのパラメーターを現在のアプリケーションリクエスト URL に設定します。
たとえば、ユーザーが http://localhost:8080/service/1 にある Quarkus サービスエンドポイントにアクセスしようとしている場合、 redirect_uri パラメーターは http://localhost:8080/service/1 に設定されます。
同様に、リクエスト URL が http://localhost:8080/service/2 の場合、 redirect_uri パラメーターは http://localhost:8080/service/2 に設定されます。
一部の OIDC プロバイダーでは、すべてのリダイレクト URL の特定のアプリケーションに対して、 redirect_uri が同じ値 (例: http://localhost:8080/service/callback) を持つことが必要です。
このような場合は、 quarkus.oidc.authentication.redirect-path プロパティーを設定する必要があります。
たとえば、 quarkus.oidc.authentication.redirect-path=/service/callback の場合、Quarkus は redirect_uri パラメーターを http://localhost:8080/service/callback などの絶対 URL に設定します。これは、現在のリクエスト URL に関係なく同じになります。
quarkus.oidc.authentication.redirect-path が設定されているが、ユーザーが http://localhost:8080/service/callback などの一意のコールバック URL にリダイレクトされた後に元のリクエスト URL を復元する必要がある場合は、 quarkus.oidc.authentication.restore-path-after-redirect プロパティーを true に設定します。
これにより、 http://localhost:8080/service/1 などのリクエスト URL が復元されます。
認証リクエストのカスタマイズ
デフォルトでは、ユーザーが認証のために OIDC プロバイダーの認可エンドポイントにリダイレクトされる際に、 response_type (code に設定)、 scope (openid に設定)、 client_id、 redirect_uri、および state プロパティーのみが HTTP クエリーパラメーターとして、OIDC プロバイダーの認可エンドポイントに渡されます。
quarkus.oidc.authentication.extra-params を使用して、さらにプロパティーを追加できます。
たとえば、一部の OIDC プロバイダーは、リダイレクト URI のフラグメントの一部として認可コードを返すことを選択する場合があり、これにより認証プロセスが中断されます。
次の例は、この問題を回避する方法を示しています。
quarkus.oidc.authentication.extra-params.response_mode=queryまた、カスタムの OidcRedirectFilter を使用して、OIDC 認可エンドポイントへのリダイレクトを含む OIDC リダイレクトをカスタマイズする方法については、OIDC リダイレクトフィルター セクションを参照してください。
認証エラーレスポンスのカスタマイズ
ユーザーが OIDC 認可エンドポイントにリダイレクトされ、Quarkus アプリケーションを認証し、必要に応じて認可する場合、このリダイレクトリクエストは、リダイレクト URI に無効なスコープが含まれている場合などに失敗する可能性があります。
このような場合、プロバイダーは、想定される code パラメーターではなく、 error および error_description パラメーターを使用してユーザーを Quarkus にリダイレクトします。
これは、たとえば、プロバイダーへのリダイレクトに無効なスコープまたはその他の無効なパラメーターが含まれている場合に発生する可能性があります。
このような場合、デフォルトで HTTP 401 エラーが返されます。
ただし、ユーザーにわかりやすいエラーメッセージを返すために、カスタムパブリックエラーエンドポイントを呼び出すようにリクエストできます。
これを行うには、 quarkus.oidc.authentication.error-path プロパティーを以下のように設定します。
quarkus.oidc.authentication.error-path=/errorプロパティーがフォワードスラッシュ (/) 文字で始まり、パスが現在のエンドポイントのベース URI と相対的であることを確認します。
たとえば、これが '/error' に設定され、現在のリクエスト URI が https://localhost:8080/callback?error=invalid_scope の場合、最終的に https://localhost:8080/error?error=invalid_scope へリダイレクトされます。
|
ユーザーがこのページにリダイレクトされて再認証されないようにするには、このエラーエンドポイントがパブリックリソースであることを確認します。 |
OIDC リダイレクトフィルター
1 つ以上の io.quarkus.oidc.OidcRedirectFilter 実装を登録して、OIDC 認可およびログアウトエンドポイントへの OIDC リダイレクトだけでなく、カスタムエラーおよびセッション期限切れページへのローカルリダイレクトもフィルタリングできます。カスタム OidcRedirectFilter は、さらにクエリーパラメーターおよびレスポンスヘッダーを追加して、新しい Cookie を設定できます。
たとえば、次の単純なカスタム OidcRedirectFilter は、Quarkus OIDC で実行できるすべてのリダイレクトリクエストに対して追加のクエリーパラメーターとカスタムレスポンスヘッダーを追加します。
package io.quarkus.it.keycloak;

import jakarta.enterprise.context.ApplicationScoped;

import io.quarkus.arc.Unremovable;
import io.quarkus.oidc.OidcRedirectFilter;

@ApplicationScoped
@Unremovable
public class GlobalOidcRedirectFilter implements OidcRedirectFilter {

    @Override
    public void filter(OidcRedirectContext context) {
        if (context.redirectUri().contains("/session-expired-page")) {
            context.additionalQueryParams().add("redirect-filtered", "true,"); (1)
            context.routingContext().response().putHeader("Redirect-Filtered", "true"); (2)
        }
    }

}| 1 | クエリーパラメーターを追加します。クエリーの名前と値は Quarkus OIDC によって URL エンコードされることに注意してください。この場合、リダイレクト URI に redirect-filtered=true%20C クエリーパラメーターが追加されます。 |
| 2 | カスタム HTTP レスポンスヘッダーを追加します。 |
OIDC 認可ポイントの追加クエリーパラメーターを設定する方法については、認証リクエストのカスタマイズ セクションも参照してください。
ローカルエラーおよびセッション期限切れページ用のカスタム OidcRedirectFilter により、そのようなページの生成に役立つセキュアな Cookie を作成することもできます。
たとえば、セッションの有効期限が切れた現在のユーザーを、 http://localhost:8080/session-expired-page で利用できるカスタムセッション期限切れページにリダイレクトする必要があるとします。次のカスタム OidcRedirectFilter は、OIDC テナントクライアントシークレットを使用して、カスタム session_expired Cookie 内のユーザー名を暗号化します。
package io.quarkus.it.keycloak;

import jakarta.enterprise.context.ApplicationScoped;

import org.eclipse.microprofile.jwt.Claims;

import io.quarkus.arc.Unremovable;
import io.quarkus.oidc.AuthorizationCodeTokens;
import io.quarkus.oidc.OidcRedirectFilter;
import io.quarkus.oidc.Redirect;
import io.quarkus.oidc.Redirect.Location;
import io.quarkus.oidc.TenantFeature;
import io.quarkus.oidc.runtime.OidcUtils;
import io.smallrye.jwt.build.Jwt;

@ApplicationScoped
@Unremovable
@TenantFeature("tenant-refresh")
@Redirect(Location.SESSION_EXPIRED_PAGE) (1)
public class SessionExpiredOidcRedirectFilter implements OidcRedirectFilter {

    @Override
    public void filter(OidcRedirectContext context) {

        if (context.redirectUri().contains("/session-expired-page")) {
        AuthorizationCodeTokens tokens = context.routingContext().get(AuthorizationCodeTokens.class.getName()); (2)
        String userName = OidcUtils.decodeJwtContent(tokens.getIdToken()).getString(Claims.preferred_username.name()); (3)
        String jwe = Jwt.preferredUserName(userName).jwe()
                .encryptWithSecret(context.oidcTenantConfig().credentials.secret.get()); (4)
        OidcUtils.createCookie(context.routingContext(), context.oidcTenantConfig(), "session_expired",
                jwe + "|" + context.oidcTenantConfig().tenantId.get(), 10); (5)
     }
    }
}| 1 | このリダイレクトフィルターは、セッション期限切れページへのリダイレクト中にのみ呼び出されるようにしてください。 |
| 2 | 期限切れになったセッションに関連付けられた AuthorizationCodeTokens トークンに、 RoutingContext 属性としてアクセスします。 |
| 3 | ID トークンクレームをデコードし、ユーザー名を取得します。 |
| 4 | 現在の OIDC テナントのクライアントシークレットで暗号化された JWT トークンにユーザー名を保存します。 |
| 5 | 暗号化されたトークンとテナント ID を区切り文字 "|" を使用して結合し、5 秒間有効なカスタム session_expired Cookie を作成します。カスタム Cookie にテナント ID を記録すると、マルチテナント OIDC セットアップで正しいセッション期限切れページを生成する場合に役立ちます。 |
次に、この Cookie を、セッション期限切れページを生成するパブリック JAX-RS リソースで使用して、このユーザーと対応する OIDC テナントに合わせたページを作成できます。次に例を示します。
package io.quarkus.it.keycloak;

import jakarta.inject.Inject;
import jakarta.ws.rs.CookieParam;
import jakarta.ws.rs.GET;
import jakarta.ws.rs.Path;

import org.eclipse.microprofile.jwt.Claims;
import org.eclipse.microprofile.jwt.JsonWebToken;

import io.quarkus.oidc.OidcTenantConfig;
import io.quarkus.oidc.runtime.OidcUtils;
import io.quarkus.oidc.runtime.TenantConfigBean;
import io.smallrye.jwt.auth.principal.DefaultJWTParser;
import io.vertx.ext.web.RoutingContext;

@Path("/session-expired-page")
public class SessionExpiredResource {
    @Inject
    RoutingContext context;

    @Inject
    TenantConfigBean tenantConfig; (1)

    @GET
    public String sessionExpired(@CookieParam("session_expired") String sessionExpired) throws Exception {
        // Cookie format: jwt|<tenant id>

        String[] pair = sessionExpired.split("\\|"); (2)
        OidcTenantConfig oidcConfig = tenantConfig.getStaticTenantsConfig().get(pair[1]).getOidcTenantConfig(); (3)
        JsonWebToken jwt = new DefaultJWTParser().decrypt(pair[0], oidcConfig.credentials.secret.get()); (4)
        OidcUtils.removeCookie(context, oidcConfig, "session_expired"); (5)
        return jwt.getClaim(Claims.preferred_username) + ", your session has expired. "
                + "Please login again at http://localhost:8081/" + oidcConfig.tenantId.get(); (6)
    }
}| 1 | 現在のすべての OIDC テナント設定にアクセスするために使用できる TenantConfigBean を注入します。 |
| 2 | カスタム Cookie 値を 2 つの部分に分割します。最初の部分は暗号化されたトークン、最後の部分はテナント ID です。 |
| 3 | OIDC テナント設定を取得します。 |
| 4 | OIDC テナントのクライアントシークレットを使用して Cookie 値を復号化します。 |
| 5 | カスタム Cookie を削除します。 |
| 6 | 復号化されたトークン内のユーザー名とテナント ID を使用して、サービス期限切れページのレスポンスを生成します。 |
認可データへのアクセス
認可に関する情報には、さまざまな方法でアクセスできます。
ID およびアクセストークンへのアクセス
OIDC コード認証メカニズムは、認可コードフロー中に 3 つのトークン IDトークン、アクセストークン、リフレッシュトークンを取得します。
ID トークンは常に JWT トークンであり、JWT クレームによるユーザー認証を表します。
これを使って発行元の OIDC エンドポイントやユーザー名、その他 クレーム と呼ばれる情報を取得することができます。
JsonWebToken に IdToken という修飾子をつけることで、ID トークンのクレームにアクセスすることができます。
import jakarta.inject.Inject;
import jakarta.ws.rs.GET;
import jakarta.ws.rs.Path;
import org.eclipse.microprofile.jwt.JsonWebToken;
import io.quarkus.oidc.IdToken;
import io.quarkus.security.Authenticated;

@Path("/web-app")
@Authenticated
public class ProtectedResource {

    @Inject
    @IdToken
    JsonWebToken idToken;

    @GET
    public String getUserName() {
        return idToken.getName();
    }
}
OIDC web-app アプリケーションは通常、アクセストークンを使用して、現在ログインしているユーザーに代わって他のエンドポイントにアクセスします。
raw アクセストークンには次のようにアクセスできます。
import jakarta.inject.Inject;
import jakarta.ws.rs.GET;
import jakarta.ws.rs.Path;
import org.eclipse.microprofile.jwt.JsonWebToken;
import io.quarkus.oidc.AccessTokenCredential;
import io.quarkus.security.Authenticated;

@Path("/web-app")
@Authenticated
public class ProtectedResource {

    @Inject
    JsonWebToken accessToken;

    // or
    // @Inject
    // AccessTokenCredential accessTokenCredential;

    @GET
    public String getReservationOnBehalfOfUser() {
        String rawAccessToken = accessToken.getRawToken();
        //or
        //String rawAccessToken = accessTokenCredential.getToken();

        // Use the raw access token to access a remote endpoint.
        // For example, use RestClient to set this token as a `Bearer` scheme value of the HTTP `Authorization` header:
        // `Authorization: Bearer rawAccessToken`.
        return getReservationfromRemoteEndpoint(rawAccesstoken);
    }
}|
認可コードフローアクセストークンが |
|
|
JsonWebToken と AccessTokenCredential の注入は、 @RequestScoped と @ApplicationScoped の両方のコンテキストでサポートされています。
Quarkus OIDC は、session management プロセスの一環として、リフレッシュトークンを使用し、現在の ID とアクセストークンを更新します。
ユーザー情報
ID トークンが現在認証されているユーザーに関する十分な情報を提供しない場合は、 UserInfo エンドポイントから詳細情報を取得できます。
quarkus.oidc.authentication.user-info-required=true プロパティーを設定して、OIDC UserInfo エンドポイントから UserInfo JSON オブジェクトをリクエストします。
認可コードの付与応答で返されたアクセストークンを使用して、OIDC プロバイダーの UserInfo エンドポイントにリクエストが送信され、 io.quarkus.oidc.UserInfo (単純な jakarta.json.JsonObject ラッパー) オブジェクトが作成されます。
io.quarkus.oidc.UserInfo は、SecurityIdentity userinfo 属性として注入またはアクセスできます。
quarkus.oidc.authentication.user-info-required は、次のいずれかの条件が満たされた場合に自動的に有効になります。
-
quarkus.oidc.roles.sourceがuserinfoに設定されている場合、またはquarkus.oidc.token.verify-access-token-with-user-infoがtrueに設定されている場合、またはquarkus.oidc.authentication.id-token-requiredがfalseに設定されている場合。このような場合、現在の OIDC テナントが UserInfo エンドポイントをサポートしている必要があります。 -
io.quarkus.oidc.UserInfoインジェクションポイントが検出された場合。ただし、有効になるのは、現在の OIDC テナントが UserInfo エンドポイントをサポートしている場合だけです。
OIDC 設定情報へのアクセス
現在のテナントの検出された OpenID Connect 設定メタデータ は、 io.quarkus.oidc.OidcConfigurationMetadata で表され、 SecurityIdentity configuration-metadata 属性として注入またはアクセスできます。
エンドポイントがパブリックの場合、デフォルトのテナントの OidcConfigurationMetadata が注入されます。
トークンクレームと SecurityIdentity ロールのマッピング
検証済みトークンから SecurityIdentity ロールにロールをマッピングする方法は、ベアラートークン の方法と同じです。 唯一の違いは、 ID トークン がデフォルトでロールのソースとして使用されることです。
|
Keycloak を使用する場合は、ID トークンに |
ただし、OIDC プロバイダーによっては、ロールがアクセストークンまたはユーザー情報に保存される場合があります。
アクセストークンにロールが含まれており、このアクセストークンがダウンストリームエンドポイントに伝播されることを意図していない場合は、 quarkus.oidc.roles.source=accesstoken を設定します。
UserInfo がロールのソースである場合は、 quarkus.oidc.roles.source=userinfo を設定し、必要に応じて quarkus.oidc.roles.role-claim-path を設定します。
さらに、カスタム SecurityIdentityAugmentor を使用してロールを追加することもできます。
詳細は、SecurityIdentity カスタマイズ を参照してください。
また、HTTP Security ポリシー を使用して、トークン要求から作成された SecurityIdentity ロールをデプロイメント固有のロールにマップすることもできます。
トークンと認証データの有効性の確認
認証プロセスの中核となるのは、トラストチェーンと情報の有効性を確認することです。 これは、トークンが信頼できることを確認することによって行われます。
トークン検証およびイントロスペクション
OIDC 認可コードフロートークンの検証プロセスは、ベアラートークン認証トークンの検証とイントロスペクションのロジックに従います。 詳細は、「Quarkus OpenID Connect (OIDC) ベアラートークン認証」ガイドの トークンの検証とイントロスペクション のセクションを参照してください。
|
Quarkus の |
トークンのイントロスペクションと UserInfo のキャッシュ
コードフローアクセストークンは、ロールのソースであると予想されない限り、イントロスペクトされません。
ただし、これらは UserInfo を取得するために使用されます。
トークンイントロスペクション または UserInfo、あるいはその両方が必要な場合は、コードフローアクセストークンを使用したリモート呼び出しが 1 回または 2 回発生します。
デフォルトのトークンキャッシュの使用またはカスタムキャッシュ実装の登録の詳細は、トークンのイントロスペクションと UserInfo のキャッシュ を参照してください。
JSON Web トークンのクレーム検証
iss (発行者) クレームを含むクレーム検証の詳細は、JSON Web Token クレーム検証 セクションを参照してください。
これは、ID トークンに適用され、 web-app アプリケーションがアクセストークンの検証をリクエストした場合は、JWT 形式のアクセストークンにも適用されます。
Jose4j Validator
You can register a custom Jose4j Validator to customize the JWT claim verification process. See the Jose4j section for more information.
Proof Key for Code Exchange (PKCE)
Proof Key for Code Exchange (PKCE) は、認可コードの傍受のリスクを最小限に抑えます。
PKCE は、ブラウザーで実行される SPA スクリプトなどのパブリック OIDC クライアントにとって最も重要ですが、Quarkus OIDC web-app アプリケーションに追加の保護を提供することもできます。
PKCE を使用すると、Quarkus OIDC web-app アプリケーションは、クライアントシークレットを安全に保存し、それを使用してトークンのコードを交換できる機密 OIDC クライアントとして機能します。
次の例に示すように、 quarkus.oidc.authentication.pkce-required プロパティーと、状態クッキーの PKCE コード検証を暗号化するために必要な 32 文字のシークレットを使用して、OIDC web-app エンドポイントの PKCE を有効にすることができます。
quarkus.oidc.authentication.pkce-required=true
quarkus.oidc.authentication.state-secret=eUk1p7UB3nFiXZGUXi0uph1Y9p34YhBU
すでに 32 文字のクライアントシークレットがある場合は、別のシークレットキーを使用する場合を除き、 quarkus.oidc.authentication.pkce-secret プロパティーを設定する必要はありません。
このシークレットは、設定されていない場合、およびクライアントシークレットの長さが 16 文字未満でクライアントシークレットへのフォールバックが不可能な場合に、自動生成されます。
秘密鍵は、ランダムに生成された PKCE code_verifier を暗号化するために必要です。一方、ユーザーは code_challenge クエリーパラメーターを使用して OIDC プロバイダーにリダイレクトされ、認証されます。
code_verifier は、ユーザーが Quarkus にリダイレクトされるときに復号化され、 code、クライアントシークレット、およびその他のパラメーターとともにトークンエンドポイントに送信され、コード交換が完了します。
code_verifier の SHA256 ダイジェストが、認証のリクエスト時に提供された code_challenge と一致しない場合、プロバイダーはコード交換に失敗します。
Pushed Authorization Requests
OAuth 2.0 Pushed Authorization Requests (PAR) allows the authorization server to authenticate the client before any user interaction happens. It mitigates front-channel attacks by preventing malicious actors from intercepting, tampering with, or spoofing the authorization request details in the user’s browser.
You can enable PAR for your OIDC web-app endpoint by setting the quarkus.oidc.authentication.par.enabled configuration property to true.
It will be enabled automatically if the OIDC metadata contains a require_pushed_authorization_requests property that is set to true.
The PAR endpoint is discovered from the OAuth Authorization Server Metadata parameter pushed_authorization_request_endpoint.
If the metadata discovery is disabled, you must configure the PAR endpoint manually like in the example below:
quarkus.oidc.authentication.par.enabled=true
quarkus.oidc.authentication.par.path=/as/par
認証のライフタイムの処理と制御
認証のもう 1 つの重要な要件は、ユーザーがリクエストのたびに認証をリクエストすることなく、セッションの基となるデータが最新であることを保証することです。 また、ログアウトイベントが明示的にリクエストされる状況もあります。 以下のポイントを参考に、Quarkus アプリケーションのセキュリティーを確保するための適切なバランスを見つけます。
クッキー
OIDC アダプターはクッキーを使用して、セッション、コードフロー、ログアウト後の状態を保持します。 この状態は、認証データの寿命を制御する重要な要素です。
quarkus.oidc.authentication.cookie-path プロパティーを使用すると、保護されたリソースに重複または異なるルートでアクセスしたときに、同じクッキーが表示されるようになります。
例:
-
/index.htmlと/web-app/service -
/web-app/service1と/web-app/service2 -
/web-app1/serviceと/web-app2/service
デフォルトでは、 quarkus.oidc.authentication.cookie-path は / に設定されていますが、必要に応じてこれを /web-app などのより具体的なパスに変更できます。
Cookie パスを動的に設定するには、 quarkus.oidc.authentication.cookie-path-header プロパティーを設定します。
たとえば、 X-Forwarded-Prefix HTTP ヘッダーの値を使用して Cookie パスを動的に設定するには、プロパティーを quarkus.oidc.authentication.cookie-path-header=X-Forwarded-Prefix に設定します。
quarkus.oidc.authentication.cookie-path-header が設定されているが、現在のリクエストで設定された HTTP ヘッダーが利用できない場合は、 quarkus.oidc.authentication.cookie-path がチェックされます。
アプリケーションが複数のドメインにまたがってデプロイされている場合は、セッションクッキー がすべての保護された Quarkus サービスに表示されるように、 quarkus.oidc.authentication.cookie-domain プロパティーを設定します。
たとえば、次の 2 つのドメインに Quarkus サービスをデプロイしている場合は、 quarkus.oidc.authentication.cookie-domain プロパティーを company.net に設定する必要があります。
-
https://whatever.wherever.company.net/
-
https://another.address.company.net/
状態 Cookie
状態 Cookie は、認可コードフローの完了をサポートするために使用されます。
認可コードフローが開始されると、Quarkus はユーザーを OIDC プロバイダーにリダイレクトする前に、状態 Cookie と一致する state クエリーパラメーターを作成します。
ユーザーが認可コードフローを完了するために Quarkus にリダイレクトされると、Quarkus はリクエスト URI に state クエリーパラメーターが含まれており、それが現在の状態 Cookie の値と一致していると想定します。
デフォルトの状態 Cookie の有効期間は 5 分ですが、これは quarkus.oidc.authentication.state-cookie-age Duration プロパティーを使用して変更できます。
Quarkus は、マルチタブ認証をサポートするために、新しい認可コードフローが開始されるたびに一意の状態 Cookie 名を作成します。同じユーザーによる多数の同時認証リクエストにより、多数の状態 Cookie が作成される場合があります。
ユーザーに対して、複数のブラウザータブを使用した認証を許可しない場合は、 quarkus.oidc.authentication.allow-multiple-code-flows=false で無効にすることが推奨されます。これにより、新しいユーザー認証ごとに同じ状態 Cookie 名が作成されます。
セッションクッキーとデフォルトの TokenStateManager
OIDC CodeAuthenticationMechanism は、デフォルトの io.quarkus.oidc.TokenStateManager インターフェイス実装を使用して、認可コードまたはリフレッシュ付与応答で返された ID、アクセストークン、およびリフレッシュトークンを暗号化されたセッションクッキーに保存します。
これにより、Quarkus OIDC エンドポイントは完全にステートレスになり、最高のスケーラビリティー結果を達成するには、このストラテジーに従うことが推奨されます。
データベースまたはその他のサーバー側ストレージソリューションにトークンを保存する方法は、このガイドの データベース TokenStateManager セクションを参照してください。この方法は、何らかの理由でトークンの状態をサーバー上に保存する必要がある場合に適しています。
トークン保存の代替方法については、セッションクッキーとカスタムTokenStateManager セクションを参照してください。これは特に、標準のサーバー側ストレージが要件を満たしていないなどの理由から、トークン状態管理のカスタマイズソリューションが必要な場合に最適です。
デフォルトの TokenStateManager を設定すると、アクセストークンをセッションクッキーに保存せずに、ID トークンとリフレッシュトークンのみ、または単一の ID トークンのみを保持できます。
アクセストークンは、エンドポイントが次のアクションを実行する必要がある場合にのみ必要です。
-
UserInfoの取得 -
このアクセストークンを使用したダウンストリームサービスへのアクセス
-
デフォルトでチェックされるアクセストークンに関連付けられたロールの使用
このような場合は、 quarkus.oidc.token-state-manager.strategy プロパティーを使用して、トークン状態ストラテジーを次のように設定します。
| 以下の場合 | プロパティーを以下に設定する |
|---|---|
ID とリフレッシュトークンのみを保存する場合 |
|
ID トークンのみを保存する場合 |
|
選択したセッションクッキーストラテジーがトークンを組み合わせ、4 KB を超える大きなセッションクッキー値が生成される場合、一部のブラウザーではそのようなクッキーサイズを処理できない可能性があります。
これは、ID、アクセストークン、およびリフレッシュトークンが JWT トークンで、選択されたストラテジーが keep-all-tokens の場合、またはストラテジーが id-refresh-token の場合にID トークンとリフレッシュトークンで発生する可能性があります。
この問題を回避するには、 quarkus.oidc.token-state-manager.split-tokens=true を設定して、トークンごとに一意のセッショントークンを作成します。
別の解決策として、トークンをデータベースに保存することが挙げられます。
詳細は、データベース TokenStateManager を参照してください。
デフォルトの TokenStateManager は、トークンをセッションクッキーに保存する前に暗号化します。
次の例は、トークンを分割して暗号化するように設定する方法を示しています。
quarkus.oidc.auth-server-url=http://localhost:8180/realms/quarkus
quarkus.oidc.client-id=quarkus-app
quarkus.oidc.credentials.secret=secret
quarkus.oidc.application-type=web-app
quarkus.oidc.token-state-manager.split-tokens=true
quarkus.oidc.token-state-manager.encryption-secret=eUk1p7UB3nFiXZGUXi0uph1Y9p34YhBU
トークンの暗号化シークレットは 32 文字以上である必要があります。
このキーが設定されていない場合は、 quarkus.oidc.credentials.secret または quarkus.oidc.credentials.jwt.secret のいずれかがハッシュ化されて暗号化キーが作成されます。
Quarkus が次のいずれかの認証方法を使用して OIDC プロバイダーに対して認証する場合は、 quarkus.oidc.token-state-manager.encryption-secret プロパティーを設定します。
-
mTLS
-
private_key_jwtでは、秘密の RSA または EC キーを使用して JWT トークンに署名します。
これ以外の場合は、ランダムなキーが生成されますが、Quarkus アプリケーションがクラウドで実行され、複数の Pod がリクエストを管理している場合、問題が発生する可能性があります。
quarkus.oidc.token-state-manager.encryption-required=false を設定することで、セッションクッキーでのトークン暗号化を無効にすることができます。
セッションクッキーとカスタムTokenStateManager
トークンをセッションクッキーに関連付ける方法をカスタマイズしたい場合は、カスタム io.quarkus.oidc.TokenStateManager' 実装を `@ApplicationScoped CDI Bean として登録します。
たとえば、トークンをキャッシュクラスターに保持し、キーのみをセッションクッキーに保存することを推奨します。 トークンを複数のマイクロサービスノードで利用できるようにする必要がある場合、このアプローチではいくつかの課題が生じる可能性があることに注意してください。
簡単な例を挙げてみます。
package io.quarkus.oidc.test;

import jakarta.annotation.Priority;
import jakarta.enterprise.context.ApplicationScoped;
import jakarta.enterprise.inject.Alternative;
import jakarta.inject.Inject;

import io.quarkus.oidc.AuthorizationCodeTokens;
import io.quarkus.oidc.OidcTenantConfig;
import io.quarkus.oidc.TokenStateManager;
import io.quarkus.oidc.runtime.DefaultTokenStateManager;
import io.smallrye.mutiny.Uni;
import io.vertx.ext.web.RoutingContext;

@ApplicationScoped
@Alternative
@Priority(1)
public class CustomTokenStateManager implements TokenStateManager {

    @Inject
    DefaultTokenStateManager tokenStateManager;

    @Override
    public Uni<String> createTokenState(RoutingContext routingContext, OidcTenantConfig oidcConfig,
            AuthorizationCodeTokens sessionContent, OidcRequestContext<String> requestContext) {
        return tokenStateManager.createTokenState(routingContext, oidcConfig, sessionContent, requestContext)
                .map(t -> (t + "|custom"));
    }

    @Override
    public Uni<AuthorizationCodeTokens> getTokens(RoutingContext routingContext, OidcTenantConfig oidcConfig,
            String tokenState, OidcRequestContext<AuthorizationCodeTokens> requestContext) {
        if (!tokenState.endsWith("|custom")) {
            throw new IllegalStateException();
        }
        String defaultState = tokenState.substring(0, tokenState.length() - 7);
        return tokenStateManager.getTokens(routingContext, oidcConfig, defaultState, requestContext);
    }

    @Override
    public Uni<Void> deleteTokens(RoutingContext routingContext, OidcTenantConfig oidcConfig, String tokenState,
            OidcRequestContext<Void> requestContext) {
        if (!tokenState.endsWith("|custom")) {
            throw new IllegalStateException();
        }
        String defaultState = tokenState.substring(0, tokenState.length() - 7);
        return tokenStateManager.deleteTokens(routingContext, oidcConfig, defaultState, requestContext);
    }
}
暗号化されたセッションクッキーにトークンを保存するデフォルトの TokenStateManager の詳細は、セッションクッキーとデフォルトの TokenStateManager を参照してください。
トークンをデータベースに保存するカスタム Quarkus TokenStateManager 実装の詳細は、データベース TokenStateManager を参照してください。
データベース TokenStateManager
ステートフルなトークンストレージストラテジーを採用したい場合は、Quarkus が提供するカスタムの TokenStateManager を使用して、アプリケーションがトークンを暗号化されたセッションクッキーに保存するのではなく、データベースに保存することができます。これは、セッションクッキーとデフォルトの TokenStateManager セクションに記載されているとおり、デフォルトで設定されています。
この機能を使用するには、以下のエクステンションをプロジェクトに追加します。
quarkus extension add oidc-db-token-state-manager./mvnw quarkus:add-extension -Dextensions='oidc-db-token-state-manager'./gradlew addExtension --extensions='oidc-db-token-state-manager'このエクステンションは、デフォルトの `io.quarkus.oidc.TokenStateManager' をデータベースをベースとするものに置き換えます。
OIDC Database Token State Manager は、認証が IO スレッドで行われる可能性が高いため、ブロックを回避するために内部で Reactive SQL クライアントを使用します。
データベースに応じて、Reactive SQL クライアント を 1 つだけ含めて設定します。 次の Reactive SQL クライアントがサポートされています。
-
Reactive Microsoft SQL クライアント
-
Reactive MySQL クライアント
-
Reactive PostgreSQL クライアント
-
Reactive Oracle クライアント
-
Reactive DB2 クライアント
| アプリケーションがすでにいずれかの JDBC ドライバーエクステンションを備えた Hibernate ORM を使用している場合は、Reactive SQL クライアントを使用するように切り替える必要はありません。 |
たとえば、Hibernate ORM エクステンションと PostgreSQL JDBC ドライバーを併用するアプリケーションがすでにあり、データソースが次のように設定されているとします。
quarkus.datasource.db-kind=postgresql
quarkus.datasource.username=quarkus_test
quarkus.datasource.password=quarkus_test
quarkus.datasource.jdbc.url=jdbc:postgresql://localhost:5432/quarkus_test
ここで、OIDC Database Token State Manager を使用することにした場合は、次の依存関係を追加し、リアクティブドライバー URL を設定する必要があります。
<dependency>
    <groupId>io.quarkus</groupId>
    <artifactId>quarkus-oidc-db-token-state-manager</artifactId>
</dependency>
<dependency>
    <groupId>io.quarkus</groupId>
    <artifactId>quarkus-reactive-pg-client</artifactId>
</dependency>implementation("io.quarkus:quarkus-oidc-db-token-state-manager")
implementation("io.quarkus:quarkus-reactive-pg-client")quarkus.datasource.reactive.url=postgresql://localhost:5432/quarkus_testこれで、トークンをデータベースに保存する準備が整いました。
デフォルトでは、トークンの保存に使用されるデータベーステーブルが作成されますが、 quarkus.oidc.db-token-state-manager.create-database-table-if-not-exists 設定プロパティーを使用して、このオプションを無効にすることができます。
代わりに Hibernate ORM エクステンションでこのテーブルを作成する場合は、次のように Entity を含める必要があります。
package org.acme.manager;

import jakarta.persistence.Column;
import jakarta.persistence.Entity;
import jakarta.persistence.Id;
import jakarta.persistence.Table;

@Table(name = "oidc_db_token_state_manager") (1)
@Entity
public class OidcDbTokenStateManagerEntity {

    @Id
    String id;

    @Column(name = "id_token", length = 4000) (2)
    String idToken;

    @Column(name = "refresh_token", length = 4000)
    String refreshToken;

    @Column(name = "access_token", length = 4000)
    String accessToken;

    @Column(name = "expires_in")
    Long expiresIn;
}| 1 | Hibernate ORM エクステンションは、データベーススキーマが生成された場合にのみ、このテーブルを作成します。 詳細は、Hibernate ORM ガイドを参照してください。 |
| 2 | トークンの長さに応じて列の長さを選択できます。 |
Redis TokenStateManager
ステートフルトークンストレージストラテジーの別の方法として、、Quarkus が提供するカスタム TokenStateManager を使用して、アプリケーションでトークンを Redis キャッシュに保存する方法があります。
OIDC Redis Token State Manager を使用する場合は、次の依存関係を追加する必要があります。
<dependency>
    <groupId>io.quarkus</groupId>
    <artifactId>quarkus-oidc-redis-token-state-manager</artifactId>
</dependency>implementation("io.quarkus:quarkus-oidc-redis-token-state-manager")Quarkus はトークンをデフォルトの Redis クライアントに保存します。 別の Redis クライアントを使用する場合は、次の例のように設定できます。
quarkus.oidc.redis-token-state-manager.redis-client-name=my-redis-client (1)| 1 | my-redis-client の名前は、 quarkus.redis.my-redis-client.* 設定プロパティーで指定された Redis クライアント設定キーに対応している必要があります。 |
Redis クライアントの設定方法については、Quarkus Redis クライアントリファレンス を参照してください。
ログアウトと有効期限
認証情報が期限切れになる主な方法は 2 つあります。トークンの有効期限が切れて更新されなかった場合と、明示的なログアウト操作がトリガーされた場合です。
最初に、明示的なログアウト操作について説明します。
|
You can request setting Clear-Site-Data directives for all of the logout operations with a |
User-initiated logout
ユーザーは、 quarkus.oidc.logout.path プロパティーで設定された Quarkus エンドポイントのログアウトパスにリクエストを送信することで、ログアウトをリクエストできます。
たとえば、エンドポイントアドレスが https://application.com/webapp で、 quarkus.oidc.logout.path が /logout に設定されている場合、ログアウトリクエストは https://application.com/webapp/logout に送信される必要があります。
このログアウトリクエストは、 RP-initiated ログアウト を開始します。 ユーザはログアウトするために OIDC プロバイダーにリダイレクトされ、そこでログアウトが本当に意図されたものであるか確認されます。
ログアウトが完了し、 quarkus.oidc.logout.post-logout-path プロパティーが設定されている場合、ユーザーはエンドポイントのログアウト後のページに戻されます。
たとえば、エンドポイントアドレスが https://application.com/webapp で、 quarkus.oidc.logout.post-logout-path が /signin に設定されている場合、ユーザーは https://application.com/webapp/signin に戻されます。
この URI は、OIDC プロバイダーで有効な post_logout_redirect_uri として登録されている必要があることに注意してください。
quarkus.oidc.logout.post-logout-path が設定されている場合、 q_post_logout クッキーが作成され、一致する state クエリーパラメーターがログアウトリダイレクト URI に追加され、ログアウトが完了すると OIDC プロバイダーはこの state を返します。
Quarkus の web-app アプリケーションでは、 state クエリーパラメーターが q_post_logout クッキーの値と一致することを確認することを推奨します。これは、たとえば Jakarta REST フィルターで実行できます。
OpenID Connect Multi-Tenancy を使用する場合、クッキー名が異なることに注意してください。
たとえば、 tenant_1 ID を持つテナントの場合は q_post_logout_tenant_1 という名前になります。
ログアウトフローを開始するように Quarkus アプリケーションを設定する方法の例を次に示します。
quarkus.oidc.auth-server-url=http://localhost:8180/realms/quarkus
quarkus.oidc.client-id=frontend
quarkus.oidc.credentials.secret=secret
quarkus.oidc.application-type=web-app

quarkus.oidc.logout.path=/logout
# Logged-out users should be returned to the /welcome.html site which will offer an option to re-login:
quarkus.oidc.logout.post-logout-path=/welcome.html

# Only the authenticated users can initiate a logout:
quarkus.http.auth.permission.authenticated.paths=/logout
quarkus.http.auth.permission.authenticated.policy=authenticated

# All users can see the Welcome page:
quarkus.http.auth.permission.public.paths=/welcome.html
quarkus.http.auth.permission.public.policy=permit
また、 quarkus.oidc.authentication.cookie-path をすべてのアプリケーションリソースに共通のパス値 (この例では /) に設定することも推奨します。
詳細は、Cookies セクションを参照してください。
|
一部の OIDC プロバイダーは、RP-initiated ログアウト 仕様をサポートしておらず、OpenID Connect の周知の RP-initiated ログアウト 仕様によれば、 この問題を回避するには、 |
バックチャネルログアウト
OIDC プロバイダーは、認証データを使用して、すべてのアプリケーションを強制的にログアウトさせることができます。 これはバックチャネルログアウトとして知られています。 この場合、OIDC は各アプリケーションから特定の URL を呼び出し、ログアウトをトリガーします。
OIDC プロバイダーは、バックチャネルログアウト を使用して、ユーザエージェントをバイパスして、そのユーザが現在ログインしているすべてのアプリケーションから現在のユーザをログアウトします。
バックチャネルログアウトをサポートするように Quarkus を設定するには、次のようにします。
quarkus.oidc.auth-server-url=http://localhost:8180/realms/quarkus
quarkus.oidc.client-id=frontend
quarkus.oidc.credentials.secret=secret
quarkus.oidc.application-type=web-app

quarkus.oidc.logout.backchannel.path=/back-channel-logout
絶対的な back-channel logout URL は、現在のエンドポイント URL に quarkus.oidc.back-channel-logout.path を追加することによって計算されます (例: http://localhost:8080/back-channel-logout)。
この URL は、OIDC プロバイダーの管理コンソールで設定する必要があります。
OIDC プロバイダーが、現在のログアウトトークンに有効期限を設定していない場合、ログアウトトークンの検証が成功するようにトークンの有効期間プロパティーを設定する必要もあります。
たとえば、ログアウトトークンの iat (発行時刻) から 10 秒超過しないようにするには、 quarkus.oidc.token.age=10S を設定します。
フロントチャネルログアウト
フロントチャネルログアウト のリンクを使用すると、ブラウザーなどのユーザーエージェントから現在のユーザーを直接ログアウトできます。 これは Back-channel logout と似ていますが、ログアウト手順はブラウザーなどのユーザーエージェントによって実行され、OIDC プロバイダーがバックグラウンドで実行することはありません。 これは、ほとんど使用されないオプションです。
Quarkus でフロントチャネルのログアウトをサポートするには、以下のように設定します。
quarkus.oidc.auth-server-url=http://localhost:8180/realms/quarkus
quarkus.oidc.client-id=frontend
quarkus.oidc.credentials.secret=secret
quarkus.oidc.application-type=web-app

quarkus.oidc.logout.frontchannel.path=/front-channel-logout
このパスは現在のリクエストのパスと比較され、これらのパスがマッチする 場合、ユーザはログアウトします。
ローカルログアウト
User-initiated logout は、ユーザーを OIDC プロバイダーからログアウトします。 これをシングルサインオンとして使用する場合は、必要とするものではない可能性があります。 たとえば、OIDC プロバイダーが Google の場合、Google とそのサービスからログアウトされます。 代わりに、ユーザーはその特定のアプリケーションからログアウトしたいだけかもしれません。 もう 1 つのユースケースとしては、OIDC プロバイダーにログアウトエンドポイントがない場合が考えられます。
OidcSession を使用することで、ローカルログアウトをサポートできます。つまり、次の例に示すように、ローカルセッションクッキーのみがクリアされます。
import jakarta.inject.Inject;
import jakarta.ws.rs.GET;
import jakarta.ws.rs.Path;

import io.quarkus.oidc.OidcSession;

@Path("/service")
public class ServiceResource {

    @Inject
    OidcSession oidcSession;

    @GET
    @Path("logout")
    public String logout() {
        oidcSession.logout().await().indefinitely();
        return "You are logged out";
    }
}
OidcSession をローカルログアウトに使用
io.quarkus.oidc.OidcSession は現在の IdToken のラッパーで、Local logout の実行、現行セッションのテナント識別子の取得、セッションの有効期限の確認を行う上で役に立ちます。
今後、より便利なメソッドが追加される予定です。
セッション管理
デフォルトでは、ログアウトは OIDC プロバイダーによって発行された ID トークンの有効期限に基づいて行われます。 ID トークンの有効期限が切れると、Quarkus エンドポイントでの現在のユーザーセッションは無効になり、ユーザーは認証のために再度 OIDC プロバイダーにリダイレクトされます。 OIDC プロバイダーのセッションが引き続き有効な場合、ユーザーは再度クレデンシャルを入力することなく、自動的に再認証されます。
quarkus.oidc.token.refresh-expired プロパティーを有効にすると、現在のユーザーセッションを自動的に延長できます。
true に設定すると、現在の ID トークンの有効期限が切れたときに、リフレッシュトークンの付与を使用して、ID トークンだけでなくアクセストークンとリフレッシュトークンもリフレッシュされます。
|
|
Quarkus OIDC web-app アプリケーションを使用する場合、Quarkus OIDC コード認証メカニズムがユーザーセッションの有効期間を管理します。
リフレッシュトークンを使用するには、セッションクッキーの有効期間を慎重に設定する必要があります。 セッションの有効期間は、ID トークンの有効期間よりも長く、リフレッシュトークンの有効期間と近いか等しい必要があります。
セッションの有効期間は、現在の ID トークンの有効期間の値と、 quarkus.oidc.authentication.session-age-extension プロパティーおよび quarkus.oidc.token.lifespan-grace プロパティーの値を加算して計算します。
|
必要に応じて、 |
現在認証されているユーザーが、保護された Quarkus エンドポイントに戻り、セッションクッキーに関連付けられた ID トークンの有効期限が切れると、デフォルトでは、ユーザーは再認証のために OIDC 認可エンドポイントに自動的にリダイレクトされます。 ユーザーとこの OIDC プロバイダー間のセッションがまだアクティブな場合、OIDC プロバイダーはユーザーに再度チャレンジする可能性があります。これは、セッションが ID トークンよりも長く続くように設定されている場合に発生する可能性があります。
quarkus.oidc.token.refresh-expired が true に設定されている場合、期限切れの ID トークン (およびアクセストークン) は、初期認可コード付与応答で返されたリフレッシュトークンを使用して更新されます。
このリフレッシュトークンも、このプロセスの一環としてリサイクル (リフレッシュ) される可能性があります。
その結果、新しいセッションクッキーが作成され、セッションが延長されます。
|
ユーザーがあまりアクティブでない場合は、 |
さらに一歩進んで、期限切れが近づいている ID トークンまたはアクセストークンを事前に更新することもできます。
quarkus.oidc.token.refresh-token-time-skew を、更新を予測する値に設定します。
現在のユーザーリクエスト中に、現在の ID トークンがこの quarkus.oidc.token.refresh-token-time-skew 内に期限切れになると計算された場合、トークンは更新され、新しいセッションクッキーが作成されます。
このプロパティーは、ID トークンの有効期間よりも短い値に設定する必要があります。この有効期間の値に近いほど、ID トークンの更新頻度が高くなります。
単純な JavaScript 関数を使用して Quarkus エンドポイントに定期的に ping を送信し、ユーザーアクティビティーをエミュレートすることで、このプロセスをさらに最適化できます。これにより、ユーザーが再認証される必要がある時間枠が最小限に抑えられます。
|
セッションを更新できない場合、現在認証されているユーザーが OIDC プロバイダーにリダイレクトされ、再認証が行われます。ただし、ユーザーが以前に認証に成功した後、アプリケーションページにアクセスしようとしたときに突然 OIDC 認証チャレンジ画面が表示されるのは、ユーザーエクスペリエンスとして最適ではない可能性があります。 代わりに、まずユーザーをパブリックのアプリケーション固有のセッション期限切れページにリダイレクトするようにリクエストできます。このページで、セッションの有効期限が切れたことをユーザーに通知し、保護されたアプリケーションのウェルカムページへのリンクをたどって再認証するように指示します。ユーザーがリンクをクリックすると、Quarkus OIDC が再認証のために OIDC プロバイダーへのリダイレクトを適用します。必要に応じて、 たとえば、アプリケーションが また、カスタムの |
|
このユーザーセッションを無期限に延長することはできません。 有効期限が切れた ID トークンを持つ復帰ユーザーは、リフレッシュトークンの有効期限が切れると、OIDC プロバイダーエンドポイントで再認証する必要があります。 |
GitHub および OIDC 以外の OAuth2 プロバイダーとのインテグレーション
GitHub や LinkedIn のような有名なプロバイダーは OpenID Connect プロバイダーではなく、 authorization code flow をサポートする OAuth2 プロバイダーです。
たとえば、GitHub OAuth2 や LinkedIn OAuth2 などです。
OIDC は OAuth2 の上に構築されていることを思い出してください。
OIDC プロバイダと OAuth2 プロバイダの主な違いは、OIDC プロバイダは OAuth2 プロバイダが返す標準認可コードフロー access および refresh トークンに加えて、ユーザ認証を表す ID Token を返すことです。
GitHub などの OAuth2 プロバイダは IdToken を返さないため、ユーザー認証は access トークンによって暗黙的かつ間接的に表現されます。
この access トークンは、現在のQuarkus web-app アプリケーションが認証されたユーザーに代わってデータにアクセスすることを認可する、認証されたユーザーを表します。
OIDC の場合は、認証の有効性の証明として ID トークンを検証しますが、OAuth2 の場合はアクセストークンを検証します。
これは、アクセストークンを必要とし、通常はユーザー情報を返すエンドポイントを後で呼び出すことによって実行されます。
これは、OIDC UserInfo と同様のアプローチで、ユーザーに代わって Quarkus OIDC が UserInfo を取得します。
たとえば、GitHub と連携する場合、Quarkus エンドポイントは access トークンを取得できます。これにより、Quarkus エンドポイントは現在のユーザーの GitHub プロファイルをリクエストできます。
このような OAuth2 サーバーとのインテグレーションをサポートするには、 quarkus-oidc を少し異なる方法で設定して、 IdToken: quarkus.oidc.authentication.id-token-required=false なしで認可コードフローの応答を許可する必要があります。
|
これにより、複数の OIDC プロバイダーをサポートするアプリケーションの取り扱いが簡単になります。 |
次の手順は、返されたアクセストークンが有用であり、現在の Quarkus エンドポイントに対して有効だと確認することです。
最初の方法は、 quarkus.oidc.introspection-path を設定して OAuth2 プロバイダーのイントロスペクションエンドポイントを呼び出すことです (プロバイダーがそのようなエンドポイントを提供している場合)。
この場合、 quarkus.oidc.roles.source=accesstoken を使用して、アクセストークンをロールのソースとして使用できます。
イントロスペクションエンドポイントが存在しない場合は、代わりに UserInfo (少なくともアクセストークンを検証するため) をプロバイダーにリクエストすることを試行できます。
これを行うには、 quarkus.oidc.token.verify-access-token-with-user-info=true を指定します。
また、 quarkus.oidc.user-info-path プロパティーを、ユーザー情報を取得する URL エンドポイント (またはアクセストークンによって保護されたエンドポイント) に設定する必要もあります。
GitHub の場合、イントロスペクションエンドポイントがないため、UserInfo をリクエストする必要があります。
|
UserInfo が必要な場合、リクエストごとにリモート呼び出しが実行されます。 したがって、 デフォルトまたはカスタムの UserInfo キャッシュプロバイダーを使用して よく知られているソーシャル OAuth2 プロバイダーのほとんどは帯域制限を実施しているため、UserInfo をキャッシュするのがよい場合が多いでしょう。 |
OAuth2 サーバーは、よく知られた設定エンドポイントをサポートしていない可能性があります。
この場合、検出を無効にして、認可、トークン、イントロスペクション、および UserInfo エンドポイントパスを手動で設定する必要があります。
Apple、Facebook、GitHub、Google、Microsoft、Spotify、X (旧 Twitter) などのよく知られた OIDC または OAuth2 プロバイダーの場合、Quarkus は quarkus.oidc.provider プロパティーを使用して、アプリケーションの設定を大幅に簡素化できます。
lGitHub OAuth アプリケーションを作成 した後に、 quarkus-oidc を GitHub と統合する方法は次のとおりです。
Quarkus エンドポイントを次のように設定します。
quarkus.oidc.provider=github
quarkus.oidc.client-id=github_app_clientid
quarkus.oidc.credentials.secret=github_app_clientsecret

# user:email scope is requested by default, use 'quarkus.oidc.authentication.scopes' to request different scopes such as `read:user`.
# See https://docs.github.com/en/developers/apps/building-oauth-apps/scopes-for-oauth-apps for more information.

# Consider enabling UserInfo Cache
# quarkus.oidc.token-cache.max-size=1000
# quarkus.oidc.token-cache.time-to-live=5M
#
# Or having UserInfo cached inside IdToken itself
# quarkus.oidc.cache-user-info-in-idtoken=true他のよく知られているプロバイダーの設定に関する詳細は、OpenID Connect プロバイダー を参照してください。
このようなエンドポイントに対して必要なのは、現在認証されているユーザーのプロファイルを GET http://localhost:8080/github/userinfo で返し、個々の UserInfo のプロパティーとしてアクセスすることです。
package io.quarkus.it.keycloak;

import jakarta.inject.Inject;
import jakarta.ws.rs.GET;
import jakarta.ws.rs.Path;
import jakarta.ws.rs.Produces;

import io.quarkus.oidc.UserInfo;
import io.quarkus.security.Authenticated;

@Path("/github")
@Authenticated
public class TokenResource {

    @Inject
    UserInfo userInfo;

    @GET
    @Path("/userinfo")
    @Produces("application/json")
    public String getUserInfo() {
        return userInfo.getUserInfoString();
    }
}
OpenID Connect Multi-Tenancy を使用して複数のソーシャルプロバイダー (たとえば、 IdToken を返す OIDC プロバイダーの Google と、 IdToken を返さず UserInfo へのアクセスのみを許可する OAuth2 プロバイダーの GitHub) をサポートする場合、Google フローと GitHub フローの両方で、注入された SecurityIdentity のみを使用してエンドポイントを動作させることができます。
GitHub フローがアクティブな場合に、内部で生成された IdToken で作成されたプリンシパルが UserInfo ベースのプリンシパルに置き換えられる場合は、 SecurityIdentity の簡単な拡張が必要になります。
package io.quarkus.it.keycloak;

import java.security.Principal;

import jakarta.enterprise.context.ApplicationScoped;

import io.quarkus.oidc.UserInfo;
import io.quarkus.security.identity.AuthenticationRequestContext;
import io.quarkus.security.identity.SecurityIdentity;
import io.quarkus.security.identity.SecurityIdentityAugmentor;
import io.quarkus.security.runtime.QuarkusSecurityIdentity;
import io.smallrye.mutiny.Uni;
import io.vertx.ext.web.RoutingContext;

@ApplicationScoped
public class CustomSecurityIdentityAugmentor implements SecurityIdentityAugmentor {

    @Override
    public Uni<SecurityIdentity> augment(SecurityIdentity identity, AuthenticationRequestContext context) {
        RoutingContext routingContext = identity.getAttribute(RoutingContext.class.getName());
        if (routingContext != null && routingContext.normalizedPath().endsWith("/github")) {
	        QuarkusSecurityIdentity.Builder builder = QuarkusSecurityIdentity.builder(identity);
	        UserInfo userInfo = identity.getAttribute("userinfo");
	        builder.setPrincipal(new Principal() {

	            @Override
	            public String getName() {
	                return userInfo.getString("preferred_username");
	            }

	        });
	        identity = builder.build();
        }
        return Uni.createFrom().item(identity);
    }

}
これで、ユーザーが Google または GitHub を使用してアプリケーションにサインインすると、次のコードが機能するようになります。
package io.quarkus.it.keycloak;

import jakarta.inject.Inject;
import jakarta.ws.rs.GET;
import jakarta.ws.rs.Path;
import jakarta.ws.rs.Produces;

import io.quarkus.security.Authenticated;
import io.quarkus.security.identity.SecurityIdentity;

@Path("/service")
@Authenticated
public class TokenResource {

    @Inject
    SecurityIdentity identity;

    @GET
    @Path("/google")
    @Produces("application/json")
    public String getGoogleUserName() {
        return identity.getPrincipal().getName();
    }

    @GET
    @Path("/github")
    @Produces("application/json")
    public String getGitHubUserName() {
        return identity.getPrincipal().getName();
    }
}
おそらく、より簡単な代替案は、 @IdToken JsonWebToken と UserInfo の両方を注入し、 IdToken を返すプロバイダーを処理する際は JsonWebToken を使用して、 IdToken を返さないプロバイダーの場合は UserInfo を使用することです。
GitHub OAuth アプリケーション設定に入力するコールバックパスが、GitHub 認証とアプリケーション認可が成功した後にユーザーをリダイレクトするエンドポイントパスと一致していることを確認する必要があります。
この場合は、 http://localhost:8080/github/userinfo に設定する必要があります。
重要な認証イベントのリッスン
重要な OIDC 認証イベントを監視する @ApplicationScoped Bean を登録できます。
ユーザが初めてログインしたり、再認証したり、セッションをリフレッシュしたりすると、リスナーが更新されます。
将来的には、さらに多くのイベントが報告されるようになるかもしれません。
例:
import jakarta.enterprise.context.ApplicationScoped;
import jakarta.enterprise.event.Observes;

import io.quarkus.oidc.SecurityEvent;
import io.vertx.ext.web.RoutingContext;

@ApplicationScoped
public class SecurityEventListener {

    public void event(@Observes SecurityEvent event) {
        String tenantId = event.getSecurityIdentity().getAttribute("tenant-id");
        RoutingContext vertxContext = event.getSecurityIdentity().getAttribute(RoutingContext.class.getName());
        vertxContext.put("listener-message", String.format("event:%s,tenantId:%s", event.getEventType().name(), tenantId));
    }
}| 「セキュリティのヒントとコツ」ガイドの セキュリティイベントの監視 セクションで説明されているように、他のセキュリティイベントを聞くことができます。 |
トークンの失効
場合によっては、現在の認可コードフローアクセストークンやリフレッシュトークンを取り消す必要があることもあります。
その場合は、OIDC プロバイダーの UserInfo、トークンイントロスペクション、失効エンドポイントへのアクセスが提供される quarkus.oidc.OidcProviderClient を使用してトークンを取り消すことができます。
たとえば、OidcSession でローカルログアウトが実行されると、注入された OidcProviderClient を使用して、現在のセッションに関連付けられているアクセストークンとリフレッシュトークンを取り消すことができます。
import jakarta.inject.Inject;
import jakarta.ws.rs.GET;
import jakarta.ws.rs.Path;

import io.quarkus.oidc.AccessTokenCredential;
import io.quarkus.oidc.OidcProviderClient;
import io.quarkus.oidc.OidcSession;
import io.quarkus.oidc.RefreshToken;

import io.smallrye.mutiny.Uni;

@Path("/service")
public class ServiceResource {

    @Inject
    OidcSession oidcSession;

    @Inject
    OidcProviderClient oidcProviderClient;

    @Inject
    AccessTokenCredential accessToken;

    @Inject
    RefreshToken refreshToken;

    @GET
    public Uni<String> logout() {
        return oidcSession.logout() (1)
                   .chain(() -> oidcClient.revokeAccessToken(accessToken.getToken())) (2)
                   .chain(() -> oidcClient.revokeRefreshToken(refreshToken.getToken())) (3)
                   .map((result) -> "You are logged out");
    }
}| 1 | セッション Cookie をクリアしてローカルログアウトを実行します。 |
| 2 | 認可コードフローのアクセストークンを取り消します。 |
| 3 | 認可コードフローのリフレッシュトークンを取り消します。 |
You can also revoke tokens in the security event listeners.
For example, when your application supports a standard User-initiated logout, you can catch a logout event and revoke tokens:
import java.util.concurrent.CompletableFuture;
import java.util.concurrent.CompletionStage;

import io.quarkus.oidc.AccessTokenCredential;
import io.quarkus.oidc.OidcProviderClient;
import io.quarkus.oidc.RefreshToken;
import io.quarkus.oidc.SecurityEvent;
import io.quarkus.security.identity.SecurityIdentity;
import io.smallrye.mutiny.Uni;
import jakarta.enterprise.context.ApplicationScoped;
import jakarta.enterprise.event.ObservesAsync;

@ApplicationScoped
public class SecurityEventListener {

    public CompletionStage<Void> processSecurityEvent(@ObservesAsync SecurityEvent event) {
        if (SecurityEvent.Type.OIDC_LOGOUT_RP_INITIATED == event.getEventType()) { (1)
	    return revokeTokens(event.getSecurityIdentity()).subscribeAsCompletionStage();
	}
	return CompletableFuture.completedFuture(null);
    }
    private Uni<Void> revokeTokens(SecurityIdentity securityIdentity) {
        return Uni.join().all(
                   revokeAccessToken(securityIdentity),
	           revokeRefreshToken(securityIdentity)
               ).andCollectFailures()
                .replaceWithVoid()
                .onFailure().recoverWithUni(t -> logFailure(t));
    }

    private static Uni<Boolean> revokeAccessToken(SecurityIdentity securityIdentity) { (2)
        OidcProviderClient oidcProvider = securityIdentity.getAttribute(OidcProviderClient.class.getName());
        String accessToken = securityIdentity.getCredential(AccessTokenCredential.class).getToken();
        return oidcProvider.revokeAccessToken(accessToken);
    }

    private static Uni<Boolean> revokeRefreshToken(SecurityIdentity securityIdentity) { (3)
        OidcProviderClient oidcProvider = securityIdentity.getAttribute(OidcProviderClient.class.getName());
        String refreshToken = securityIdentity.getCredential(RefreshToken.class).getToken();
        return oidcProvider.revokeRefreshToken(refreshToken);
    }

    private static Uni<Void> logFailure(Throwable t) {
        // Log failure as required
        return Uni.createFrom().voidItem();
    }
}| 1 | Revoke tokens if an RP-initiated logout event is observed. |
| 2 | 認可コードフローのアクセストークンを取り消します。 |
| 3 | 認可コードフローのリフレッシュトークンを取り消します。 |
下流サービスへのトークンの伝播
認可コードフローから下流のサービスへのアクセストークンの伝播については、トークンの伝播 セクションを参照してください。
インテグレーションに関する考慮事項
OIDC によって保護されたアプリケーションは、シングルページアプリケーションから呼び出すことができる環境に統合されます。 これは、よく知られている OIDC プロバイダーと連携し、HTTP リバースプロキシーの背後で実行される必要があるほか、外部および内部アクセスなども必要とされます。
このセクションでは、これらの考慮事項について説明します。
シングルページアプリケーション
「OpenID Connect (OIDC) ベアラートークン認証」ガイドの シングルページアプリケーション セクションで提案されている方法でシングルページアプリケーション (SPA) を実装した場合、要件が満たされるか確認できます。
Quarkus Web アプリケーションで Fetch や XMLHttpRequest(XHR) などの SPA および JavaScript API を使用する場合は、Quarkus からのリダイレクト後にユーザーが認証される認可エンドポイントに対して、OIDC プロバイダーがクロスオリジンリソース共有 (CORS) をサポートしない可能性があることに注意してください。
Quarkus アプリケーションと OIDC プロバイダーが異なる HTTP ドメイン、ポート、またはその両方でホストされている場合、認証に失敗します。
このような場合は、 quarkus.oidc.authentication.java-script-auto-redirect プロパティーを false に設定します。これにより、Quarkus は 499 ステータスコードと OIDC 値を含む WWW-Authenticate ヘッダーを返すように指示されます。
quarkus.oidc.authentication.java-script-auto-redirect プロパティーが false に設定されている場合に 499 ステータスコードが返されるようにするには、ブラウザースクリプトで現在のリクエストを JavaScript リクエストとして識別するためのヘッダーを設定する必要があります。
スクリプトエンジンがエンジン固有のリクエストヘッダーを設定する場合は、カスタム quarkus.oidc.JavaScriptRequestChecker Bean を登録できます。これにより、現在のリクエストが JavaScript リクエストであるかどうかが Quarkus に通知されます。たとえば、JavaScript エンジンが HX-Request: true などのヘッダーを設定する場合は、次のようにチェックできます。
import jakarta.enterprise.context.ApplicationScoped;

import io.quarkus.oidc.JavaScriptRequestChecker;
import io.vertx.ext.web.RoutingContext;

@ApplicationScoped
public class CustomJavaScriptRequestChecker implements JavaScriptRequestChecker {

    @Override
    public boolean isJavaScriptRequest(RoutingContext context) {
        return "true".equals(context.request().getHeader("HX-Request"));
    }
}
ステータスコードが 499 の場合は、最後にリクエストされたページを再度読み込みます。
それ以外の場合は、ブラウザースクリプトを更新し、 X-Requested-With ヘッダーに JavaScript 値を設定して、 499 ステータスコードの場合は最後にリクエストされたページを再度読み込みする必要があります。
例:
Future<void> callQuarkusService() async {
    Map<String, String> headers = Map.fromEntries([MapEntry("X-Requested-With", "JavaScript")]);

    await http
        .get("https://localhost:443/serviceCall")
        .then((response) {
            if (response.statusCode == 499) {
                window.location.assign("https://localhost.com:443/serviceCall");
            }
         });
  }
クロスオリジンリソース共有
別のドメインで実行されているシングルページのアプリケーションからこのアプリケーションを利用する場合は、クロスオリジンリソース共有 (CORS) を設定する必要があります。 詳細は、「クロスオリジンリソース共有」ガイドの CORSフィルター のセクションを参照してください。
クラウドプロバイダーサービスの呼び出し
Google Cloud
Google Developer Consoles の BigQuery などの Google Cloud Services に対して OIDC 認可コードフロー権限を有効化している現在認証済みのユーザーに代わり、Quarkus OIDC web-app アプリケーションが、それらのサービスにアクセスできるようにすることが可能です。
Quarkiverse Google クラウドサービス を使用して、これを行うことができます。 追加する必要があるのは、 以下の例に示すように、 最新タグ サービス依存関係のみです。
<dependency>
    <groupId>io.quarkiverse.googlecloudservices</groupId>
    <artifactId>quarkus-google-cloud-bigquery</artifactId>
    <version>${quarkiverse.googlecloudservices.version}</version>
</dependency>implementation("io.quarkiverse.googlecloudservices:quarkus-google-cloud-bigquery:${quarkiverse.googlecloudservices.version}")次に、Google OIDC プロパティーを設定します。
quarkus.oidc.provider=google
quarkus.oidc.client-id={GOOGLE_CLIENT_ID}
quarkus.oidc.credentials.secret={GOOGLE_CLIENT_SECRET}
quarkus.oidc.token.issuer=https://accounts.google.com
Quarkus アプリケーションのリバースプロキシーの背後での実行
Quarkus アプリケーションがリバースプロキシー、ゲートウェイ、またはファイアウォールの背後で実行されている場合に、HTTP Host ヘッダーが内部 IP アドレスにリセットされたり、 https 接続が終了したりするなどして、OIDC 認証メカニズムが影響を受けることがあります。
たとえば、認可コードフローの redirect_uri パラメーターが、予期される外部ホストではなく内部ホストに設定されている場合があります。
このような場合、プロキシーによって転送された元のヘッダーを認識するように Quarkus を設定する必要があります。 詳細は、リバースプロキシーの背後での実行 Vert.x のドキュメントセクションを参照してください。
たとえば、Quarkus エンドポイントが Kubernetes Ingress の背後にあるクラスターで実行されている場合、計算された redirect_uri パラメーターが内部エンドポイントアドレスを指している可能性があるため、OIDC プロバイダーからこのエンドポイントへのリダイレクトが機能しない可能性があります。
この問題は、Kubernetes Ingress によって外部エンドポイントアドレスを表すように X-ORIGINAL-HOST が設定されている次の設定を使用することで解決できます。
quarkus.http.proxy.proxy-address-forwarding=true
quarkus.http.proxy.allow-forwarded=false
quarkus.http.proxy.enable-forwarded-host=true
quarkus.http.proxy.forwarded-host-header=X-ORIGINAL-HOST
quarkus.oidc.authentication.force-redirect-https-scheme プロパティーは、Quarkus アプリケーションが SSL 終了リバースプロキシーの背後で実行されている場合にも使用できます。
OIDC プロバイダーへの外部および内部アクセス
OIDC プロバイダーの外部からアクセス可能な認可、ログアウト、およびその他のエンドポイントは、自動検出された URL や内部 URL quarkus.oidc.auth-server-url とは異なる HTTP(S) URL を持つ場合があります。
このような場合、エンドポイントは発行者の検証の失敗を報告し、外部からアクセス可能な OIDC プロバイダーエンドポイントへのリダイレクトが失敗する可能性があります。
Keycloak を使用する場合は、 KEYCLOAK_FRONTEND_URL システムプロパティーを外部からアクセス可能なベース URL に設定して起動します。
他の OIDC プロバイダーと連携する場合は、プロバイダーのドキュメントを確認してください。
OIDC HTTP クライアントリダイレクト
ファイアウォールの背後にある OIDC プロバイダーは、Quarkus OIDC HTTP クライアントの GET リクエストを、既知の設定エンドポイントなどのエンドポイントにリダイレクトする場合があります。 デフォルトでは、Quarkus OIDC HTTP クライアントは、セキュリティー上の理由からリダイレクトリクエスト中に設定された Cookie を除外して、自動的に HTTP リダイレクトい従います。
これは、必要に応じて quarkus.oidc.follow-redirects=false で無効にできます。
リダイレクトへの自動対応が無効になっている場合、Quarkus OIDC HTTP クライアントはリダイレクトリクエストを受信すると、リダイレクト URI が元のリクエスト URI とまったく同じで、リダイレクトリクエスト中に 1 つ以上の Cookie が設定されている場合に限り、リダイレクト URI に従って 1 回だけ回復を試みます。
OIDC SAML アイデンティティーブローカー
アイデンティティープロバイダーが OpenID Connect を実装しておらず、従来の XML ベースの SAML2.0 SSO プロトコルのみを実装している場合、 quarkus-oidc を OIDC アダプターとして使用する場合と同じように、Quarkus を SAML 2.0 アダプターとして使用することはできません。
ただし、Keycloak、Okta、Auth0、Microsoft ADFS などの多くの OIDC プロバイダーは、OIDC から SAML 2.0 へのブリッジを提供しています。
OIDC プロバイダーで SAML 2.0 プロバイダーへのアイデンティティーブローカー接続を作成し、 quarkus-oidc を使用してこの SAML 2.0 プロバイダーに対してユーザーを認証し、OIDC プロバイダーが OIDC と SAML 2.0 の通信を調整することができます。
Quarkus エンドポイントに関しては、同じ Quarkus セキュリティー、OIDC API、 @Authenticated、 SecurityIdentity などのアノテーションなどを引き続き使用できます。
たとえば、 Okta が SAML 2.0 プロバイダーで、 Keycloak が OIDC プロバイダーだとします。
ここでは、 Keycloak を Okta SAML 2.0 プロバイダーと仲介するように設定する方法を説明する一般的なシーケンスを示します。
まず、 Okta Dashboard/Applications に新しい SAML2 インテグレーションを作成します。
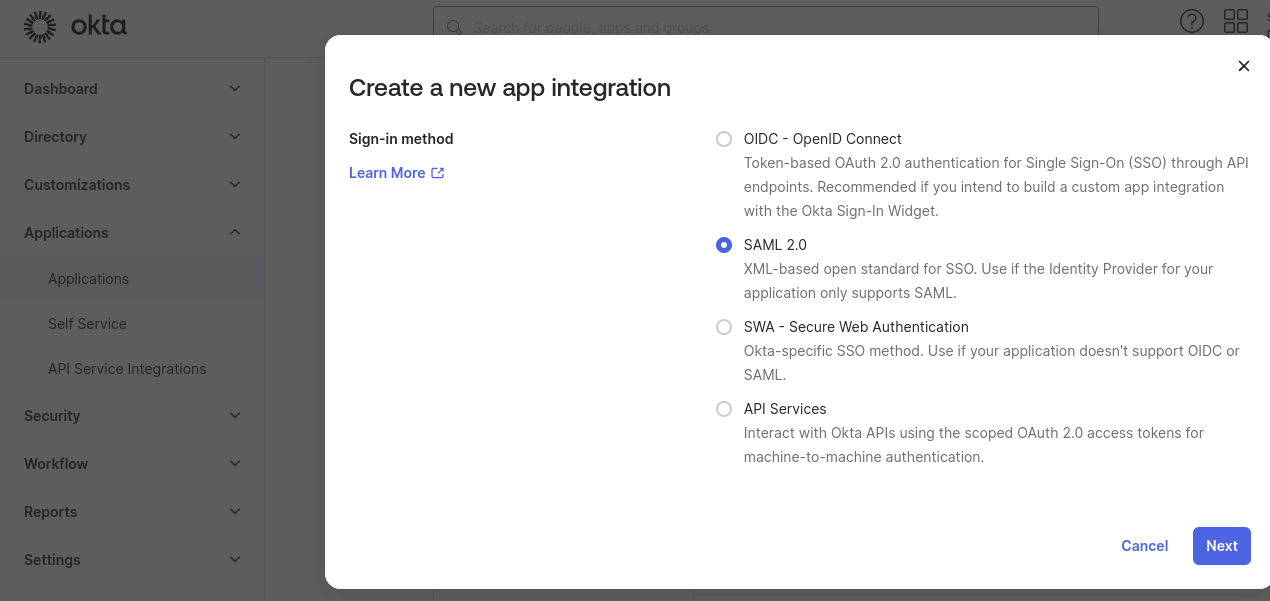
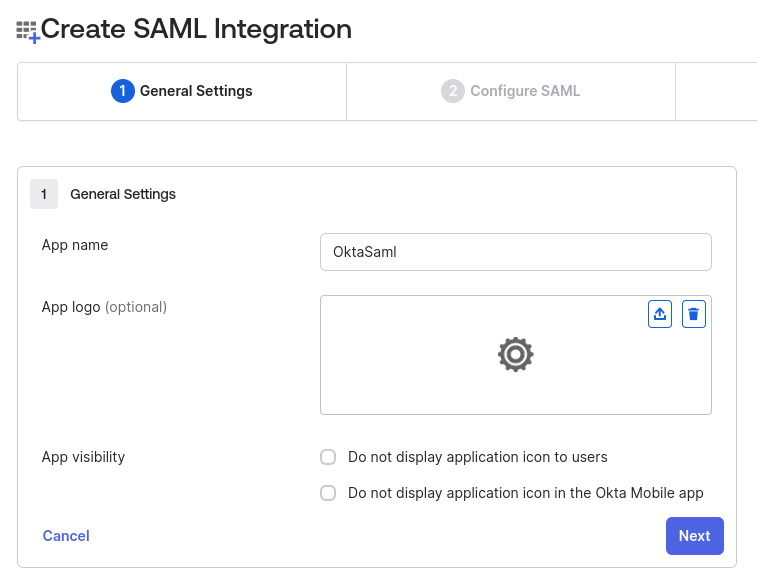
たとえば、 OktaSaml と名前を付けます。
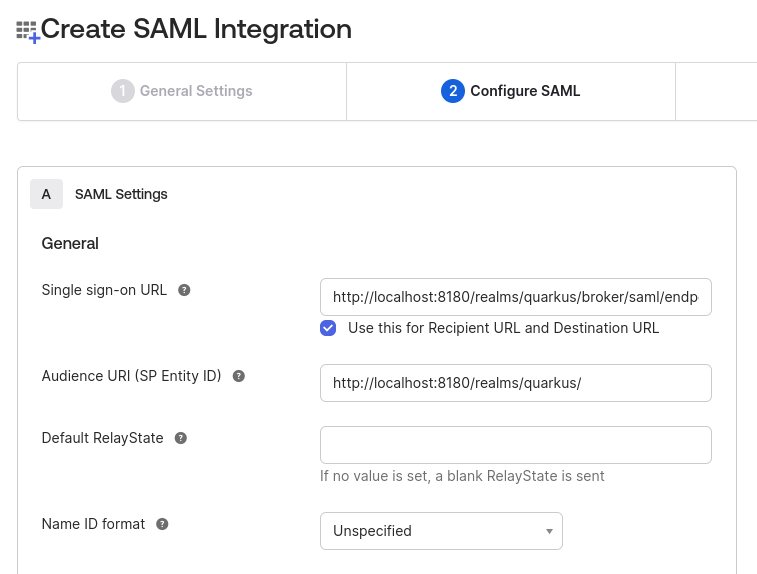
次に、Keycloak SAML ブローカーエンドポイントを指すように設定します。
この時点で、Keycloak レルムの名前 (例: quarkus) を知っておく必要があります。Keycloak SAML ブローカーのエイリアスが saml であると仮定して、エンドポイントアドレスを http://localhost:8081/realms/quarkus/broker/saml/endpoint と入力します。
サービスプロバイダー (SP) エンティティー ID を http://localhost:8081/realms/quarkus と入力します。ここで、 http://localhost:8081 は Keycloak ベースアドレスで、 saml はブローカーエイリアスです。
次に、この SAML インテグレーションを保存し、その Metadata URL をメモします。
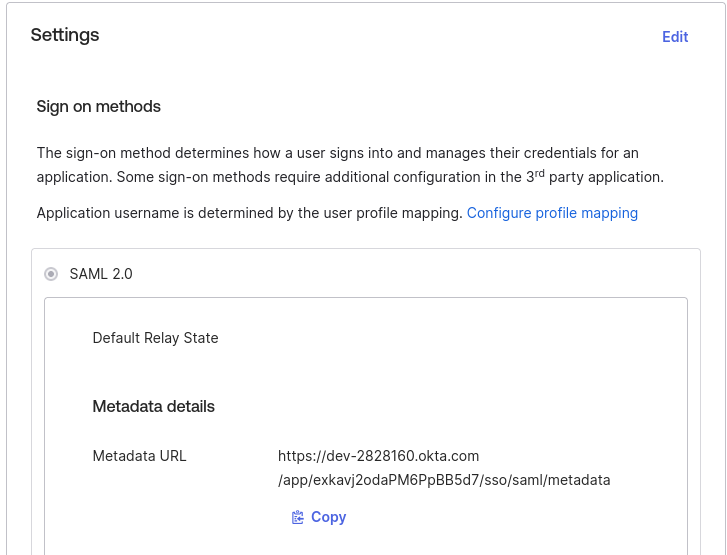
続いて、SAML プロバイダーを Keycloak に追加します。
まず、通常どおりに、新しいレルムを作成するか、既存のレルムを Keycloak にインポートします。
この場合、レルム名は quarkus にする必要があります。
次に、 quarkus レルムのプロパティーで、 Identity Providers に移動し、新しい SAML プロバイダーを追加します。
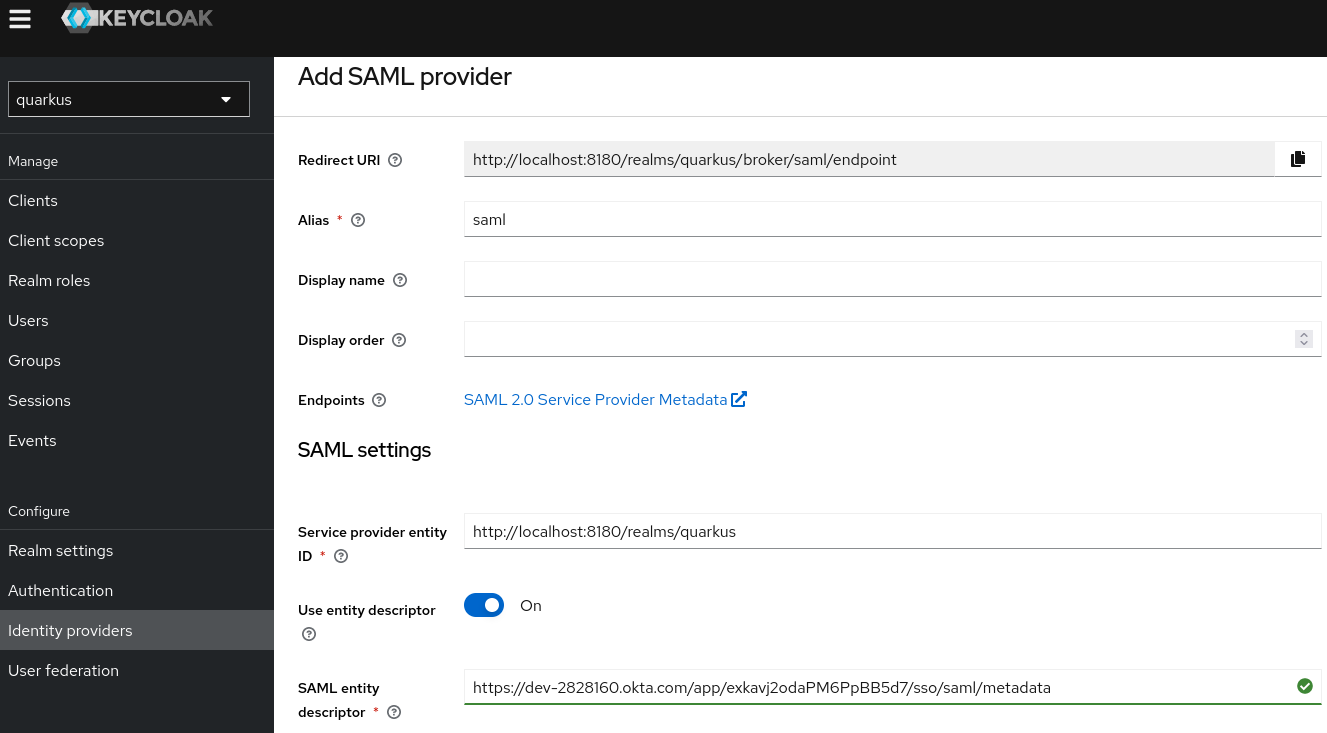
エイリアスは saml に設定され、 Redirect URI は http://localhost:8081/realms/quarkus/broker/saml/endpoint で、 Service provider entity ID は http://localhost:8081/realms/quarkus である点に注意してください。これらは、前の手順で Okta SAML Integration を作成するときに入力した値と同じです。
最後に、前の手順の最後に書き留めた Okta SAML Integration Metadata URL を指すように Service entity descriptor を設定します。
次に、必要に応じて、Authentication/browser/Identity Provider Redirector config` に移動し、 Alias プロパティーと Default Identity Provider プロパティーの両方を saml に設定して、この Keycloak SAML プロバイダーをデフォルトプロバイダーとして登録できます。
デフォルトのプロバイダーとして設定しない場合は、認証時に Keycloak は次の 2 つのオプションを提供します。
-
SAML プロバイダーによる認証
-
名前とパスワードを使用した Keycloak への直接認証
ここで、Quarkus OIDC web-app アプリケーションを、Keycloak quarkus レルム quarkus.oidc.auth-server-url=http://localhost:8180/realms/quarkus を指すように設定します。
次に、Keycloak OIDC および Okta SAML 2.0 プロバイダーによって提供される OIDC から SAML へのブリッジを使用して、Quarkus ユーザーを Okta SAML 2.0 プロバイダーに認証する準備が整います。
Keycloak の場合と同様に、他の OIDC プロバイダーを設定して SAML ブリッジを提供することもできます。
テスト
別の OIDC のようなサーバーへの認証に関しては、テストが困難になることがよくあります。 Quarkus は、モックから OIDC プロバイダーのローカル実行まで、さまざまなオプションを提供します。
テストプロジェクトに以下の依存関係を追加することから始めます。
<dependency>
    <groupId>org.htmlunit</groupId>
    <artifactId>htmlunit</artifactId>
    <exclusions>
        <exclusion>
            <groupId>org.eclipse.jetty</groupId>
            <artifactId>*</artifactId>
       </exclusion>
    </exclusions>
    <scope>test</scope>
</dependency>
<dependency>
    <groupId>io.quarkus</groupId>
    <artifactId>quarkus-junit</artifactId>
    <scope>test</scope>
</dependency>testImplementation("org.htmlunit:htmlunit")
testImplementation("io.quarkus:quarkus-junit")Dev Services for Keycloak
Keycloak に対する結合テストの場合は、Dev services for Keycloak を使用します。
このサービスは、テストコンテナーを初期化し、 quarkus レルムを作成し、シークレット secret を使用して quarkus-app クライアントを設定します。
また、 admin および user ロールを持つ alice と、 user ロールを持つ bob の 2 人のユーザーも設定します。
まず、 application.properties ファイルを準備します。
空の application.properties ファイルから開始する場合、 Dev Services for Keycloak は次のプロパティーを自動的に登録します。
-
実行中のテストコンテナーを指す
quarkus.oidc.auth-server-url -
quarkus.oidc.client-id=quarkus-app -
quarkus.oidc.credentials.secret=secret
必要な quarkus-oidc プロパティーがすでに設定されている場合は、 quarkus.oidc.auth-server-url を prod プロファイルに関連付けます。
これにより、 Dev Services for Keycloak が期待どおりにコンテナーを起動できるようになります。
以下はその例です。
%prod.quarkus.oidc.auth-server-url=http://localhost:8180/realms/quarkusテストを実行する前にカスタムレルムファイルを Keycloak にインポートするには、次のように Dev services for Keycloak を設定します。
%prod.quarkus.oidc.auth-server-url=http://localhost:8180/realms/quarkus
quarkus.keycloak.devservices.realm-path=quarkus-realm.json最後に、Wiremock セクションで説明されているとおりテストコードを作成します。
唯一の違いは、 @QuarkusTestResource が不要になったことです。
@QuarkusTest
public class CodeFlowAuthorizationTest {
}
Wiremock
次の依存関係を追加します。
<dependency>
    <groupId>io.quarkus</groupId>
    <artifactId>quarkus-test-oidc-server</artifactId>
    <scope>test</scope>
</dependency>testImplementation("io.quarkus:quarkus-test-oidc-server")REST テストエンドポイントを準備し、 application.properties を設定します。
以下に例を示します。
# keycloak.url is set by OidcWiremockTestResource
quarkus.oidc.auth-server-url=${keycloak.url:replaced-by-test-resource}/realms/quarkus/
quarkus.oidc.client-id=quarkus-web-app
quarkus.oidc.credentials.secret=secret
quarkus.oidc.application-type=web-app
最後にテストコードを書きます。例:
import static org.junit.jupiter.api.Assertions.assertEquals;

import org.junit.jupiter.api.Test;

import org.htmlunit.SilentCssErrorHandler;
import org.htmlunit.WebClient;
import org.htmlunit.html.HtmlForm;
import org.htmlunit.html.HtmlPage;

import io.quarkus.test.common.QuarkusTestResource;
import io.quarkus.test.junit.QuarkusTest;
import io.quarkus.test.oidc.server.OidcWiremockTestResource;

@QuarkusTest
@QuarkusTestResource(OidcWiremockTestResource.class)
public class CodeFlowAuthorizationTest {

    @Test
    public void testCodeFlow() throws Exception {
        try (final WebClient webClient = createWebClient()) {
            // the test REST endpoint listens on '/code-flow'
            HtmlPage page = webClient.getPage("http://localhost:8081/code-flow");

            HtmlForm form = page.getForms().get(0);
            // user 'alice' has the 'user' role
            form.getInputByName("username").type("alice");
            form.getInputByName("password").type("alice");

            page = form.getButtonByName("login").click();

            assertEquals("alice", page.getBody().asNormalizedText());
        }
    }

    private WebClient createWebClient() {
        WebClient webClient = new WebClient();
        webClient.setCssErrorHandler(new SilentCssErrorHandler());
        return webClient;
    }
}
OidcWiremockTestResource は alice と admin ユーザーを認識します。
ユーザー alice にはデフォルトで user ロールしかありませんが、 quarkus.test.oidc.token.user-roles システムプロパティーでカスタマイズできます。
ユーザー admin にはデフォルトで user と admin ロールがありますが、 quarkus.test.oidc.token.user-roles システムプロパティーでカスタマイズできます。
さらに、 OidcWiremockTestResource はトークンの発行者と対象ユーザーを https://service.example.com に設定します。これは、 quarkus.test.oidc.token.issuer および quarkus.test.oidc.token.audience システムプロパティーを使用してカスタマイズできます。
OidcWiremockTestResource は、すべての OIDC プロバイダーをエミュレートするために使用できます。
KeecycloakTestResourceLifecycleManager の使用
Dev Services for Keycloak を使用しない正当な理由がある場合にのみ、テストには KeycloakTestResourceLifecycleManager を使用してください。
Keycloak に対する結合テストが必要な場合は、Dev Services for Keycloak を使用してテストすることを推奨します。
まず、以下の依存関係を追加します。
<dependency>
    <groupId>io.quarkus</groupId>
    <artifactId>quarkus-test-keycloak-server</artifactId>
    <scope>test</scope>
</dependency>testImplementation("io.quarkus:quarkus-test-keycloak-server")これは、Keycloak コンテナーを起動する io.quarkus.test.common.QuarkusTestResourceLifecycleManager の実装である io.quarkus.test.keycloak.server.KeycloakTestResourceLifecycleManager を提供します。
次に、Maven Surefire プラグインを次のように設定します (ネイティブイメージでテストする場合は、Maven Failsafe プラグインを同様に設定します)。
<plugin>
    <artifactId>maven-surefire-plugin</artifactId>
    <configuration>
        <systemPropertyVariables>
            <!-- or, alternatively, configure 'keycloak.version' -->
            <keycloak.docker.image>${keycloak.docker.image}</keycloak.docker.image>
            <!--
              Disable HTTPS if required:
              <keycloak.use.https>false</keycloak.use.https>
            -->
        </systemPropertyVariables>
    </configuration>
</plugin>次に、設定を行い、Wiremock セクションに説明されているのと同じ方法でテストコードを記述します。
唯一の違いは QuarkusTestResource の名前です。
import io.quarkus.test.keycloak.server.KeycloakTestResourceLifecycleManager;

@QuarkusTest
@QuarkusTestResource(KeycloakTestResourceLifecycleManager.class)
public class CodeFlowAuthorizationTest {
}
KeycloakTestResourceLifecycleManager は alice と admin ユーザーを登録します。
ユーザー alice にはデフォルトで user ロールしかありませんが、 keycloak.token.user-roles システムプロパティーでカスタマイズできます。
ユーザー admin にはデフォルトで user と admin ロールがありますが、 keycloak.token.admin-roles システムプロパティーでカスタマイズできます。
デフォルトでは、 KeycloakTestResourceLifecycleManager が HTTPS を使用して Keycloak インスタンスを初期化します。これは、 keycloak.use.https=false を指定することで無効にすることができます。
デフォルトのレルム名は quarkus で、クライアント ID は quarkus-web-app です。必要に応じて、 keycloak.realm、 keycloak.web-app.client システムプロパティーを設定して値をカスタマイズしてください。
TestSecurity アノテーション
@TestSecurity および @OidcSecurity アノテーションを使用して、次の注入のいずれか、または 4 つすべてに依存する web-app アプリケーションエンドポイントコードをテストできます。
-
ID
JsonWebToken -
Access
JsonWebToken -
UserInfo -
OidcConfigurationMetadata
詳細は、注入された JsonWebToken での TestingSecurityの使用 を参照してください。
ログでのエラー確認
トークン検証エラーの詳細を確認するには、 io.quarkus.oidc.runtime.OidcProvider の TRACE レベルのロギングを有効にする必要があります。
quarkus.log.category."io.quarkus.oidc.runtime.OidcProvider".level=TRACE
quarkus.log.category."io.quarkus.oidc.runtime.OidcProvider".min-level=TRACE
OidcProvider クライアントの初期化エラーの詳細を確認するには、 io.quarkus.oidc.runtime.OidcRecorder の TRACE レベルのロギングを有効にしてください。
quarkus.log.category."io.quarkus.oidc.runtime.OidcRecorder".level=TRACE
quarkus.log.category."io.quarkus.oidc.runtime.OidcRecorder".min-level=TRACE
アプリケーションのグローバルログレベルを変更するには、 quarkus dev コンソールから j と入力します。
プログラムによる OIDC のスタートアップ
OIDC テナントは、次の例のようにプログラムで作成できます。
package io.quarkus.it.oidc;

import io.quarkus.oidc.Oidc;
import jakarta.enterprise.event.Observes;

public class OidcStartup {

    void observe(@Observes Oidc oidc) {
        oidc.createWebApp("http://localhost:8180/realms/quarkus", "quarkus-app", "mysecret");
    }

}
上記のコードは、 application.properties ファイル内の次の設定とプログラム的に同等です。
quarkus.oidc.auth-server-url=http://localhost:8180/realms/quarkus
quarkus.oidc.application-type=web-app
quarkus.oidc.client-id=quarkus-app
quarkus.oidc.credentials.secret=mysecret
さらに多くの OIDC テナントプロパティーを設定する必要がある場合は、次の例のように OidcTenantConfig ビルダーを使用します。
package io.quarkus.it.oidc;

import io.quarkus.oidc.Oidc;
import io.quarkus.oidc.OidcTenantConfig;
import io.quarkus.oidc.common.runtime.config.OidcClientCommonConfig.Credentials.Secret.Method;
import jakarta.enterprise.event.Observes;

public class OidcStartup {

    void createDefaultTenant(@Observes Oidc oidc) {
        var defaultTenant = OidcTenantConfig
                .authServerUrl("http://localhost:8180/realms/quarkus/")
                .clientId("quarkus-app")
                .credentials().clientSecret("mysecret", Method.POST).end()
                .build();
        oidc.create(defaultTenant);
    }
}
複数のテナントが関係するより複雑な設定については、OpenID Connect マルチテナンシーガイドの マルチテナントアプリケーション用のプログラムによる OIDC の起動 セクションを参照してください。
