Vert.x OIDC から Quarkus OIDC への移行
Vert.x OIDC アプリケーションを Quarkus に移行する方法を学び、Vert.x OIDC をそのまま使い続けるか、Quarkus OIDC に置き換えるかを選択します。
まず、オリジナルの Vert.x Securing a Web Application with OAuth2/OpenID Connect how-to チュートリアルから始めます。これは、Vert.x OIDC を使用して GitHub OAuth2 アプリケーション を実装する方法を示しています。Vert.x OIDC ユーザーであれば、すでにこのチュートリアルに取り組んだことがあるかもしれません。
|
GitHub は |
次に、Vert.x OIDC のコードを 完全に保持 したまま、Vert.x アプリケーションを Quarkus に移行する方法を学びます。
最後に、Vert.x OIDC を Quarkus OIDC に置き換えるオプションについて説明します。これを分析し、実装を検討してください。
Vert.x 上の Vert.x OIDC
Securing a Web Application with OAuth2/OpenID Connect how-to チュートリアルから始めましょう。
プロジェクトを作成 すると、以下のプロパティーと依存関係を含む pom.xml が作成されます。
<project>
  <groupId>howto</groupId>
  <artifactId>oauth-oidc</artifactId>
  <version>1.0.0-SNAPSHOT</version>

  <properties>
    <! ... -->
    <vertx.version>5.0.16</vertx.version>
    <main.verticle>howto.oauth_oidc.MainVerticle</main.verticle>
    <launcher.class>io.vertx.launcher.application.VertxApplication</launcher.class>
  </properties>

  <dependencyManagement>
    <dependencies>
      <dependency>
        <groupId>io.vertx</groupId>
        <artifactId>vertx-stack-depchain</artifactId>
        <version>${vertx.version}</version>
        <type>pom</type>
        <scope>import</scope>
      </dependency>
    </dependencies>
  </dependencyManagement>

  <dependencies>
    <dependency>
      <groupId>io.vertx</groupId>
      <artifactId>vertx-launcher-application</artifactId>
    </dependency>
    <dependency>
      <groupId>io.vertx</groupId>
      <artifactId>vertx-web-client</artifactId>
    </dependency>
    <dependency>
      <groupId>io.vertx</groupId>
      <artifactId>vertx-web-templ-handlebars</artifactId>
    </dependency>
    <dependency>
      <groupId>io.vertx</groupId>
      <artifactId>vertx-web</artifactId>
    </dependency>
    <dependency>
      <groupId>io.vertx</groupId>
      <artifactId>vertx-auth-oauth2</artifactId>
    </dependency>
    <! ... -->
  </dependencies>
  <! ... -->
</project>
Securing a Web Application with OAuth2/OpenID Connect チュートリアルの説明に従って GitHub アプリケーションを登録します。唯一の違いは、コールバック URL として http://localhost:8080/callback の代わりに http://localhost:8080/login を登録する必要があることです。
最終的な MainVerticle Java クラスは以下のようになります。
package howto.oauth_oidc;

import io.vertx.core.Future;
import io.vertx.core.VerticleBase;
import io.vertx.ext.auth.authorization.PermissionBasedAuthorization;
import io.vertx.ext.auth.oauth2.OAuth2Auth;
import io.vertx.ext.auth.oauth2.authorization.ScopeAuthorization;
import io.vertx.ext.auth.oauth2.providers.GithubAuth;
import io.vertx.ext.web.Router;
import io.vertx.ext.web.handler.AuthorizationHandler;
import io.vertx.ext.web.handler.OAuth2AuthHandler;
import io.vertx.ext.web.handler.SessionHandler;
import io.vertx.ext.web.sstore.LocalSessionStore;
import io.vertx.ext.web.templ.handlebars.HandlebarsTemplateEngine;

public class MainVerticle extends VerticleBase {

    private static final String CLIENT_ID = System.getenv("GITHUB_CLIENT_ID");
    private static final String CLIENT_SECRET = System.getenv("GITHUB_CLIENT_SECRET");

    @Override
    public Future<?> start() {

        HandlebarsTemplateEngine engine = HandlebarsTemplateEngine.create(vertx); (1)

        Router router = Router.router(vertx); (2)

        router.route().handler(SessionHandler.create(LocalSessionStore.create(vertx))); (3)

        router.get("/").handler(ctx -> { (4)
            // we pass the client id to the template
            ctx.put("client_id", CLIENT_ID);
            // and now delegate to the engine to render it.
            engine.render(ctx.data(), "views/index.hbs").onSuccess(buffer -> {
                ctx.response().putHeader("Content-Type", "text/html").end(buffer);
            }).onFailure(ctx::fail);
        });

        OAuth2Auth authProvider = GithubAuth.create(vertx, CLIENT_ID, CLIENT_SECRET); (5)

        router.get("/protected").handler(

                OAuth2AuthHandler.create(vertx, authProvider, "http://localhost:8080/login")
                        .setupCallback(router.route("/login")).withScope("user:email")) (6)
                .handler(AuthorizationHandler.create(PermissionBasedAuthorization.create("user:email"))
                        .addAuthorizationProvider(ScopeAuthorization.create(" "))) (7)
                .handler(new ProtectedProfileHandler(authProvider, engine)); (8)

        return vertx.createHttpServer().requestHandler(router).listen(Integer.getInteger("port", 8080))
                .onSuccess(server -> System.out.println("HTTP server started on port: " + server.actualPort()));
    }
}| 1 | Handlebars テンプレートエンジンを初期化します。 |
| 2 | Vert.x ルーターを作成します。 |
| 3 | セッション詳細をメモリーに保持する Vert.x OIDC セッションハンドラーを登録します。 |
| 4 | http://localhost:8080 アドレスでウェルカムページをサポートするためのルートハンドラーを作成します。 |
| 5 | Vert.x インスタンス、および GitHub のクライアント ID とシークレットプロパティーを使用して、OAuth2 GitHub プロバイダーを初期化します。 |
| 6 | http://localhost:8080/protected エンドポイントを保護するために OAuth2 ハンドラーを登録します。このハンドラーは GitHub プロバイダーを使用してユーザーを認証し、ユーザーを GitHub にリダイレクトする際に user:email スコープを要求します。ハンドラーにはコールバックルートが設定されており、返された認可コードと指定された http://localhost:8080/login リダイレクト URL を使用して認可コードフローを完了し、GitHub アクセストークンを取得します。 |
| 7 | GitHub アクセストークンに user:email スコープがない場合、 http://localhost:8080/protected エンドポイントへのアクセスを許可しないでください。アクセストークンを制限する PermissionBasedAuthorization 機能は優れていますが、このアプリケーションのコンテキストで適用する必要はないことに注意してください。認可コードフローのアクセストークン、特に GitHub のアクセストークンは、それを取得したアプリケーションへのアクセスを制御するためのものではなく、認証されたユーザーに代わって GitHub API などの別の API にアクセスするためにそのアプリケーションが使用するためのものです。これについては後述の実演で説明します。 |
ProtectedProfileHandler Java クラスはユーザーのメール一覧を返します。内容は Securing a Web Application with OAuth2/OpenID Connect チュートリアルに示されているものと全く同じです。
package howto.oauth_oidc;

import io.vertx.core.Handler;
import io.vertx.ext.auth.authentication.TokenCredentials;
import io.vertx.ext.auth.oauth2.OAuth2Auth;
import io.vertx.ext.web.RoutingContext;
import io.vertx.ext.web.client.WebClient;
import io.vertx.ext.web.codec.BodyCodec;
import io.vertx.ext.web.templ.handlebars.HandlebarsTemplateEngine;

class ProtectedProfileHandler implements Handler<RoutingContext> {

    private final OAuth2Auth authProvider;
    private final HandlebarsTemplateEngine engine;

    ProtectedProfileHandler(OAuth2Auth authProvider, HandlebarsTemplateEngine engine) {
        this.authProvider = authProvider;
        this.engine = engine;
    }

    @Override
    public void handle(RoutingContext ctx) {
        authProvider.userInfo(ctx.user())
                .onFailure(err -> {
                    ctx.session().destroy();
                    ctx.fail(err);
                }).onSuccess(userInfo -> {
                    WebClient.create(ctx.vertx()).getAbs("https://api.github.com/user/emails") (1)
                            .authentication(new TokenCredentials(ctx.user().<String>get("access_token"))) (2)
                            .as(BodyCodec.jsonArray()).send().onFailure(err -> {
                                ctx.session().destroy();
                                ctx.fail(err);
                            }).onSuccess(res -> {
                                userInfo.put("private_emails", res.body());
                                // we pass the client info to the template
                                ctx.put("userInfo", userInfo); (3)
                                // and now delegate to the engine to render it.
                                engine.render(ctx.data(), "views/protected.hbs").onSuccess(buffer -> {
                                    ctx.response().putHeader("Content-Type", "text/html").end(buffer);
                                }).onFailure(err -> {
                                    ctx.session().destroy();
                                    ctx.fail(err);
                                });
                            });
                });
    }
}| 1 | Vert.x WebClient を使用してユーザーのメールを取得します。 |
| 2 | GitHub アクセストークンを使用して GitHub API にアクセスします。 |
| 3 | プライベートメールを含む JSON 配列で UserInfo を更新し、それを protected.hbs テンプレートに渡します。 |
最後に、 src/main/resources/views ディレクトリーに index.hbs と protected.hbs テンプレートを作成し、 Securing a Web Application with OAuth2/OpenID Connect チュートリアルから内容をコピーします。
java -jar target/oauth-oidc-1.0.0-SNAPSHOT-fat.jar としてアプリケーションをコンパイルして実行し、 http://localhost:8080 にアクセスして Securing a Web Application with OAuth2/OpenID Connect チュートリアルに従い GitHub にログインすると、GitHub アカウントのメールアドレスが表示されます。
初めて http://localhost:8080/protected ページにアクセスしたとき、以下のリダイレクトが発生しました。
-
Vert.x OIDC によってログインのために GitHub にリダイレクトされました。
-
GitHub によって
http://localhost:8080/loginコールバックルートハンドラーにリダイレクトされました。ここで認可コードフローが完了し、GitHub アクセストークンが取得されました。 -
Vert.x OIDC によって、
元のリクエスト URL であるhttp://localhost:8080/protectedにリダイレクトされました。
Quarkus 上の Vert.x OIDC
Vert.x 上の Vert.x OIDC セクションでオリジナルの Securing a Web Application with OAuth2/OpenID Connect チュートリアルを進めました。ここからは、Vert.x OIDC を保持したまま、Vert.x アプリケーションを Quarkus に移行する計画を立てることができます。
pom.xml を次のように更新しましょう。
<project>
  <groupId>howto</groupId>
  <artifactId>quarkus-oauth-oidc</artifactId>
  <version>1.0.0-SNAPSHOT</version>

  <properties>
    <! ... -->
    <quarkus.platform.artifact-id>quarkus-bom</quarkus.platform.artifact-id>
    <quarkus.platform.group-id>io.quarkus</quarkus.platform.group-id>
    <quarkus.platform.version>3.24.0</quarkus.platform.version>
  </properties>

  <dependencyManagement>
    <dependencies>
      <dependency>
        <groupId>${quarkus.platform.group-id}</groupId>
        <artifactId>${quarkus.platform.artifact-id}</artifactId>
        <version>${quarkus.platform.version}</version>
        <type>pom</type>
        <scope>import</scope>
      </dependency>
    </dependencies>
  </dependencyManagement>

  <dependencies>
      <dependency>
          <groupId>io.quarkus</groupId>
          <artifactId>quarkus-vertx-http</artifactId>
      </dependency>
      <dependency>
          <groupId>io.quarkus</groupId>
          <artifactId>quarkus-qute</artifactId>
      </dependency>
      <dependency>
          <groupId>io.vertx</groupId>
          <artifactId>vertx-web-client</artifactId>
      </dependency>
      <dependency>
          <groupId>io.vertx</groupId>
          <artifactId>vertx-auth-oauth2</artifactId>
      </dependency>
  </dependencies>
  <! ... -->
</project>
Vert.x 上の Vert.x OIDC セクションの pom.xml と比較すると、この pom.xml は io.vertx グループのオリジナルの Vert.x 依存関係を 2 つだけ保持しています。GitHub API 呼び出しをサポートする vertx-web-client と、Vert.x GitHub OAuth2 プロバイダーで保護されたエンドポイントのセキュリティーを継続するための vertx-auth-oauth2 です。
また、 io.quarkus グループの 2 つの Quarkus 依存関係を導入しています。 quarkus-vertx-http と、 Qute テンプレートエンジン を提供し、 Vert.x 上の Vert.x OIDC セクションで使用されていた Handlebars エンジンを置き換える quarkus-qute です。
MainVerticle Java クラスは、起動時に Vert.x ルートとハンドラーを登録する CDI @ApplicationScoped の GitHubProfileService Java Bean クラスに変換されました。
package howto.oauth_oidc;

import org.eclipse.microprofile.config.inject.ConfigProperty;

import io.quarkus.qute.Template;
import io.vertx.core.Vertx;
import io.vertx.ext.auth.authorization.PermissionBasedAuthorization;
import io.vertx.ext.auth.oauth2.OAuth2Auth;
import io.vertx.ext.auth.oauth2.authorization.ScopeAuthorization;
import io.vertx.ext.auth.oauth2.providers.GithubAuth;
import io.vertx.ext.web.Router;
import io.vertx.ext.web.handler.AuthorizationHandler;
import io.vertx.ext.web.handler.OAuth2AuthHandler;
import io.vertx.ext.web.handler.SessionHandler;
import io.vertx.ext.web.sstore.LocalSessionStore;
import jakarta.enterprise.context.ApplicationScoped;
import jakarta.enterprise.event.Observes;
import jakarta.inject.Inject;

@ApplicationScoped
public class GitHubProfileService {

    OAuth2Auth authProvider;
    @Inject
    Template userEmail;

    public GithubProfileService(Vertx vertx,
            @ConfigProperty(name = "github_client_id") String githubClientId,
            @ConfigProperty(name = "github_client_secret") String githubClientSecret) {
        authProvider = GithubAuth.create(vertx, githubClientId, githubClientSecret); (1)
    }

    void start(@Observes Router router, Vertx vertx) { (2)

        router.route().handler(SessionHandler.create(LocalSessionStore.create(vertx)));

        router.get("/protected").handler(
                OAuth2AuthHandler.create(vertx, authProvider, "http://localhost:8080/login")
                        .setupCallback(router.route("/login")).withScope("user:email"))
                .handler(AuthorizationHandler.create(PermissionBasedAuthorization.create("user:email"))
                        .addAuthorizationProvider(ScopeAuthorization.create(" ")))
                .handler(new ProtectedProfileHandler(authProvider, userEmail)); (3)
    }
}| 1 | 注入された Vert.x インスタンス、および GitHub のクライアント ID とシークレットプロパティーを使用して、OAuth2 GitHub プロバイダーを初期化します。 |
| 2 | 起動時にルーターをセットアップします。これは、 Vert.x 上の Vert.x OIDC セクションの MainVerticle クラスで行ったのとほぼ同じですが、次のポイントで述べるわずかな違いがあります。 |
| 3 | 注入された Qute の userEmail テンプレートを ProtectedProfileHandler に渡します。 |
ProtectedProfileHandler Java クラスは Vert.x 上の Vert.x OIDC セクションで実装されたものと同様ですが、Qute テンプレートを使用するように変更されており、以下のようになります。
package howto.oauth_oidc;

import io.quarkus.qute.Template;
import io.vertx.core.Handler;
import io.vertx.ext.auth.authentication.TokenCredentials;
import io.vertx.ext.auth.oauth2.OAuth2Auth;
import io.vertx.ext.web.RoutingContext;
import io.vertx.ext.web.client.WebClient;
import io.vertx.ext.web.codec.BodyCodec;

class ProtectedProfileHandler implements Handler<RoutingContext> {

    private final OAuth2Auth authProvider;
    private final Template userEmail;

    ProtectedProfileHandler(OAuth2Auth authProvider, Template userEmail) {
        this.authProvider = authProvider;
        this.userEmail = userEmail;
    }

    @Override
    public void handle(RoutingContext ctx) {
        authProvider.userInfo(ctx.user()).onSuccess(userInfo -> {
            // fetch the user emails from the github API
            WebClient.create(ctx.vertx()).getAbs("https://api.github.com/user/emails") (1)
                    .authentication(new TokenCredentials(ctx.user().<String>get("access_token"))) (2)
                    .as(BodyCodec.jsonArray()).send().onSuccess(res -> {
                        userInfo.put("private_emails", res.body());

                        userEmail.data("userInfo", userInfo).renderAsync() (3)
                           .whenComplete((result, failure) -> {
		               if (failure == null) {
		                   ctx.response().putHeader("Content-Type", "text/html").end(result);
		               } else {
		                   ctx.session().destroy();
		                   ctx.fail(failure);
		               }
                           });
                    });
        });
    }
}| 1 | Vert.x WebClient を使用してユーザーのメールを取得します。 |
| 2 | GitHub アクセストークンを使用して GitHub API にアクセスします。 |
| 3 | プライベートメールを含む JSON 配列で UserInfo を更新し、それを userEmail テンプレートに渡して非同期にレンダリングします。 |
index.hbs は index.html という Qute テンプレートに名前が変更され、 src/main/resources/META-INF/resources/ ディレクトリーに移動されましたが、内容は同じままです。
protected.hbs は userEmail.html という Qute テンプレートに変換され、 src/main/resources/templates ディレクトリーに移動されました。Qute のルールに従って更新されています。
<html lang="en">
<body>
<p>Well, well, well, {userInfo.login}!</p>
<p>
  {#if userInfo.email} It looks like your public email
    address is {userInfo.email}.
  {#else} It looks like you don't have a public email.
    That's cool.
  {/if}
</p>
<p>
  {#if userInfo.containsKey('private_emails')}
    With your permission, we were also able to dig up your
    private email addresses:
    {#for email in userInfo.private_emails}
      {email.email}
      {#if email_hasNext},{/if}
    {/for}
  {#else}
    Also, you're a bit secretive about your private email
    addresses.
  {/if}
</p>
</body>
</html>
このシンプルなテンプレートは、 Vert.x 上の Vert.x OIDC セクションで作成した Handlebars テンプレートと非常によく似ています。詳細は Qute リファレンスガイド を参照してください。
これで、アプリケーションをコンパイルして実行できるようになりました。 mvn quarkus:dev を使用して開発モードで起動してみましょう。
http://localhost:8080 にアクセスし、 Securing a Web Application with OAuth2/OpenID Connect チュートリアルに従って GitHub にログインし、GitHub アカウントのメールアドレスが表示されることを確認してください。
http://localhost:8080/protected にアクセスした後のリダイレクトシーケンスは、 Vert.x 上の Vert.x OIDC セクションの最後で説明したものと同じことがこのアプリケーションでも発生しました。
この時点で、必要であれば、既存の Vert.x OIDC のコードを維持したまま、Quarkus の学習を続けることができます。
また、アノテーションを使用せずに、 HTTP リクエストパスに認可ルールを適用する方法 も確認しておくとよいでしょう。
Vert.x OIDC から Quarkus OIDC への移行方法を学びたい場合は、次の Quarkus OIDC への移行 セクションに進んでください。
Quarkus OIDC への移行
Vert.x 上の Vert.x OIDC セクションでオリジナルの Securing a Web Application with OAuth2/OpenID Connect チュートリアルを進めました。そして Quarkus 上の Vert.x OIDC セクションでは、Vert.x OIDC を保持したまま、Quarkus で動作するように変換しました。
このセクションでは、Vert.x OIDC のコードを Quarkus OIDC に変換する方法を学びます。
まず pom.xml の更新から始めましょう。以下のようになるはずです。
<project>
  <groupId>howto</groupId>
  <artifactId>quarkus-oauth-oidc</artifactId>
  <version>1.0.0-SNAPSHOT</version>

  <properties>
    <! ... -->
    <quarkus.platform.artifact-id>quarkus-bom</quarkus.platform.artifact-id>
    <quarkus.platform.group-id>io.quarkus</quarkus.platform.group-id>
    <quarkus.platform.version>3.24.0</quarkus.platform.version>
  </properties>

  <dependencyManagement>
    <dependencies>
      <dependency>
        <groupId>${quarkus.platform.group-id}</groupId>
        <artifactId>${quarkus.platform.artifact-id}</artifactId>
        <version>${quarkus.platform.version}</version>
        <type>pom</type>
        <scope>import</scope>
      </dependency>
    </dependencies>
  </dependencyManagement>

  <dependencies>
      <dependency>
          <groupId>io.quarkus</groupId>
          <artifactId>quarkus-vertx-http</artifactId>
      </dependency>
      <dependency>
          <groupId>io.quarkus</groupId>
          <artifactId>quarkus-qute</artifactId>
      </dependency>
      <dependency>
          <groupId>io.quarkus</groupId>
          <artifactId>quarkus-oidc</artifactId>
      </dependency>
      <dependency>
          <groupId>io.quarkus</groupId>
          <artifactId>quarkus-rest</artifactId>
      </dependency>
      <dependency>
          <groupId>io.quarkus</groupId>
          <artifactId>quarkus-rest-qute</artifactId>
      </dependency>
      <dependency>
          <groupId>io.quarkus</groupId>
          <artifactId>quarkus-rest-client-jackson</artifactId>
      </dependency>
      <dependency>
          <groupId>io.quarkus</groupId>
          <artifactId>quarkus-rest-client-oidc-token-propagation</artifactId>
      </dependency>
  </dependencies>
  <! ... -->
</project>
上記の Quarkus 上の Vert.x OIDC セクションの pom.xml と比較すると、この pom.xml には io.vertx グループの依存関係はもうありませんが、 io.quarkus グループの 2 つの Quarkus 依存関係である quarkus-vertx-http と quarkus-qute は保持され、さらにいくつかの Quarkus 依存関係が追加されています。
quarkus-oidc エクステンションは、保護されたエンドポイントのセキュリティーを確保し、GitHub OAuth2 認証を管理するために使用されます。 quarkus-rest エクステンションは JAX-RS REST エンドポイントをサポートするために使用され、 quarkus-rest-qute エクステンションは JAX-RS で Qute テンプレートをレンダリングしやすくします。
quarkus-rest-client-oidc-token-propagation エクステンションは REST クライアントによる簡単なアクセストークンの伝播をサポートし、 quarkus-rest-client-jackson は Jackson を使用して JSON 形式の REST クライアントレスポンスを Java Bean やレコードに変換するのを助けます。
GitHubProfileService は JAX-RS REST クラスになりました。
package howto.oauth_oidc;

import java.util.Set;
import java.util.function.Function;

import org.eclipse.microprofile.rest.client.inject.RestClient;

import howto.oauth_oidc.GitHubApiClient.Email;
import io.quarkus.oidc.OidcSession;
import io.quarkus.oidc.UserInfo;
import io.quarkus.qute.Template;
import io.quarkus.qute.TemplateInstance;
import io.quarkus.security.Authenticated;
import io.smallrye.mutiny.Uni;
import jakarta.inject.Inject;
import jakarta.ws.rs.GET;
import jakarta.ws.rs.NotAuthorizedException;
import jakarta.ws.rs.Path;
import jakarta.ws.rs.Produces;
import jakarta.ws.rs.core.Response;

@Path("/protected")
@Authenticated (1)
public class GitHubProfileService {

    @Inject
    Template userEmail;

    @Inject
    UserInfo userInfo; (2)

    @Inject
    @RestClient
    GitHubApiClient gitHubApiClient; (3)

    @Inject
    OidcSession oidcSession; (4)

    @GET
    @Produces("text/html")
    public Uni<TemplateInstance> getEmail() { (5)
        return gitHubApiClient.userEmails() (6)
            .onItemOrFailure().transformToUni((emails, throwable) -> {
                if (throwable == null) {
                    return Uni.createFrom().item(toUserEmails(emails)); (7)
                }
                return oidcSession.logout(). (8)
                    onItem().transform(new Function<Void, TemplateInstance>() {
                        @Override
                        public TemplateInstance apply(Void t) {
                            throw new NotAuthorizedException(Response.status(401).build());
                        }
                    });
        });
    }

    private TemplateInstance toUserEmails(Set<Email> emails) { (7)
        return userEmail.data("name", userInfo.getName()).data("email", userInfo.getEmail())
                .data("private_emails", emails);
    }

}| 1 | /protected エンドポイントへのアクセスに認証を要求します。 |
| 2 | GitHub 固有の UserInfo 表現を注入します。 |
| 3 | ユーザーメールの要求に使用される GitHub API REST クライアントを注入します。 |
| 4 | 現在の OIDC セッションを注入します。 |
| 5 | レンダリングされる userEmail テンプレートインスタンスを返す JAX-RS メソッドです。 Uni を使用する必要はありませんが、Vert.x から移行する場合、Quarkus の Uni でサポートされるリアクティブなコードには慣れているはずです。 |
| 6 | 注入された REST クライアントを使用して GitHub API にアクセスし、プライベートなユーザーメールを要求します。 |
| 7 | GitHub API へのリクエストが成功した場合、ユーザーメールと返されたプライベートメールアドレスのセットでテンプレートインスタンスを初期化します。 |
| 8 | GitHub API へのリクエストが失敗した場合は、ローカルセッションログアウトを実行してセッションクッキーをクリアし、HTTP 401 ステータスを返します。 |
プライベートなユーザーメールを取得するために、 GitHubApiClient REST クライアントが使用されます。
package howto.oauth_oidc;

import java.util.Set;

import org.eclipse.microprofile.rest.client.inject.RegisterRestClient;

import io.quarkus.oidc.token.propagation.common.AccessToken;
import io.smallrye.mutiny.Uni;
import jakarta.ws.rs.GET;
import jakarta.ws.rs.Path;
import jakarta.ws.rs.Produces;
import jakarta.ws.rs.core.MediaType;

@RegisterRestClient(configKey = "github-api-client") (1)
@Path("/")
@AccessToken (2)
public interface GitHubApiClient {

    @GET
    @Produces(MediaType.APPLICATION_JSON)
    @Path("user/emails")
    Uni<Set<Email>> userEmails(); (3)

    record Email(String email) {

    }
}| 1 | REST クライアントを登録し、 github-api-client 設定キーを使用します。 |
| 2 | アクセストークンの伝播を要求します。 |
| 3 | プライベートメールのセットを返します。前の例と同様に Uni を使用する必要はありませんが、 Uni を使用する方が、このメソッドを呼び出して Uni レスポンスを返す上記の GitHubProfileService JAX-RS リソースの JAX-RS メソッドとの親和性が高くなります。 |
application.properties の設定は以下のようになります。
quarkus.oidc.provider=github (1)
quarkus.oidc.client-id=${github_client_id}
quarkus.oidc.credentials.secret=${github_client_secret} (2)

# By default, Quarkus GitHub provider submits the client id and secret in the HTTP Authorization header. (2)
# However, GitHub may require that both client id and secret are submitted as form parameters instead.
# In this case, replace 'quarkus.oidc.credentials.secret=${github_client_secret}'
# with the following two properties:
#quarkus.oidc.credentials.client-secret.method=post
#quarkus.oidc.credentials.client-secret.value=${github_client_secret}

quarkus.oidc.authentication.redirect-path=/login (3)
quarkus.oidc.authentication.restore-path-after-redirect=true (4)

quarkus.http.auth.permission.login.paths=/login (5)
quarkus.http.auth.permission.login.policy=authenticated

quarkus.rest-client.github-api-client.url=https://api.github.com (6)

quarkus.rest-client.logging.scope=request-response (7)
quarkus.rest-client.logging.body-limit=200
quarkus.log.category."org.jboss.resteasy.reactive.client.logging".level=DEBUG| 1 | Quarkus GitHub プロバイダーを有効にします。 |
| 2 | デフォルトでは、Quarkus GitHub プロバイダーがアクセストークンを取得する際、クライアント ID とシークレットをエンコードされた HTTP Authorization Basic スキームの値として送信します。一部の地域では GitHub がこのオプションをサポートしていない場合があります。クライアント ID とシークレットをフォームパラメーターとして送信する client_secret_post メソッドを代わりに有効にする方法については、上記の application.properties 内のコメントを参照してください。 |
| 3 | コールバック用の /login パスを宣言します。 |
| 4 | 認可コードフローが完了したら、元の /protected リクエストパスを復元します。Vert.x 上の Vert.x OIDC および Vert.x 上の Vert.x OIDC セクションの Vert.x OIDC の例では、ユーザーが何もする必要なく、デフォルトで元のリクエストパスが復元されたことを思い出すかもしれません。しかし、デフォルトでは、Quarkus OIDC はコールバックリソースへのアクセスを許可しますが、認可コードフローが完了した後にのみ 許可します。詳細については、次の カスタムコールバックメソッドを使用した Quarkus OIDC への移行 セクションを参照してください。 |
| 5 | Quarkus セキュリティーでは、 @Authenticated などのセキュリティーアノテーションが付けられているか、構成済みの HTTP セキュリティーポリシーでそのエンドポイントパスが保護されている場合に、リソースが保護されます。 /login コールバックリソースは仮想的なものです。JAX-RS メソッドも追加のコールバックハンドラーもその処理には割り当てられないため、Quarkus OIDC 認証メカニズムがそれを保護できるように、HTTP セキュリティーポリシー設定で保護する必要があります。 |
| 6 | github-api-client REST クライアントのベース URL を設定します。 |
| 7 | REST クライアントのリクエストとレスポンスのデータをログに記録します。 |
src/main/resources/META-INF/resources/ ディレクトリーの index.html Qute テンプレートと、 src/main/templates ディレクトリーの userEmail.html Qute テンプレートは変更されません。
ここで、 mvn quarkus:dev を使用して開発モードでアプリケーションを起動します。
http://localhost:8080 にアクセスし、GitHub にログインして、GitHub アカウントのメールアドレスが表示されることを確認してください。
初めて http://localhost:8080/protected ページにアクセスしたとき、以下のリダイレクトが発生しました。
-
Quarkus OIDC によって GitHub にリダイレクトされ、ログインしました。
-
GitHub によって
http://localhost:8080/login仮想コールバックハンドラーにリダイレクトされ、Quarkus OIDC が認可コードフローを完了して GitHub アクセストークンを取得しました。 -
Quarkus OIDC によって、
元のリクエスト URL であるhttp://localhost:8080/protectedにリダイレクトされました。この最終的なリダイレクト中に、codeやstateなどの OIDC リダイレクトクエリーパラメーターも削除されます。
カスタムコールバックメソッドを使用した Quarkus OIDC への移行
最初の Vert.x OIDC から Quarkus OIDC への移行例 では、認可コードフローの完了後に元のリクエスト URL を復元するように Quarkus OIDC を設定する必要がありました。
このセクションでは、デフォルトの代替オプションを見ていきます。ここではカスタムコールバックハンドラーが呼び出されますが、それは Quarkus OIDC が認可コードフローを完了した後になります。
通常、本番環境では、ログインが必要なユーザーはまず中央のログイン URL に誘導されます。ランダムな保護されたパスにアクセスして、まったく同じ元のリクエストパスに戻ることを期待するのとは対照的です。後者の場合、中央のログインエンドポイントから利用可能なコンテキストが失われる可能性があります。代わりに、ユーザーが保護された中央のログインページに到達すると、このページがアプリケーションのフローに従ってユーザーをさらにリダイレクトします。
中央のログインエンドポイントをコールバック URL として指定することで、認可コードフローの完了後に認証済みユーザーをこのログインエンドポイントに着地させることができます。これにより、Quarkus OIDC が復元のために元のリクエスト URL を認可コードフローの状態として保持する必要がなくなり、コールバックエンドポイントをセキュリティーアノテーションで保護することも可能になります。
その方法を見てみましょう。
依存関係は Quarkus OIDC への移行 セクションと同じですが、ログインコールバックを管理する JAX-RS リソースをさらにもう 1 つ追加します。
package howto.oauth_oidc;

import io.quarkus.security.Authenticated;
import jakarta.ws.rs.GET;
import jakarta.ws.rs.Path;
import jakarta.ws.rs.Produces;
import jakarta.ws.rs.core.Context;
import jakarta.ws.rs.core.Response;
import jakarta.ws.rs.core.UriInfo;

@Path("/login")
@Authenticated (1)
public class LoginService {

    @GET
    public Response login(@Context UriInfo uriInfo) {
        return Response.seeOther(uriInfo.getBaseUriBuilder().path("protected").build()).build(); (2)
    }
}| 1 | LoginService は保護されたコールバックハンドラーであり、Quarkus OIDC が認可コードフローを完了すると制御を引き継ぎます。 |
| 2 | 認証済みユーザーがこのページに到達したら、アプリケーションで必要な処理を何でも行ってください。この例では、保護された /protected リソースにリダイレクトされます。この /protected エンドポイントは内部的なエンドポイントかもしれません。保護された /protected エンドポイントがパブリックにもアクセス可能で、未認証のユーザーがそこにアクセスしようとした場合でも、GitHub で認証した後はまずこの LoginService ページに到達し、次に /protected ページにリダイレクトされます。 |
GitHubProfileService クラスと GitHubApiClient クラスは Quarkus OIDC への移行 セクションと同じままです。
設定は非常にシンプルになりました。
quarkus.oidc.provider=github (1)
quarkus.oidc.client-id=${github_client_id}
quarkus.oidc.credentials.secret=${github_client_secret}

quarkus.oidc.authentication.redirect-path=/login (2)

quarkus.rest-client.github-api-client.url=https://api.github.com (3)

quarkus.rest-client.logging.scope=request-response (4)
quarkus.rest-client.logging.body-limit=200
quarkus.log.category."org.jboss.resteasy.reactive.client.logging".level=DEBUG| 1 | Quarkus GitHub プロバイダーを有効にします。 |
| 2 | コールバック用の /login パスを宣言します。 |
| 3 | github-api-client REST クライアントのベース URL を設定します。 |
| 4 | REST クライアントのリクエストとレスポンスのデータをログに記録します。 |
src/main/resources/META-INF/resources/ ディレクトリーの index.html Qute テンプレートと、 src/main/templates ディレクトリーの userEmail.html Qute テンプレートは変更されません。
http://localhost:8080 にアクセスし、GitHub にログインして、GitHub アカウントのメールアドレスが表示されることを確認してください。
初めて http://localhost:8080/protected ページにアクセスしたとき、以下のリダイレクトが発生しました。
-
Quarkus OIDC によって GitHub にリダイレクトされ、ログインしました。
-
GitHub によって
http://localhost:8080/loginコールバックハンドラーにリダイレクトされましたが、Quarkus OIDC がまず認可コードフローを完了し、GitHub アクセストークンを取得します。 -
/loginハンドラーに制御が渡される前に、Quarkus OIDC は OIDC リダイレクトのcodeおよびstateプロパティーを削除し、ユーザーを同じ/loginエンドポイントにリダイレクトします。これは、認可コードフローの完了後にアプリケーションがエラーを返した場合に、codeやstateクエリーパラメーターが現在のブラウザービューに残ったままになり、ユーザーのブラウザーにこれらのパラメーターが表示され続けるリスクを最小限に抑えるために行われます。必要に応じて、quarkus.oidc.authentication.remove-redirect-parameters=falseでこの最終リダイレクトを無効にできます。
Quarkus OIDC で GitHub アクセストークンのスコープを強制する
Vert.x 上の Vert.x OIDC および Quarkus 上の Vert.x OIDC の両セクションでは、GitHub アクセストークンに user:email スコープがあることを強制することで、Vert.x OIDC アプリケーションへのアクセスを制限する方法を説明しました。
また、 Vert.x 上の Vert.x OIDC セクションでは、GitHub アクセストークンは GitHub API へのアクセスに使用するためのものであり、それを取得したアプリケーションへのアクセスに使用するためのものではないため、GitHub アクセストークンの user:email スコープを強制する必要はないとも述べました。
Quarkus OIDC に移行した後も GitHub アクセストークンの user:email スコープを強制し続けたい場合は、次のように行うことができます。
まず、 @Authenticated アノテーションを @PermissionsAllowed("user:email") に置き換えます。後者は前者を含んでおり、同様にユーザー認証を必要とします。
@Path("/protected")
@PermissionsAllowed("user:email") (1)
public class GitHubProfileService {
//...
}
そして、次の設定プロパティーを追加します。 quarkus.oidc.roles.source=accesstoken。
このプロパティーを追加する必要がある理由は、認可コードフローにおいて、Quarkus OIDC は ID トークンを、ユーザーがログインしたアプリケーションへのアクセスを制御するプライマリトークンとして扱うためです。アクセストークンは、アプリケーションが許可した認証済みユーザーに代わって、アプリケーションが必要に応じてダウンストリームサービスにアクセスするために使用されます。
Quarkus OIDC が GitHub のような純粋な OAuth2 プロバイダーと連携する場合、ユーザー認証を表すための内部 ID トークンを生成します。GitHub アクセストークンは依然として GitHub API にアクセスするためのものです。
認可コードフロー中にアプリケーションが取得したアクセストークンを、まさにその同じアプリケーションへのアクセスに使用したい場合には、 quarkus.oidc.roles.source=accesstoken を設定する必要があります。
Vertx OIDC と Quarkus OIDC におけるセッション管理
Vert.x OIDC は stateful (ステートフル) であるため、Vert.x OIDC はクッキーを使用しないと一部のユーザーは考えるかもしれません。しかし、そうではありません。認可コードフローの進行状況と認証済みユーザーセッションの両方を追跡するために、不透明なセッションクッキーを使用します。
Vert.x 上の Vert.x OIDC または Quarkus 上の Vert.x OIDC セクションで作成したアプリケーションを実行すると、ブラウザーの開発者ツールを使用して、不透明な vertx-web-session セッションクッキーがユーザーセッションの追跡に使用されていることを観察できます。
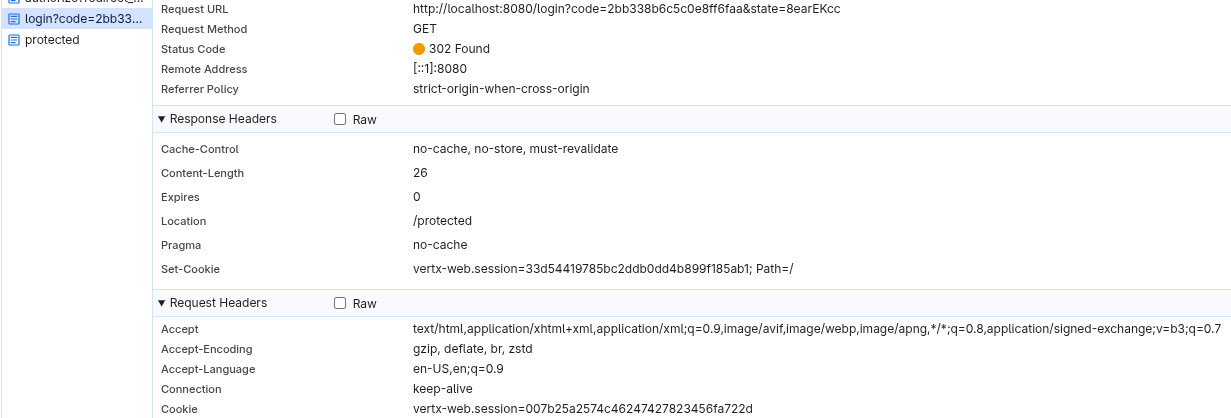
現在のユーザーセッションに関連付けられた状態はサーバー上に保存されます。
一方、 Quarkus OIDC への移行 または カスタムコールバックメソッドを使用した Quarkus OIDC への移行 セクションで作成したアプリケーションを実行すると、Quarkus OIDC も q_session セッションクッキーを使用しますが、そのサイズが大幅に大きいことがわかります。
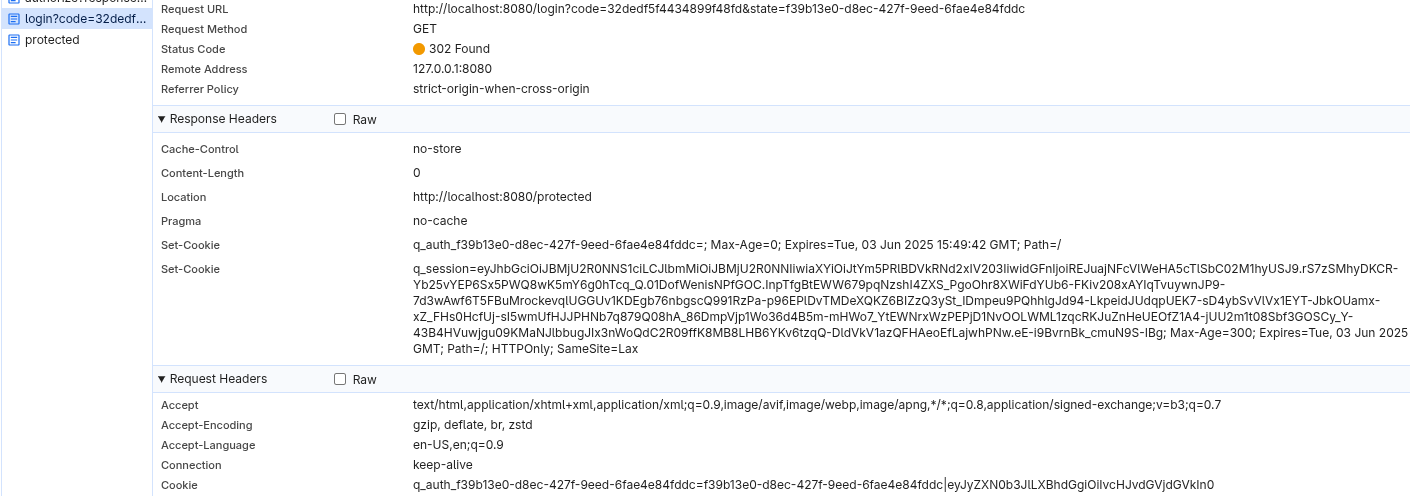
これは、Quarkus OIDC がデフォルトで stateless (ステートレス) であるためです。ユーザーセッションの詳細をセッションクッキー内で暗号化し、ユーザーセッションに関連するコンテンツはサーバーに保存されません。このアプローチにより、大幅に高い WEB スケールレベルの機能が提供されます。
stateful (ステートフル) なアプローチよりも安全性が低いのでしょうか?正確な答えを出すのは困難です。stateful なアプローチではセッションクッキーを保護しないため、攻撃者がそれを入手するとセキュアなアクセスが侵害されます。したがって、どちらのアプローチでも、HTTPS の使用と追加の CORS および CSRF 制御の適用を検討する必要があります。
stateless (ステートレス) なアプローチの場合、Quarkus は、ユーザーがセッションクッキーの暗号化キーを設定できるようにします。クライアントシークレットにフォールバックし、最終的には生成されたセキュアなランダムキーにフォールバックして、JSON Web Encryption (JWE) を適用し、対称型の A256GCMKW アルゴリズムで生成されたコンテンツ暗号化キーを暗号化し、A256GCM アルゴリズムで実際のセッションクッキーの内容を暗号化します。
ただし、ステートフルなアプローチを継続したい場合は、Quarkus OIDC で簡単に実現できます。
Quarkus OIDC が保持するセッション状態には、ID、アクセス、およびリフレッシュトークンが含まれます。さらに、認可コード付与のレスポンスでアクセストークンの有効期限とスコーププロパティーが返された場合は、それらの値も保存されます。
まず、カスタムの quarkus.oidc.TokenStateManager を登録し、必要なセッション状態の保存メカニズムを実装できます。例えば、Quarkus OIDC は、再起動後や複数の Pod 間では実際には機能しないため、インメモリの TokenStateManager を同梱していませんが、カスタム TokenStateManager の試行を開始するために実装することは可能です。
さらに、Quarkus OIDC は、ほとんどの既知のデータベースと統合できるデータベース対応の TokenStateManager と、Redis TokenStateManager の両方を提供しています。詳細は セクション を参照してください。
Redis TokenStateManager でどのように動作するか見てみましょう。
Quarkus OIDC への移行 または カスタムコールバックメソッドを使用した Quarkus OIDC への移行 セクションの pom.xml に、この依存関係を 1 つ追加するだけです。
<project>
  <! ... -->
  <dependencies>
      <! ... ->
      <dependency>
          <groupId>io.quarkus</groupId>
          <artifactId>quarkus-oidc-redis-token-state-manager</artifactId>
      </dependency>
  </dependencies>
  <! ... -->
</project>
Redis TokenStateManager の使用を開始するために必要なのはこれだけです。
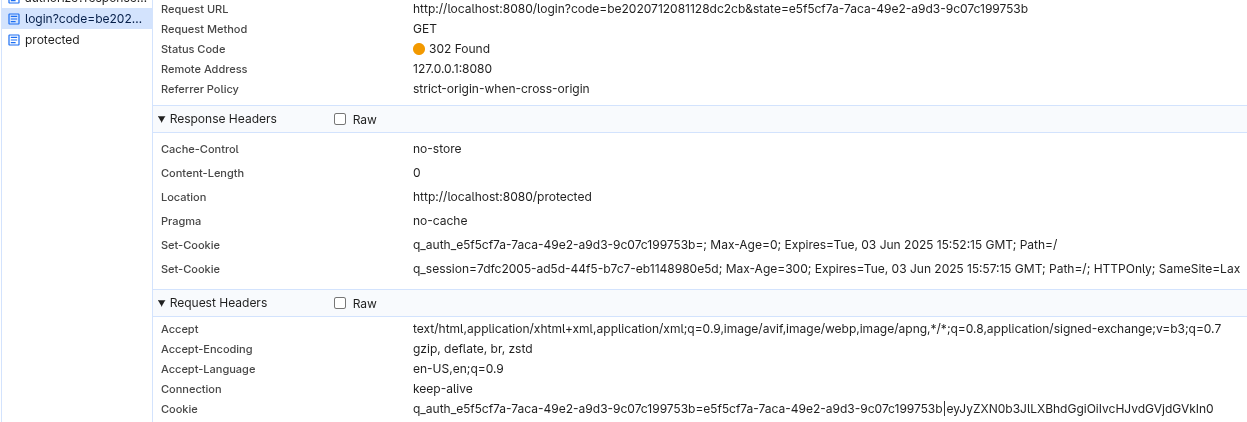
ブラウザーのクッキーをクリアして保護されたエンドポイントに再度アクセスすると、不透明な q_session セッションクッキーのみが確認できます。
また、Vert.x OIDC が認可コードフローの進行状況と認証済みユーザーのセッションを追跡するためにセッションクッキーを使用していることも観察できるでしょう。
一方、Quarkus OIDC は、認可コードフローの進行中は専用の q_auth_<uuid> 状態クッキーを使用し、コードフローが完了した後にのみセッションクッキーを作成します。状態クッキーの名前も一意であるため、マルチタブ認証が可能です。
移行のサポート
Vert.x OIDC から Quarkus OIDC への移行を検討しており、このガイドで回答されていない質問がある場合は、 Quarkus チームにお問い合わせください。
詳細は 参考文献 も参照してください。