OpenID Connect (OIDC) と Keycloak を使用した認可の一元化
保護されたリソースへ安全にアクセスするために、Keycloak Authorization Services を使用して、Quarkus アプリケーションでベアラートークン認可を有効にする方法を学習します。
概要
Keycloak Authorization エクステンションである quarkus-keycloak-authorization は、OpenID Connect エクステンションの quarkus-oidc を拡張して、高度な認可機能を提供します。これには、保護されたリソースへのアクセスを動的に管理するポリシーエンフォーサーが備わっています。アクセスは Keycloak で定義された権限によって管理され、柔軟で動的なリソースベースのアクセス制御 (RBAC) をサポートします。
Keycloak を使用しており、認可判断を処理するために環境で Keycloak 認可サービス機能が有効になっている場合にのみ、quarkus-keycloak-authorization エクステンションを使用してください。
Keycloak を使用していない場合、または Keycloak 認可サービス機能を使用せずに Keycloak が設定されている場合は、代わりに quarkus-oidc エクステンションを使用してください。
quarkus-keycloak-authorization エクステンションは、Keycloak の認可責任を一元化し、セキュリティーを強化して、アプリケーションのメンテナンスを簡素化します。
-
ベアラートークンを検証するために
quarkus-oidcエクステンションを使用します。 -
検証されたトークンを Keycloak Authorization Services に送信します。
-
これにより、Keycloak はリソース名、識別子、URI などの属性を使用して、リソースベースの権限を動的に評価できるようになります。
認可決定を外部化することで、次のことが可能になります。
-
アプリケーションコードを変更せずに、多様なアクセス制御ストラテジーを実装できます。
-
セキュリティー要件が進化するにつれ、再デプロイの必要性を軽減できます。
このエクステンションは、Quarkus OIDC サービスアプリケーション とのみ互換性があります。ロールベースのアクセス制御などの明示的なメカニズムを動的認可ポリシーで補完します。
-
集中管理: アプリケーション間で一貫したセキュリティーポリシーを実現するために、認可の決定を Keycloak に委譲します。
-
動的権限: リソース属性を使用してアクセス制御を動的に定義します。
-
メンテナンスの簡素化: アクセスポリシーが変更されたときにアプリケーションを更新して再デプロイする必要性を軽減します。
このエクステンションを使用する前に、次の点を確認してください。
-
Keycloak 認可サービス機能が Keycloak インスタンスで有効になっています。
-
Quarkus アプリケーションに
quarkus-keycloak-authorizationエクステンションが含まれている。
詳細な手順については、OIDC ベアラートークン認証 ガイドを参照してください。
Keycloak Authorization Services とポリシーエンフォーサーの詳細は、公式ドキュメントを参照してください: Keycloak Authorization Services ドキュメント 。
前提条件
このガイドを完成させるには、以下が必要です:
-
約15分
-
IDE
-
JDK 17+がインストールされ、
JAVA_HOMEが適切に設定されていること -
Apache Maven 3.9.15
-
動作するコンテナランタイム(Docker, Podman)
-
使用したい場合は、 Quarkus CLI
-
ネイティブ実行可能ファイルをビルドしたい場合、MandrelまたはGraalVM(あるいはネイティブなコンテナビルドを使用する場合はDocker)をインストールし、 適切に設定していること
アーキテクチャー
この例では、2 つの保護されたエンドポイントを持つ単純なマイクロサービスのセットアップを示します。
-
/api/users/me -
/api/admin
これらのエンドポイントへのアクセスは、ベアラートークンを使用して制御されます。アクセスするには、次の条件を満たす必要があります。
-
有効なトークン: トークンには正しい署名、適切な有効期限、適切な対象者が設定されている必要があります。
-
信頼: マイクロサービスは発行元の Keycloak サーバーを信頼する必要があります。
Keycloak サーバーによって発行されるベアラートークンは、以下の役割を果たします。
-
ユーザー識別子: トークンが発行された対象 (ユーザー) を示します。
-
クライアント参照: OAuth 2.0 Authorization Server 標準に従って、ユーザーに代わって動作するクライアントアプリケーションを識別します。
/api/users/me の場合:
-
アクセスポリシー: 有効なベアラートークンと
userロールを持つユーザーに適用されます。 -
レスポンス: トークンから派生した JSON オブジェクトとしてユーザーの詳細を返します。
応答の例{ "user": { "id": "1234", "username": "johndoe", "email": "johndoe@example.com" } }
/api/admin の場合:
-
アクセスポリシー: 有効なベアラートークンと
adminロールを持つユーザーに制限されます。
この例では、リソースを保護するためのロールベースのアクセス制御 (RBAC) ポリシーの使用について説明します。主なポイントは次のとおりです。
-
ポリシーの柔軟性: Keycloak は、属性ベースやカスタムポリシーなど、さまざまなポリシータイプをサポートしており、きめ細かい制御が可能です。
-
分離されたアプリケーションロジック: 認可ポリシーは Keycloak によって完全に管理されるため、アプリケーションはコア機能に集中できます。
ソリューション
次のセクションの指示に従って、アプリケーションをステップバイステップで作成することをお勧めします。ただし、完成した例に直接進むこともできます。
Git リポジトリーをクローン: git clone https://github.com/quarkusio/quarkus-quickstarts.git 、または アーカイブ をダウンロードします。
ソリューションは、 security-keycloak-authorization-quickstart ディレクトリー にあります。
プロジェクトの作成
まず、次のコマンドを使用して新しいプロジェクトを作成します。
Windowsユーザーの場合:
-
cmdを使用する場合、(バックスラッシュ
\を使用せず、すべてを同じ行に書かないでください)。 -
Powershellを使用する場合は、
-Dパラメータを二重引用符で囲んでください。例:"-DprojectArtifactId=security-keycloak-authorization-quickstart"
このコマンドは、 keycloak-authorization エクステンションを持つ新しいプロジェクトを生成します。このエクステンションは、Keycloak アダプターを Quarkus アプリケーションに統合し、Keycloak サーバーと対話してベアラーアクセストークンの認可を実行するために必要な機能を提供します。
既存の Quarkus プロジェクトがある場合は、プロジェクトのベースディレクトリーで次のコマンドを実行して、 oidc および keycloak-authorization エクステンションを追加できます。
quarkus extension add oidc,keycloak-authorization./mvnw quarkus:add-extension -Dextensions='oidc,keycloak-authorization'./gradlew addExtension --extensions='oidc,keycloak-authorization'このコマンドは、ビルドファイルに以下の依存関係を追加します。
<dependency>
    <groupId>io.quarkus</groupId>
    <artifactId>quarkus-oidc</artifactId>
</dependency>
<dependency>
    <groupId>io.quarkus</groupId>
    <artifactId>quarkus-keycloak-authorization</artifactId>
</dependency>implementation("io.quarkus:quarkus-oidc")
implementation("io.quarkus:quarkus-keycloak-authorization")/api/users/me エンドポイントの実装/api/users/me エンドポイントの実装から開始します。次のコードは、ユーザーの詳細を提供する Jakarta REST リソースを定義します。
package org.acme.security.keycloak.authorization;

import jakarta.inject.Inject;
import jakarta.ws.rs.GET;
import jakarta.ws.rs.Path;

import org.jboss.resteasy.reactive.NoCache;

import io.quarkus.security.identity.SecurityIdentity;

@Path("/api/users")
public class UsersResource {

    @Inject
    SecurityIdentity identity;

    @GET
    @Path("/me")
    @NoCache
    public User me() {
        return new User(identity);
    }

    public static class User {

        private final String userName;

        User(SecurityIdentity identity) {
            this.userName = identity.getPrincipal().getName();
        }

        public String getUserName() {
            return userName;
        }
    }
}
/api/admin エンドポイントの実装次に、 /api/admin エンドポイントを定義します。次のコードは、認証で保護された単純な Jakarta REST リソースを表しています。
package org.acme.security.keycloak.authorization;

import jakarta.ws.rs.GET;
import jakarta.ws.rs.Path;
import jakarta.ws.rs.Produces;
import jakarta.ws.rs.core.MediaType;

import io.quarkus.security.Authenticated;

@Path("/api/admin")
@Authenticated
public class AdminResource {

    @GET
    @Produces(MediaType.TEXT_PLAIN)
    public String admin() {
        return "granted";
    }
}リソースのアクセス制御を強制するために、 @RolesAllowed などの明示的なアノテーションは定義されていない点に注意してください。代わりに、 keycloak-authorization エクステンションは、Keycloak 内の保護されたリソースの URI を動的にマッピングします。
アクセス制御は次のように管理されます。
-
Keycloak は、設定されたポリシーに基づいて各リクエストの権限を評価します。
-
エクステンションはこれらの権限を適用し、Keycloak で定義されたロールまたはポリシーに基づいてアクセスを許可または拒否します。
これにより、アクセス制御ロジックがアプリケーションコードから分離され、Keycloak で直接アクセスポリシーを管理および更新しやすくなります。
アプリケーションの設定
OpenID Connect エクステンションを使用すると、通常は src/main/resources ディレクトリーにある application.properties ファイルを通じてアダプター設定を行うことができます。以下に例を示します。
# OIDC Configuration
%prod.quarkus.oidc.auth-server-url=https://localhost:8543/realms/quarkus (1)
quarkus.oidc.client-id=backend-service (2)
quarkus.oidc.credentials.secret=secret (3)
quarkus.oidc.tls.verification=none (4)

# Enable Policy Enforcement
quarkus.keycloak.policy-enforcer.enabled=true (5)

# Import the realm file with Dev Services for Keycloak
# Note: This property is effective only in dev mode, not in JVM or native modes
quarkus.keycloak.devservices.realm-path=quarkus-realm.json (6)| 1 | Keycloak サーバーの URL と認証に使用するレルムを指定します。 |
| 2 | Keycloak レルム内のクライアントアプリケーションを識別します。 |
| 3 | Keycloak サーバーによる認証用のクライアントシークレットを定義します。 |
| 4 | 開発目的で TLS 検証を無効にします。実稼働環境では推奨されません。 |
| 5 | Keycloak ポリシーエンフォーサーが、定義された権限に基づいてアクセス制御を管理できるようにします。 |
| 6 | 指定されたレルムファイルをインポートするように Dev Services を設定します。これは開発モードでのみ有効で、JVM モードやネイティブモードでは有効ではありません。 |
|
|
|
デフォルトでは、
|
Keycloak サーバーの起動と設定
|
アプリケーションを開発モードで実行するときは、Keycloak サーバーを起動しないでください。Dev Services for Keycloak がコンテナーを起動します。詳細は、開発モードでアプリケーションを実行する セクションを参照してください。 |
Keycloak サーバーを起動するには、以下の Docker コマンドを使用します。
docker run --name keycloak \
  -e KC_BOOTSTRAP_ADMIN_USERNAME=admin \
  -e KC_BOOTSTRAP_ADMIN_PASSWORD=admin \
  -p 8543:8443 \
  -v "$(pwd)"/config/keycloak-keystore.jks:/etc/keycloak-keystore.jks \
  quay.io/keycloak/keycloak:26.5.7 \
start --hostname-strict=false --https-key-store-file=/etc/keycloak-keystore.jks (1)| 1 | Keycloak キーストアの場合は、 quarkus-quickstarts/security-keycloak-authorization-quickstart/config にある keycloak-keystore.jks ファイルを使用します。 |
-
ブラウザーを開き、 https://localhost:8543 に移動します。
-
次のクレデンシャルを使用して、Keycloak Administration Console にログインします。
-
ユーザー名:
admin -
パスワード:
admin
-
新しいレルムを作成するには、レルム設定ファイル をインポートします。レルムを作成する詳細な手順については、Keycloak のドキュメント ( 新しいレルムを作成する) を参照してください。
レルムをインポートした後、[Clients] に移動し、 backend-service クライアントを選択し、このクライアントの [Authorization and Resources] タブを選択します。これでリソースの権限を確認できます。
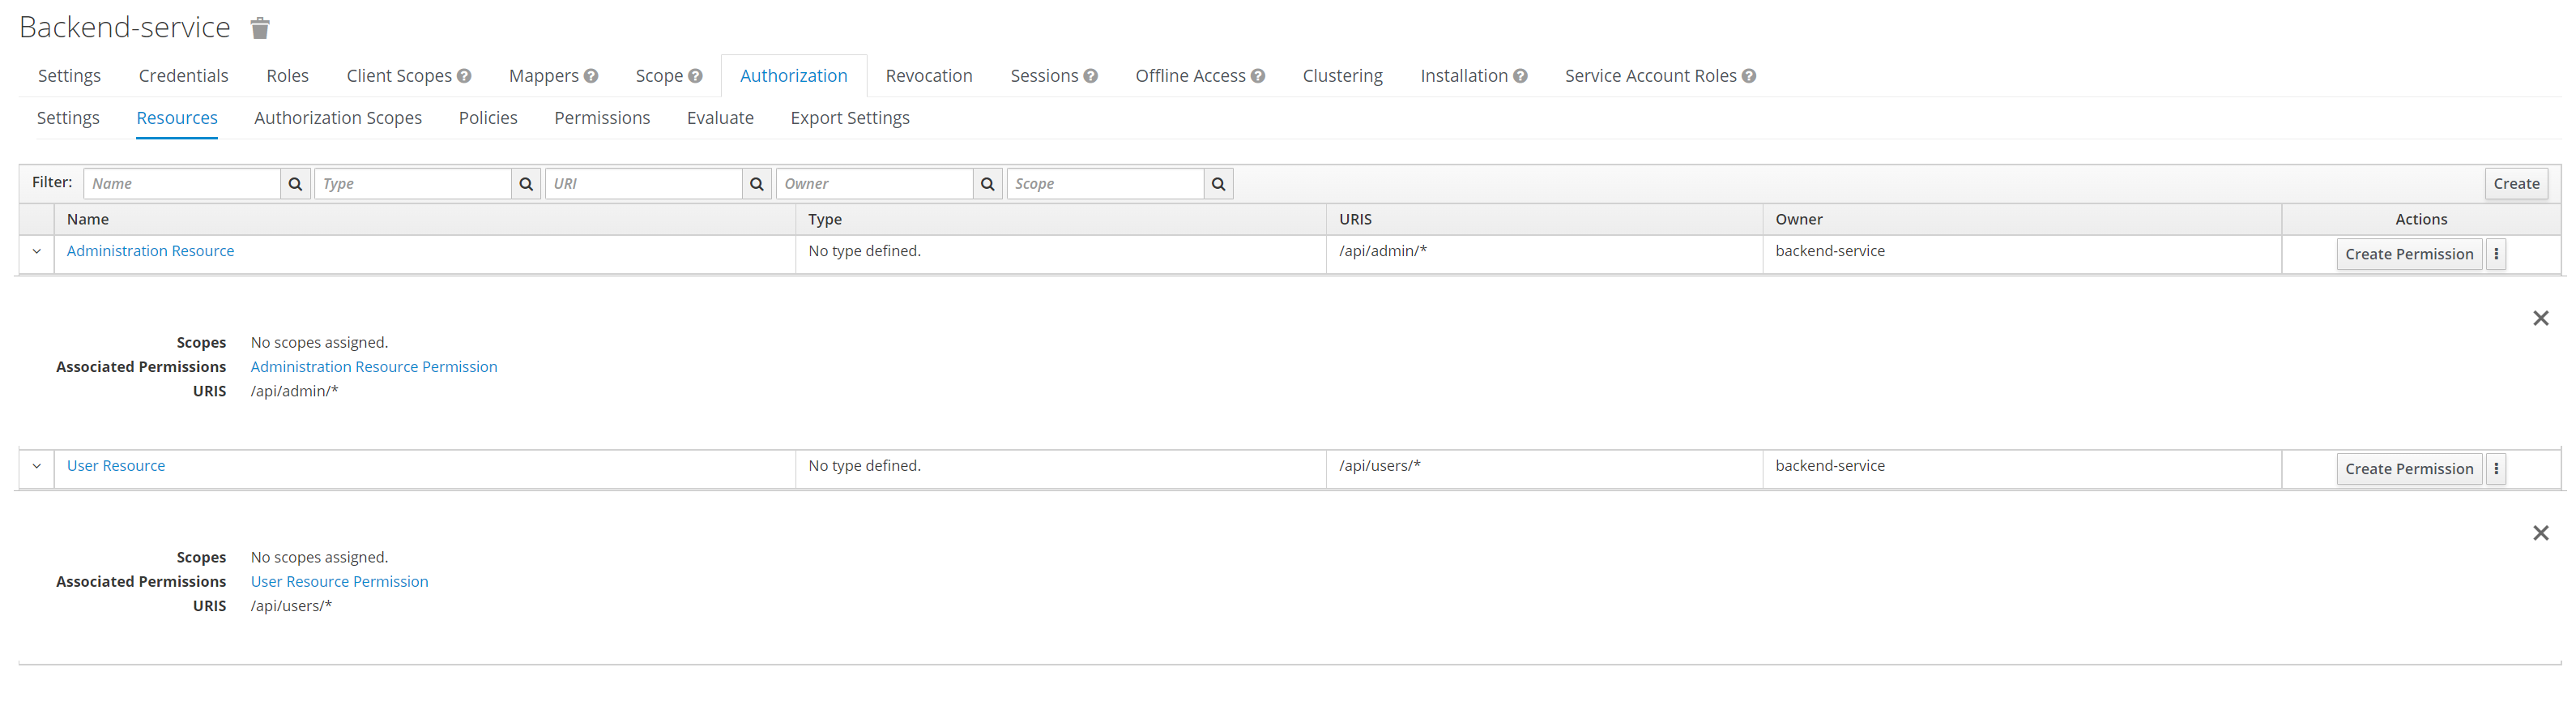
リソースのアクセス権限は Keycloak で直接設定されるため、アプリケーションコードに @RolesAllowed アノテーションを追加する必要がなくなります。このアプローチにより、Keycloak 内でアクセス制御管理が集中化され、アプリケーションのメンテナンスとセキュリティー更新が簡素化されます。
開発モードでのアプリケーションの実行
アプリケーションを開発モードで実行するには、次のコマンドを使用します。
quarkus dev./mvnw quarkus:dev./gradlew --console=plain quarkusDevDev Services for Keycloak は、Keycloak コンテナーを起動し、 quarkus-realm.json 設定ファイルをインポートします。
OpenID Connect Dev UI によって提供される Single Page Application へのログインを求められたら、次の操作を行います。
-
/api/users/meリソースにアクセスするためのUser Permissionのみを持つalice(パスワード:alice) としてログインします。-
/api/adminにアクセスすると、403が返されます。 -
/api/users/meにアクセスすると、200が返されます。
-
-
ログアウトして、
/api/adminリソースにアクセスするためのAdmin Permissionと/api/users/meリソースにアクセスするためのUser Permissionの両方を持つadmin(パスワード:admin) としてログインします。-
/api/adminにアクセスすると、200が返されます。 -
/api/users/meにアクセスすると、200が返されます。
-
quarkus-realm.json のようなレルムファイルをインポートせずに Dev Services for Keycloak を起動した場合、Keycloak 認可ポリシーなしでデフォルトの quarkus レルムを作成します。
-
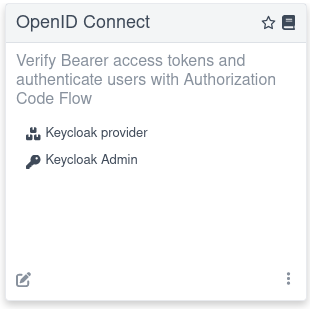
Dev UI の OpenID Connect カードから Keycloak Admin リンクを選択します。
-
Keycloak 管理コンソールにログインします。 ユーザー名とパスワードはどちらも
adminです。 -
quarkusレルムで認可ポリシーを有効にするには、Keycloak Authorization Services ドキュメント の指示に従ってください。
Keycloak Admin リンクは Dev UI で簡単に見つけることができます。
アプリケーションが、JAR アーカイブにデプロイされた JavaScript ポリシー で設定された Keycloak 認可を使用する場合、Dev Services for Keycloak はこのアーカイブを Keycloak コンテナーに転送できます。
転送を設定するには、 application.properties に次のプロパティーを使用します。
# Alias the policies archive
quarkus.keycloak.devservices.resource-aliases.policies=/policies.jar (1)
# Map the policies archive to a specific location in the container
quarkus.keycloak.devservices.resource-mappings.policies=/opt/keycloak/providers/policies.jar (2)| 1 | /policies.jar クラスパスリソースの policies エイリアスを作成します。
ポリシーアーカイブはファイルシステム上に配置することもできます。 |
| 2 | ポリシーアーカイブを Keycloak コンテナー内の /opt/keycloak/providers/policies.jar のロケーションにマップします。 |
JVM モードでのアプリケーションの実行
開発モードでアプリケーションを試した後、JVM モードで標準の Java アプリケーションとして実行できます。
アプリケーションをコンパイルします。
quarkus build./mvnw install./gradlew buildアプリケーションを実行します。
java -jar target/quarkus-app/quarkus-run.jarネイティブモードでのアプリケーションの実行
このデモはネイティブコードにコンパイルできます。変更は必要ありません。
ネイティブコンパイルでは、生成されたバイナリーにランタイムが含まれ、リソースの使用が最小限になるように最適化されるため、実稼働環境で JVM が不要になります。
コンパイルには時間がかかるため、デフォルトでは無効になっています。
アプリケーションをビルドするには、 native プロファイルを有効にします。
ネイティブバイナリーをビルドします。
quarkus build --native./mvnw install -Dnative./gradlew build -Dquarkus.native.enabled=trueしばらくしたら、ネイティブバイナリーを実行します。
./target/security-keycloak-authorization-quickstart-1.0.0-SNAPSHOT-runnerアプリケーションのテスト
開発モードでアプリケーションをテストする手順については、前述の 開発モードでのアプリケーションの実行 セクションを参照してください。
curl を使用して、JVM またはネイティブモードで実行されているアプリケーションをテストできます。
このアプリケーションはベアラートークン認可を使用します。 そのリソースにアクセスするには、まず Keycloak サーバーからアクセストークンを取得します。
export access_token=$(\
    curl --insecure -X POST https://localhost:8543/realms/quarkus/protocol/openid-connect/token \
    --user backend-service:secret \
    -H 'content-type: application/x-www-form-urlencoded' \
    -d 'username=alice&password=alice&grant_type=password' | jq --raw-output '.access_token' \
)|
|
上記の例は、ユーザー alice のアクセストークンを取得します。
/api/users/me エンドポイントへのアクセス有効なアクセストークンを持つすべてのユーザーは、ユーザーの詳細を含む JSON ペイロードを返す http://localhost:8080/api/users/me エンドポイントにアクセスできます。
curl -v -X GET \
  http://localhost:8080/api/users/me \
  -H "Authorization: Bearer "$access_token
/api/admin エンドポイントへのアクセスhttp://localhost:8080/api/admin エンドポイントは、 admin ロールを持つユーザーに制限されています。
以前に発行されたアクセストークンを使用してこのエンドポイントにアクセスしようとすると、サーバーは 403 Forbidden レスポンスを返します。
curl -v -X GET \
  http://localhost:8080/api/admin \
-H "Authorization: Bearer "$access_token管理エンドポイントにアクセスするには、 admin ユーザーのアクセストークンを取得します。
export access_token=$(\
    curl --insecure -X POST https://localhost:8543/realms/quarkus/protocol/openid-connect/token \
    --user backend-service:secret \
    -H 'content-type: application/x-www-form-urlencoded' \
    -d 'username=admin&password=admin&grant_type=password' | jq --raw-output '.access_token' \
 )
認可クライアントのインジェクション
リソースの管理や Keycloak からの直接の権限取得などの高度なタスクについては、Keycloak Authorization Client Java API を参照してください。
この機能を有効にするには、Bean に AuthzClient インスタンスを注入します。
public class ProtectedResource {
    @Inject
    AuthzClient authzClient;
}|
|
保護リソースのマッピング
デフォルトでは、エクステンションは必要に応じて Keycloak からリソースを遅延ロードします。リクエスト URI を使用して、保護が必要なアプリケーションリソースを識別し、マッピングします。
遅延ロードを無効にし、代わりに起動時にすべてのリソースを事前ロードするには、次のプロパティーを設定します。
quarkus.keycloak.policy-enforcer.lazy-load-paths=false起動時に Keycloak からリソースを事前ロードするのに必要な時間はリソースの数によって異なり、アプリケーションの初期ロード時間に影響する可能性があります。
保護されたリソースの設定に関する詳細
デフォルト設定では、Keycloak がロールを管理し、誰がどのルートにアクセスできるかを決定します。
@RolesAllowed アノテーションまたは application.properties ファイルを使用して保護されたルートを設定するには、OpenID Connect (OIDC) ベアラー認証 と Web エンドポイントの認可 のガイドを確認してください。詳細は、Quarkus Security の概要 を参照してください。
パブリックリソースへのアクセス
quarkus-keycloak-authorization ポリシーを適用せずにパブリックリソースへのアクセスを許可するには、application.properties ファイルで permit HTTP ポリシーを定義します。詳細は、Web エンドポイントの認可 ガイドを参照してください。
次のような設定を使用する場合、Keycloak Authorization Policy のポリシーチェックを無効にする必要はありません。
quarkus.keycloak.policy-enforcer.paths.1.paths=/api/public
quarkus.keycloak.policy-enforcer.paths.1.enforcement-mode=DISABLED
匿名ユーザーによるパブリックリソースへのアクセスを制限するには、強制的な Keycloak Authorization Policy を定義します。
quarkus.keycloak.policy-enforcer.paths.1.paths=/api/public-enforcing
quarkus.keycloak.policy-enforcer.paths.1.enforcement-mode=ENFORCING
パブリックリソースへの匿名アクセスを制御する必要がある場合、デフォルトのテナント設定のみが適用されます。
プログラムによるパーミッションスコープのチェック
リソース権限に加えて、メソッドスコープを定義できます。スコープは通常、リソースに対して実行されるアクションを表します。メソッドスコープを使用して、強制的な Keycloak Authorization Policy を作成できます。以下に例を示します。
# path policy with enforced scope 'read' for method 'GET'
quarkus.keycloak.policy-enforcer.paths.1.name=Scope Permission Resource
quarkus.keycloak.policy-enforcer.paths.1.paths=/api/protected/standard-way
quarkus.keycloak.policy-enforcer.paths.1.methods.get.method=GET
quarkus.keycloak.policy-enforcer.paths.1.methods.get.scopes=read (1)

# path policies without scope
quarkus.keycloak.policy-enforcer.paths.2.name=Scope Permission Resource
quarkus.keycloak.policy-enforcer.paths.2.paths=/api/protected/programmatic-way,/api/protected/annotation-way| 1 | ユーザーはリソースパーミッション Scope Permission Resource とスコープ read を持っている必要があります。 |
Keycloak Policy Enforcer は /api/protected/standard-way リクエストパスを保護し、@RolesAllowed などのアノテーションの必要性を排除します。ただし、シナリオによっては、プログラムによるチェックを実行する必要がある場合があります。
次の例に示すように、Bean に SecurityIdentity インスタンスを注入することでこれを実現できます。または、リソースメソッドに @PermissionsAllowed アノテーションを付与することで同じ結果を得ることができます。次の例は、それぞれ同じ read スコープを必要とする 3 つのリソースメソッドを示しています。
import java.security.BasicPermission;
import java.util.List;

import jakarta.inject.Inject;
import jakarta.ws.rs.ForbiddenException;
import jakarta.ws.rs.GET;
import jakarta.ws.rs.Path;

import org.keycloak.representations.idm.authorization.Permission;

import io.quarkus.security.PermissionsAllowed;
import io.quarkus.security.identity.SecurityIdentity;
import io.smallrye.mutiny.Uni;

@Path("/api/protected")
public class ProtectedResource {

    @Inject
    SecurityIdentity identity;

    @GET
    @Path("/standard-way")
    public Uni<List<Permission>> standardWay() { (1)
        return Uni.createFrom().item(identity.<List<Permission>> getAttribute("permissions"));
    }

    @GET
    @Path("/programmatic-way")
    public Uni<List<Permission>> programmaticWay() {
        var requiredPermission = new BasicPermission("Scope Permission Resource") {
            @Override
            public String getActions() {
                return "read";
            }
        };
        return identity.checkPermission(requiredPermission).onItem() (2)
                .transform(granted -> {
                    if (granted) {
                        return identity.getAttribute("permissions");
                    }
                    throw new ForbiddenException();
                });
    }

    @PermissionsAllowed("Scope Permission Resource:read") (3)
    @GET
    @Path("/annotation-way")
    public Uni<List<Permission>> annotationWay() {
        return Uni.createFrom().item(identity.<List<Permission>> getAttribute("permissions"));
    }
}| 1 | /standard-way サブパスには、application.properties ファイルで設定された設定に基づいて、リソース権限と read スコープの両方が必要です。 |
| 2 | /programmatic-way サブパスは、デフォルトでは Scope Permission Resource 権限のみをチェックします。ただし、SecurityIdentity#checkPermission を使用して、スコープ要件などの追加の制約を適用できます。 |
| 3 | /annotation-way の @PermissionsAllowed アノテーションは、Scope Permission Resource パーミッションと read スコープを持つリクエストへのアクセスを制限します。詳細については、Web エンドポイントの認可ガイドの アノテーションを使用した認可 のセクションを参照してください。 |
マルチテナンシー
OpenID Connect (OIDC) マルチテナンシー と同様に、テナントごとにポリシーエンフォーサー設定をセットアップできます。以下に例を示します。
quarkus.keycloak.policy-enforcer.enabled=true

# Default Tenant
quarkus.oidc.auth-server-url=${keycloak.url:replaced-by-test-resource}/realms/quarkus
quarkus.oidc.client-id=quarkus-app
quarkus.oidc.credentials.secret=secret

quarkus.keycloak.policy-enforcer.enforcement-mode=PERMISSIVE
quarkus.keycloak.policy-enforcer.paths.1.name=Permission Resource
quarkus.keycloak.policy-enforcer.paths.1.paths=/api/permission
quarkus.keycloak.policy-enforcer.paths.1.claim-information-point.claims.static-claim=static-claim

# Service Tenant

quarkus.oidc.service-tenant.auth-server-url=${keycloak.url:replaced-by-test-resource}/realms/quarkus
quarkus.oidc.service-tenant.client-id=quarkus-app
quarkus.oidc.service-tenant.credentials.secret=secret

quarkus.keycloak.service-tenant.policy-enforcer.enforcement-mode=PERMISSIVE
quarkus.keycloak.service-tenant.policy-enforcer.paths.1.name=Permission Resource Service
quarkus.keycloak.service-tenant.policy-enforcer.paths.1.paths=/api/permission
quarkus.keycloak.service-tenant.policy-enforcer.paths.1.claim-information-point.claims.static-claim=static-claim


# WebApp Tenant

quarkus.oidc.webapp-tenant.auth-server-url=${keycloak.url:replaced-by-test-resource}/realms/quarkus
quarkus.oidc.webapp-tenant.client-id=quarkus-app
quarkus.oidc.webapp-tenant.credentials.secret=secret
quarkus.oidc.webapp-tenant.application-type=web-app
quarkus.oidc.webapp-tenant.roles.source=accesstoken

quarkus.keycloak.webapp-tenant.policy-enforcer.enforcement-mode=PERMISSIVE
quarkus.keycloak.webapp-tenant.policy-enforcer.paths.1.name=Permission Resource WebApp
quarkus.keycloak.webapp-tenant.policy-enforcer.paths.1.paths=/api/permission
quarkus.keycloak.webapp-tenant.policy-enforcer.paths.1.claim-information-point.claims.static-claim=static-claim
動的なテナント設定の解決
設定ファイル内の過剰なエントリーを避けながら複数のテナントの設定を作成するには、io.quarkus.keycloak.pep.TenantPolicyConfigResolver インターフェイスを使用して、実行時にプログラムで定義することができます。
package org.acme.security.keycloak.authorization;

import java.util.Map;

import jakarta.enterprise.context.ApplicationScoped;

import io.quarkus.keycloak.pep.TenantPolicyConfigResolver;
import io.quarkus.keycloak.pep.runtime.KeycloakPolicyEnforcerConfig;
import io.quarkus.keycloak.pep.runtime.KeycloakPolicyEnforcerTenantConfig;
import io.quarkus.oidc.OidcRequestContext;
import io.quarkus.oidc.OidcTenantConfig;
import io.smallrye.mutiny.Uni;
import io.vertx.ext.web.RoutingContext;

@ApplicationScoped
public class CustomTenantPolicyConfigResolver implements TenantPolicyConfigResolver {

    private final KeycloakPolicyEnforcerTenantConfig enhancedTenantConfig;
    private final KeycloakPolicyEnforcerTenantConfig newTenantConfig;

    public CustomTenantPolicyConfigResolver(KeycloakPolicyEnforcerConfig enforcerConfig) {
        this.enhancedTenantConfig = KeycloakPolicyEnforcerTenantConfig.builder(enforcerConfig.defaultTenant()) (1)
            .paths("/enhanced-config")
            .permissionName("Permission Name")
            .get("read-scope")
            .build();
        this.newTenantConfig = KeycloakPolicyEnforcerTenantConfig.builder() (2)
            .paths("/new-config")
            .claimInformationPoint(Map.of("claims", Map.of("grant", "{request.parameter['grant']}")))
            .build();
    }

    @Override
    public Uni<KeycloakPolicyEnforcerTenantConfig> resolve(RoutingContext routingContext, OidcTenantConfig tenantConfig,
                                                OidcRequestContext<KeycloakPolicyEnforcerTenantConfig> requestContext) {
        String path = routingContext.normalizedPath();
        String tenantId = tenantConfig.tenantId().orElse(null);
        if ("enhanced-config-tenant".equals(tenantId) && path.equals("/enhanced-config")) {
            return Uni.createFrom().item(enhancedTenantConfig);
        } else if ("new-config-tenant".equals(tenantId) && path.equals("/new-config")) {
            return Uni.createFrom().item(newTenantConfig);
        }
        return Uni.createFrom().nullItem(); (3)
    }
}| 1 | デフォルトのテナント設定で /enhanced-config パスを定義または更新します。 |
| 2 | プログラムによって設定されるカスタムクレームと値を含む、テナント設定に /new-config パスを追加します。 |
| 3 | application.properties ファイルまたはその他の SmallRye Config ソースで定義されているデフォルトの静的テナント設定解決にフォールバックします。 |
設定リファレンス
この設定は、公式の Keycloak Policy Enforcer 設定 ガイドラインに準拠しています。さまざまな設定オプションの詳細は、次のドキュメントを参照してください。
ビルド時に固定される設定プロパティー - 他のすべての設定プロパティーは実行時にオーバーライド可能
Configuration property |
タイプ |
デフォルト |
|---|---|---|
Enables policy enforcement. Environment variable: Show more |
ブーリアン |
|
Adapters will make separate HTTP invocations to the Keycloak server to turn an access code into an access token. This config option defines how many connections to the Keycloak server should be pooled Environment variable: Show more |
int |
|
Specifies how policies are enforced. Environment variable: Show more |
|
|
Defines the limit of entries that should be kept in the cache Environment variable: Show more |
int |
|
Defines the time in milliseconds when the entry should be expired Environment variable: Show more |
長 |
|
Specifies how the adapter should fetch the server for resources associated with paths in your application. If true, the policy enforcer is going to fetch resources on-demand accordingly with the path being requested Environment variable: Show more |
ブーリアン |
|
Complex config. Environment variable: Show more |
Map<String,Map<String,Map<String,String>>> |
|
Simple config. Environment variable: Show more |
Map<String,Map<String,String>> |
|
Specifies how scopes should be mapped to HTTP methods. If set to true, the policy enforcer will use the HTTP method from the current request to check whether access should be granted Environment variable: Show more |
ブーリアン |
|
The name of a resource on the server that is to be associated with a given path Environment variable: Show more |
string |
|
HTTP request paths that should be protected by the policy enforcer Environment variable: Show more |
文字列のリスト |
|
The name of the HTTP method Environment variable: Show more |
string |
required |
An array of strings with the scopes associated with the method Environment variable: Show more |
文字列のリスト |
required |
A string referencing the enforcement mode for the scopes associated with a method Environment variable: Show more |
|
|
Specifies how policies are enforced Environment variable: Show more |
|
|
Complex config. Environment variable: Show more |
Map<String,Map<String,Map<String,String>>> |
|
Simple config. Environment variable: Show more |
Map<String,Map<String,String>> |
|
This property is deprecated since Enables policy enforcement. Environment variable: Show more |
ブーリアン |
|
This property is deprecated since A URI relative to the application’s context path that should be protected by the policy enforcer Environment variable: Show more |
string |
|
タイプ |
デフォルト |
|
Adapters will make separate HTTP invocations to the Keycloak server to turn an access code into an access token. This config option defines how many connections to the Keycloak server should be pooled Environment variable: Show more |
int |
|
Specifies how policies are enforced. Environment variable: Show more |
|
|
The name of a resource on the server that is to be associated with a given path Environment variable: Show more |
string |
|
HTTP request paths that should be protected by the policy enforcer Environment variable: Show more |
文字列のリスト |
|
The name of the HTTP method Environment variable: Show more |
string |
required |
An array of strings with the scopes associated with the method Environment variable: Show more |
文字列のリスト |
required |
A string referencing the enforcement mode for the scopes associated with a method Environment variable: Show more |
|
|
Specifies how policies are enforced Environment variable: Show more |
|
|
Complex config. Environment variable: Show more |
Map<String,Map<String,Map<String,String>>> |
|
Simple config. Environment variable: Show more |
Map<String,Map<String,String>> |
|
Defines the limit of entries that should be kept in the cache Environment variable: Show more |
int |
|
Defines the time in milliseconds when the entry should be expired Environment variable: Show more |
長 |
|
Specifies how the adapter should fetch the server for resources associated with paths in your application. If true, the policy enforcer is going to fetch resources on-demand accordingly with the path being requested Environment variable: Show more |
ブーリアン |
|
Complex config. Environment variable: Show more |
Map<String,Map<String,Map<String,String>>> |
|
Simple config. Environment variable: Show more |
Map<String,Map<String,String>> |
|
Specifies how scopes should be mapped to HTTP methods. If set to true, the policy enforcer will use the HTTP method from the current request to check whether access should be granted Environment variable: Show more |
ブーリアン |
|