Quarkus Messagingエクステンション
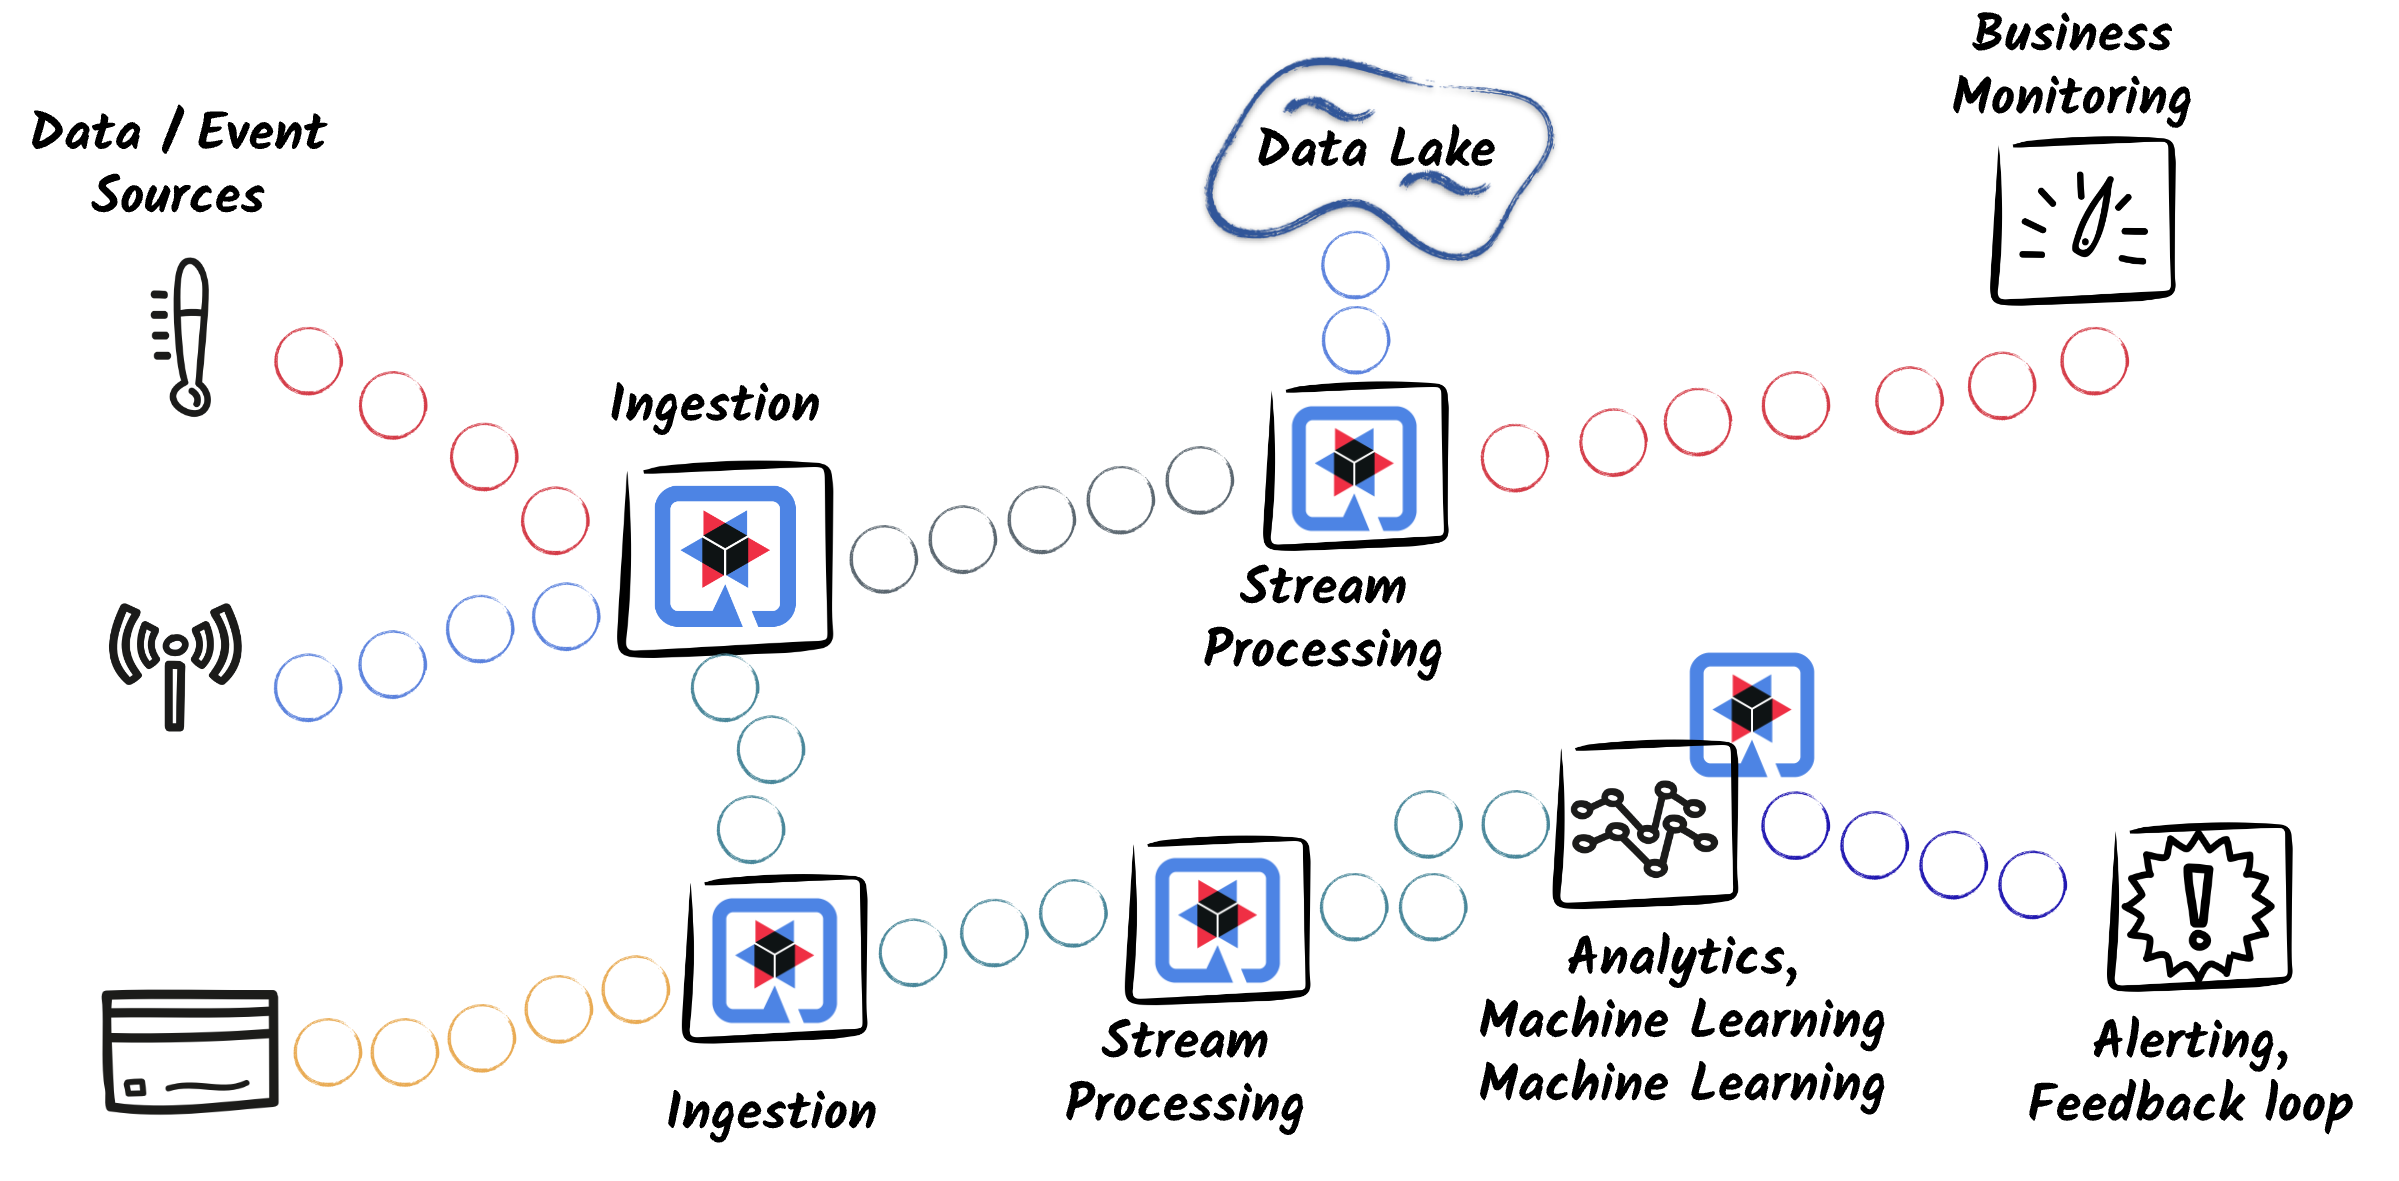
イベント駆動型メッセージングシステムは、ほとんどの最新アプリケーションのバックボーンとなっており、 メッセージ駆動型マイクロサービスや複雑なデータストリーミングパイプラインの構築を可能にしています。
Quarkus は、主要なメッセージングテクノロジーと簡単に同期できるように設計された、包括的なメッセージングエクステンションスイートを提供します。 これにより、開発者はコアアプリケーションロジックの作成に集中でき、個々の API やメッセージングインフラストラクチャーの複雑さに深く入り込む必要がなくなります。
このページでは、すべてのメッセージングエクステンションに共通する機能と開発モデルに焦点を当てています。
これらのエクステンションの一部は、コア Quarkus リポジトリーで管理されています。
-
メッセージング: コアエクステンションは、メッセージングアプリケーションを開発するための基本的な概念と API を定義します。
-
メッセージング - MQTT コネクター
いくつかのエクステンションはコミュニティーによって提供され、維持されています。
JMS コネクター や Google PubSub コネクター などの他のコネクターでは、同じレベルのインテグレーションのメリットが得られず、セットアップには手動での設定がさらに必要となります。
一方、メッセージング関連のエクステンションの中には、低レベルのプロバイダー固有のインテグレーションを提案するものもあります。 このページで説明されているサポートレベルには、これらの低レベルのエクステンションは含まれません。 この種のエクステンションの一部を以下に示します。
Quarkus Messaging 開発モデル
Quarkus は、基盤となるブローカーテクノロジーがメッセージキューイングまたはイベントストリーミングを使用するかどうかに関係なく、メッセージの公開、消費、および処理のための統一モデルを確立することで、メッセージ駆動型アプリケーションの開発を簡素化します。 MicroProfile Reactive Messaging 仕様に基づいてビルドされた Quarkus Messaging エクステンションは、シームレスかつ確実にこれらのテクノロジーと統合します。 重要なのは、これらの機能を活用するために、リアクティブプログラミングを習熟していることが前提条件ではないという点です。
Reactive Messaging 仕様は、イベント駆動型およびメッセージ駆動型のアプリケーションを実装するための CDI ベースのプログラミングモデルを定義します。 少数のアノテーションセットを使用することで、CDI Bean はメッセージブローカーとの対話を実装するための構成要素になります。 これらのやり取りは、アプリケーションコンポーネントがメッセージを読み書きする チャネル を通じて行われます。
チャネル は一意の名前で識別され、一連のアノテーションを使用して宣言されます。
@Incoming および @Outgoing アノテーション
@Incoming および @Outgoing メソッドアノテーションは、メッセージブローカーからのメッセージの消費とメッセージブローカーへのメッセージの生成を可能にする チャネル を定義します。
import jakarta.enterprise.context.ApplicationScoped;

import org.eclipse.microprofile.reactive.messaging.Incoming;
import org.eclipse.microprofile.reactive.messaging.Outgoing;

@ApplicationScoped
public class MessageProcessingBean {

   @Incoming("source")
   @Outgoing("sink")
   public String process(String consumedPayload) {
       // Process the incoming message payload and return an updated payload
       return consumedPayload.toUpperCase();
   }

}
@Outgoing は、メッセージを生成するメソッドで単独で使用できます。
import jakarta.enterprise.context.ApplicationScoped;

import org.eclipse.microprofile.reactive.messaging.Incoming;
import org.eclipse.microprofile.reactive.messaging.Message;
import org.eclipse.microprofile.reactive.messaging.Outgoing;

@ApplicationScoped
public class MessageGeneratorBean {

   @Outgoing("sink")
   public Multi<String> generate() {
       return Multi.createFrom().items("a", "b", "c");
   }

}
@Incoming は、メッセージを消費するために単独で使用できます。
import jakarta.enterprise.context.ApplicationScoped;

import org.eclipse.microprofile.reactive.messaging.Incoming;
import org.eclipse.microprofile.reactive.messaging.Message;
import org.eclipse.microprofile.reactive.messaging.Outgoing;

@ApplicationScoped
public class MessageProcessingBean {

   @Incoming("source")
   public void process(String consumedPayload) {
       // process the payload
       consumedPayload.toUpperCase();
   }

}|
コードから直接 |
サポートされるメソッド署名の詳細は、SmallRye Reactive Messaging – サポートされる署名 を参照してください。
Emitter と @Channel アノテーション
アプリケーションでは、多くの場合、メッセージングをアプリケーションの他の部分と組み合わせる必要があります。たとえば、HTTP エンドポイントからメッセージを生成したり、消費されたメッセージをレスポンスとしてストリーミングしたりする必要があります。
命令型コードから特定のチャネルにメッセージを送信するには、@Channel アノテーションで識別される Emitter オブジェクトを注入する必要があります。
import org.eclipse.microprofile.reactive.messaging.Channel;
import org.eclipse.microprofile.reactive.messaging.Emitter;

@ApplicationScoped
@Path("/")
public class MyImperativeBean {

   @Channel("prices")
   Emitter<Double> emitter;

   @GET
   @Path("/send")
   public CompletionStage<Void> send(double d) {
       return emitter.send(d);
   }
}
@Channel アノテーションを使用すると、ペイロードまたはメッセージを送信するチャネルを指定できます。
Emitter を使用すると、チャネルに送信されたメッセージをバッファリングできます。
さらに制御するには、Mutiny API を使用して、MutinyEmitter エミッターインターフェイスを使用できます。
import io.smallrye.mutiny.Multi;
import io.smallrye.reactive.messaging.MutinyEmitter;

import org.eclipse.microprofile.reactive.messaging.Channel;

@ApplicationScoped
@Path("/")
public class MyImperativeBean {

   @Channel("prices")
   MutinyEmitter<Double> emitter;

   @GET
   @Path("/send")
   public void send(double d) {
       emitter.sendAndAwait(d);
   }

}
@Channel アノテーションは、着信チャネルからのメッセージストリームを注入するためにも使用できます。
import org.eclipse.microprofile.reactive.messaging.Channel;

@ApplicationScoped
@Path("/")
public class SseResource {

    @Channel("prices")
    Multi<Double> prices;

    @GET
    @Path("/prices")
    @RestStreamElementType(MediaType.TEXT_PLAIN)
    public Multi<Double> stream() {
        return prices;
    }

}
@Channel でメッセージを消費する場合、アプリケーションコードがストリームへのサブスクライブを行います。
上記の例では、Quarkus REST (旧称 RESTEasy Reactive) エンドポイントがサブスクリプションを処理します。
エミッターとチャネルの詳細は、SmallRye Reactive Messaging – エミッターとチャネル のドキュメントを参照してください。
メッセージとメタデータ
Message はペイロードを包むエンベロープです。
上記の例ではペイロードのみが使用されていましたが、Quarkus Messaging ではすべてのペイロードが内部的に Message でラップされています。
Message<T> インターフェイスは、<T> タイプのペイロードを Metadata、
任意のオブジェクト、および確認応答 (ack) と否定応答 (nack) のための非同期アクションのセットに関連付けます。
import org.eclipse.microprofile.reactive.messaging.Message;

@Incoming("source")
@Outgoing("sink")
public Message<String> process(Message<String> consumed) {
    // Access the metadata
    MyMetadata my = consumed.getMetadata(MyMetadata.class).get();
    // Process the incoming message and return an updated message
    return consumed.withPayload(consumed.getPayload().toUpperCase());
}
メッセージの処理または受信が成功すると、ブローカーに確認応答が返されます。
メッセージ間の確認応答は連鎖しており、メッセージを処理する際には、
発信メッセージの確認が着信メッセージの確認をトリガーします。
ほとんどの場合、確認応答と否定応答は自動的に管理され、コネクターを使用するとチャネルごとに異なるストラテジーを設定できます。
したがって、通常は Message インターフェイスと直接やり取りする必要はありません。
高度なユースケースでのみ、Message と直接処理する必要があります。
一方、Metadata へのアクセスは、多くの場合に実用的です。
コネクターは、メッセージヘッダー、プロパティー、およびその他のコネクター固有の情報へのアクセスを可能にするために、特定のメタデータオブジェクトをメッセージに追加します。
コネクター固有のメタデータにアクセスするために Message インターフェイスと直接やり取りする必要はありません。
ペイロードパラメーターの後にメタデータオブジェクトをメソッドパラメーターとして注入するだけで済みます。
import org.eclipse.microprofile.reactive.messaging.Metadata;
@Incoming("source")
@Outgoing("sink")
public String process(String payload, MyMetadata my) {
    // Access the metadata
    Map<String, Object> props = my.getProperties();
    // Process the payload and return an updated payload
    return payload.toUpperCase();
}
コネクターに応じて、処理メソッドで使用できるペイロードタイプが異なります。
カスタム MessageConverter を実装して、ペイロードをアプリケーションで受け入れられる型に変換できます。
チャネル設定
チャネル属性は、mp.messaging.incoming.<channel-name> および mp.messaging.outgoing.<channel-name> 設定プロパティーを使用して設定できます。
たとえば、カスタムデシリアライザーを使用して my-topic トピックからのメッセージを消費するように Kafka コネクターを設定するには、以下のようにします。
mp.messaging.incoming.source.connector=smallrye-kafka
mp.messaging.incoming.source.topic=my-topic
mp.messaging.incoming.source.value.deserializer=org.apache.kafka.common.serialization.StringDeserializer
mp.messaging.incoming.source.auto.offset.reset=earliest
connector 属性はすべてのチャネルに必須であり、使用するコネクターを指定します。
クラスパスにコネクターが 1 つしかない場合は、Quarkus が自動的にコネクターを選択するため、この設定を省略できます。
グローバルチャネル属性は、コネクター名を使用して設定できます。
mp.messaging.connector.smallrye-kafka.bootstrap.servers=localhost:9092コネクター固有の属性は、コネクターのドキュメントに記載されています。
チャネルワイヤリングとメッセージングパターン
起動時に、Quarkus は宣言されたチャネルを分析してそれらをワイヤリングし、すべてのチャネルが接続されていることを確認します。 具体的には、各チャネルは、別のチャネルのメッセージの リアクティブストリーム に接続されたメッセージの リアクティブストリーム を作成します。 リアクティブストリームプロトコルに準拠し、チャネル間でバックプレッシャーメカニズムが適用され、アプリケーションリソースの使用を制御し、過剰なコミットやシステムの一部への過負荷を防ぐことができます。
その一方で、実行時にプログラムで新しいチャネルを作成することはできません。 ただし、すべてではないにしても、ほとんどのメッセージングおよびインテグレーションユースケースを実装できるパターンは多数あります。
|
一部のメッセージングテクノロジーでは、コンシューマーがトピックまたはキューのセットをサブスクライブし、プロデューサーがメッセージベースで特定のトピックにメッセージを送信できます。 実行時にクライアントを動的に設定および作成する必要があることが確実な場合は、低レベルのクライアントを直接使用することを検討する必要があります。 |
内部チャネル
ユースケースによっては、メッセージングパターンを使用して同じアプリケーション内でメッセージを転送すると便利です。 チャネルをメッセージングバックエンド、つまりコネクターに接続しない場合は、すべてがアプリケーション内部で行われます。 そして、ストリームはメソッドを連鎖することで作成されます。 各チェーンは引き続きリアクティブストリームで、バックプレッシャープロトコルが適用されます。
フレームワークは、プロデューサー/コンシューマーチェーンが完全であることを確認します。
つまり、アプリケーションがメッセージをインターナルチャネルに書き込む場合 (@Outgoing のみを持つメソッド、または Emitter を使用)、
アプリケーション内からメッセージを消費する必要もあります (@Incoming のみを持つメソッド、またはアンマネージドストリームを使用)。
チャネルを有効化/無効化
定義されたすべてのチャネルはデフォルトで有効化されていますが、以下の設定でチャネルを無効化することもできます。
mp.messaging.incoming.my-channel.enabled=falseこれを Quarkus ビルドプロファイルと一緒に使用して、ターゲット環境などのビルド時の条件に基づいてチャネルを有効化/無効化することができます。 チャネルを無効化するときは、以下の 2 つの点を確認する必要があります。
-
無効化されたチャネルの使用方法が、ビルド時にフィルタリングできる Bean 内に設定されていること。
-
このチャネルがなくても、残りのチャネルが引き続き正常に動作すること。
@ApplicationScoped
@IfBuildProfile("my-profile")
public class MyProfileBean {

    @Outgoing("my-channel")
    public Multi<String> generate() {
        return Multi.createFrom().items("a", "b", "c");
    }

}
一時停止可能なチャネル
注入された @Channel ストリームはデフォルトではサブスクライブされないため、メッセージのフローはリアクティブストリームと Mutiny API を使用してアプリケーションコードによって制御されます。
ただし、@Incoming メソッドの場合、メッセージのフローはランタイムによって制御されます。
一時停止可能なチャネルは、メッセージフローをプログラムで制御するメカニズムを提供します。 これは、ライフサイクルの管理やメンテナンス操作の実行のために、プロデューサーまたはコンシューマーが一時的に停止する必要がある場合に役立ちます。
一時停止可能なチャネルを使用するには、設定プロパティー pausable を true に設定してアクティブ化する必要があります。
mp.messaging.incoming.my-channel.pausable=true
# optional, by default the channel is NOT paused initially
mp.messaging.outgoing.my-channel.initially-paused=true
チャネルが一時停止可能に設定されている場合は、プログラにより ChannelRegistry からチャネル名で PausableChannel を取得し、必要に応じてチャネルを一時停止または再開できます。
import jakarta.annotation.PostConstruct;
import jakarta.enterprise.context.ApplicationScoped;
import jakarta.inject.Inject;

import org.eclipse.microprofile.reactive.messaging.Incoming;

import io.smallrye.reactive.messaging.ChannelRegistry;
import io.smallrye.reactive.messaging.PausableChannel;

@ApplicationScoped
public class PausableController {

    @Inject
    ChannelRegistry registry;

    @PostConstruct
    public void resume() {
        // Wait for the application to be ready
        // Retrieve the pausable channel
        PausableChannel pausable = registry.getPausable("my-channel");
        // Pause the processing of the messages
        pausable.resume();
    }

    public void pause() {
        // Retrieve the pausable channel
        PausableChannel pausable = registry.getPausable("my-channel");
        // Pause the processing of the messages
        pausable.pause();
    }

    @Incoming("my-channel")
    void process(String message) {
        // Process the message
    }

}
この機能はコネクターに依存しておらず、理論的には任意のコネクターをベースとするチャネルで使用できます。 メッセージの消費を一時停止すると、リモートブローカーからメッセージを受信する基礎となるコンシューマーにバックプレッシャーが適用されることに注意してください。
|
Kafka コンシューマーは、トピックパーティションからのメッセージの消費を一時停止および再開するための同様の機能を提供します。 Quarkus Kafka コネクターを使用すると、基盤となるクライアントにアクセス して消費を一時停止/再開できます。 ただし、デフォルトでは、 |
Multiple Outgoings と @Broadcast
デフォルトでは、チャネルで送信されるメッセージは単一のコンシューマーにのみディスパッチされます。 複数のコンシューマーが存在するとエラーとみなされ、デプロイメント時に報告されます。
@Broadcast アノテーションはこの動作を変更し、チャネルを通過するメッセージがすべてのコンシューマーにディスパッチされることを示します。
@Broadcast は @Outgoing アノテーションと一緒に使用する必要があります。
import org.eclipse.microprofile.reactive.messaging.Broadcast;
import org.eclipse.microprofile.reactive.messaging.Outgoing;

@Incoming("in")
@Outgoing("out")
@Broadcast
public int increment(int i) {
    return i + 1;
}

@Incoming("out")
public void consume1(int i) {
    //...
}

@Incoming("out")
public void consume2(int i) {
    //...
}
@Broadcast と同様に、同じメソッドで @Outgoing アノテーションを複数回使用して、このメソッドが複数のチャネルにメッセージを生成することを示すことができます。
import org.eclipse.microprofile.reactive.messaging.Incoming;
import org.eclipse.microprofile.reactive.messaging.Outgoing;

@Incoming("in")
@Outgoing("out1")
@Outgoing("out2")
public String process(String s) {
    // send messages from channel in to both channels out1 and out2
    return s.toUpperCase();
}
Multiple Outgoings を使用すると、単一のメッセージが複数のターゲットチャネルによって処理されるファンアウトパターンを実装する場合に役立ちます。
処理メソッドから Targeted を返すことで、メッセージを複数の送信先に選択的にディスパッチできます。
@Incoming("in")
@Outgoing("out1")
@Outgoing("out2")
@Outgoing("out3")
public Targeted process(double price) {
    // send messages from channel-in to both channel-out1 and channel-out2
    Targeted targeted = Targeted.of("out1", "Price: " + price, "out2", "Quote: " + price);
    if (price > 90.0) {
        return targeted.with("out3", price);
    }
    return targeted;
}
Multiple Incomings と @Merge
デフォルトでは、単一のプロデューサーがチャネル内でメッセージを送信できます。
複数のプロデューサーが存在するとエラーとみなされ、デプロイメント時に報告されます。
@Merge アノテーションはこの動作を変更し、チャネルに複数のプロデューサーが存在する可能性があることを示します。
@Merge は @Incoming アノテーションと一緒に使用する必要があります。
@Incoming("in1")
@Outgoing("out")
public int increment(int i) {
    return i + 1;
}

@Incoming("in2")
@Outgoing("out")
public int multiply(int i) {
    return i * 2;
}

@Incoming("out")
@Merge
public void getAll(int i) {
    //...
}
@Merge と同様に、同じメソッドで @Incoming アノテーションを複数回使用して、メソッドが複数のチャネルからのメッセージを消費することを示すことができます。
@Incoming("in1")
@Incoming("in2")
public String process(String s) {
    // get messages from channel-1 and channel-2
    return s.toUpperCase();
}
ストリーム処理
一部の高度なシナリオでは、個々のメッセージではなく、メッセージのストリームを直接操作できます。
着信署名と発信署名で Mutiny API を使用すると、メッセージのストリームを処理できます。
import io.smallrye.mutiny.Multi;
import org.eclipse.microprofile.reactive.messaging.Incoming;
import org.eclipse.microprofile.reactive.messaging.Outgoing;

@ApplicationScoped
public class StreamProcessor {

    @Incoming("source")
    @Outgoing("sink")
    public Multi<String> process(Multi<String> in) {
        return in.map(String::toUpperCase);
    }

}
実行モデル
Quarkus Messaging は、Quarkus の リアクティブエンジン の上に位置し、Eclipse Vert.x を活用して処理用にメッセージをディスパッチします。以下の 3 つの実行モードをサポートしています。
-
イベントループ: メッセージが Vert.x I/O スレッドにディスパッチされます。 イベントループではブロッキング操作を実行しないでください。
-
ワーカースレッド: メッセージはワーカースレッドプールにディスパッチされます。
-
仮想スレッド: メッセージは仮想スレッドにディスパッチされます (Java 21 以降が必要です)。 仮想スレッドはプールされないため、メッセージごとに新しい仮想スレッドが作成されます。 詳細は、専用の Quarkus Virtual Thread サポート ガイドを参照してください。
Quarkus はメソッド署名に基づいてデフォルトの実行モードを選択します。 メソッド署名が synchronous の場合、メッセージは ワーカースレッド にディスパッチされ、それ以外の場合はデフォルトで イベントループ にディスパッチされます。
| メソッドシグネチャ | デフォルトの実行モード |
|---|---|
@Incoming("source") void process(String payload) |
ワークスレッド |
@Incoming("source") Uni<Void> process(String payload) |
イベントループ |
@Incoming("source") CompletionStage<Void> process(Message<String> message) |
イベントループ |
@Incoming("source") @Outgoing("sink") Multi<R> process(Multi<T> in) |
ストリーム処理メソッドは起動時に実行され、各メッセージはイベントループにディスパッチされます。 |
アノテーションを使用すると、実行モデルを細かく制御できます。
-
@Blockingは、メソッドをワーカースレッドプールで強制的に実行します。ワーカースレッドのデフォルトプールは、すべてのチャネル間で共有されます。@Blocking("my-custom-pool")を使用すると、カスタムスレッドプールでチャネルを設定できます。設定プロパティーsmallrye.messaging.worker.my-custom-pool.max-concurrencyは、プール内のスレッドの最大数を指定します。ブロッキング処理の詳細は、SmallRye Reactive Messaging のドキュメント を参照してください。 -
@NonBlockingは、メソッドをイベントループスレッドで強制的に実行します。 -
@RunOnVirtualThreadは、メソッドを仮想スレッド上で強制的に実行します。仮想スレッドの軽量な性質を活用するために、@RunOnVirtualThreadアノテーションが付けられたメソッドのデフォルトの最大同時実行数は 1024 です。これは、smallrye.messaging.worker.<virtual-thread>.max-concurrency設定プロパティーを設定することで変更できます。または、@Blocking("my-custom-pool")アノテーションと一緒に使用することで変更できます。
@Transactional アノテーションの存在は、実行をブロックすることを意味します。
メッセージングアプリケーションでは、生成および消費されるメッセージは順序付けられたイベントのストリームを構成します。これは、(トピックまたはキュー内に) ブローカーによって強制されるか、アプリケーションの受付および発行の順序によって強制されます。この順序を維持するために、Quarkus Messaging はデフォルトでメッセージを順番にディスパッチします。@Blocking(ordered = false) または @RunOnVirtualThread アノテーションを使用して、この動作をオーバーライドできます。
着信チャネルの同時実行
一部のコネクターは、着信チャネルの同時実行レベルの設定をサポートしています。
mp.messaging.incoming.my-channel.concurrency=4これにより、内部的に着信チャネルのコピーが 4 つ作成され、同じ処理メソッドにワイヤリングされます。これは、ブローカーテクノロジーによっては、異なるコピーで受信されたメッセージの部分的な順序を保持したまま、複数のメッセージを同時に処理することでアプリケーションのスループットを向上させる際に役立つ場合があります。たとえば、複数のコンシューマーが異なるトピックパーティションを消費できる Kafka の場合がこれに該当します。
コンテキスト伝搬
Quarkus Messaging では、異なる処理ステージ間でコンテキストを伝搬するためのデフォルトのメカニズムは、メッセージコンテキスト です。これにより、異なるステージを流れるメッセージとともにコンテキスト情報を渡す一貫した方法が提供されます。
特に Emitter を使用して他のエクステンションと統合する場合、Mutiny のコンテキスト伝搬に依存します。
Mutiny と MicroProfile のコンテキスト伝搬との相互作用
Quarkus のリアクティブプログラミングの基盤である Mutiny は、MicroProfile Context Propagation と統合されています。この統合により、非同期境界を越えてコンテキストを自動的にキャプチャして復元できます。Quarkus と Mutiny のコンテキスト伝搬について詳しくは、Context Propagation ガイドを参照してください。
一貫した動作を確保するため、Quarkus Messaging は、インバウンドまたはアウトバウンドコネクターを介したメッセージディスパッチ中のコンテキスト伝搬を無効にします。これは、Emitter を介してキャプチャされたコンテキストが送信チャネルに伝搬されず、着信チャネルがコンテキストをアクティブ化することによってメッセージをディスパッチしない (例: リクエストコンテキスト) ことを意味します。この動作は、伝搬するコンテキストのタイプをリストすることで、quarkus.messaging.connector-context-propagation 設定プロパティーを使用して設定できます。たとえば、quarkus.messaging.connector-context-propagation=CDI は CDI コンテキストのみを伝搬します。
Emitter によるコンテキスト伝搬
メッセージング Emitter を使用する場合、コンテキストはデフォルトでは伝搬されません。
特定のシナリオでは、内部チャネル を使用して、呼び出し元のコンテキストをメッセージ処理ステージに伝搬したい場合があります。
Quarkus は、メッセージを送信する際にコンテキストを伝搬できる ContextualEmitter (MutinyEmitter および Emitter のドロップイン代替) を提供します。
エミッター メソッドから伝搬されるコンテキストを設定するには、コンテキスト伝搬アノテーション @CurrentThreadContext を使用できます。
このアノテーションは、そのメソッドからキャプチャーされ伝搬されるコンテキストを設定し、プロパゲーターメソッド (つまり、エミッターの呼び出し元) に存在する必要があり、処理メソッドには必要ありません。
RequestScopedBean をリクエストスコープの Bean とすると、ContextualEmitter を使用して、内部チャネル app を介してローカルにメッセージをディスパッチできます。
import jakarta.inject.Inject;
import jakarta.ws.rs.Consumes;
import jakarta.ws.rs.POST;
import jakarta.ws.rs.Path;
import jakarta.ws.rs.core.MediaType;

import org.eclipse.microprofile.reactive.messaging.Channel;

import io.quarkus.logging.Log;
import io.quarkus.smallrye.reactivemessaging.runtime.ContextualEmitter;

@Path("/")
public class Resource {

    @Channel("app")
    ContextualEmitter<String> emitter;

    @Inject
    RequestScopedBean requestScopedBean;

    @POST
    @Path("/send")
    public void send(String message) {
        requestScopedBean.setValue("Hello");
        emitter.sendAndAwait(message);
    }

}すると、実行モデル にかかわらず、メッセージ処理ステージでリクエストスコープの Bean にアクセスできます。
import jakarta.enterprise.context.ApplicationScoped;
import jakarta.inject.Inject;

import org.eclipse.microprofile.reactive.messaging.Incoming;

import io.quarkus.logging.Log;
import io.smallrye.reactive.messaging.annotations.Blocking;


@ApplicationScoped
public class Processor {

    @Inject
    RequestScopedBean requestScopedBean;

    @Incoming("app")
    @Blocking
    public void process(String message) {
        Log.infof("Message %s from request %s", message, requestScopedBean.getValue());
    }

}また、@CurrentThreadContext アノテーションを使用して、伝搬するコンテキストを制御することもできます。次の例は、メッセージ処理ステージにコンテキストを伝搬しない方法を示しています。
import jakarta.inject.Inject;
import jakarta.ws.rs.Consumes;
import jakarta.ws.rs.POST;
import jakarta.ws.rs.Path;
import jakarta.ws.rs.core.MediaType;

import org.eclipse.microprofile.reactive.messaging.Channel;

import io.quarkus.logging.Log;
import io.quarkus.smallrye.reactivemessaging.runtime.ContextualEmitter;

import io.smallrye.mutiny.Uni;
import io.vertx.core.Context;
import io.vertx.core.Vertx;

@Path("/")
public class Resource {

    @Channel("app")
    ContextualEmitter<String> emitter;

    @Inject
    RequestScopedBean requestScopedBean;

    @POST
    @Path("/send")
    @CurrentThreadContext(propagated = {})
    public void send(String message) {
        requestScopedBean.setValue("Hello");
        emitter.sendAndAwait(message);
    }

}|
RequestScoped コンテキストがバインドされる実行コンテキスト (前の例では REST コール) が、そのコンテキストのライフサイクルを制御します。これは、REST コールが完了すると RequestScoped コンテキストが破棄されることを意味します。したがって、REST コールが完了する前に処理またはメッセージディスパッチが完了していることを確認する必要があります。 詳細については、コンテキスト伝搬 ガイドを参照してください。 |
リクエストコンテキストの有効化
場合によっては、ブローカーから消費されたメッセージを処理する際に、リクエストコンテキストをアクティブにする必要があるかもしれません。@Incoming メソッドに @ActivateRequestContext を使用することもオプションですが、そのライフサイクルは Quarkus Messaging メッセージのライフサイクルには従いません。着信チャネルの場合、ビルド時プロパティー quarkus.messaging.request-scoped.enabled=true を使用してリクエストスコープの有効化を有効にできます。これにより、着信チャネルによって処理される各メッセージに対してリクエストコンテキストがアクティブになり、メッセージが処理されるとコンテキストが閉じられます。
ヘルスチェック
SmallRye Health エクステンションと連携して、Quarkus Messaging エクステンションはチャネルごとにヘルスチェックをサポートします。startup、readiness、liveness チェックの実装はコネクターによって異なります。一部のコネクターでは、ヘルスチェックの動作を設定したり、完全にまたはチャネルごとに無効にしたりできます。
チャネルのヘルスチェックは、quarkus.messaging.health.<channel-name>.enabled を使用するか、ヘルスチェックの種類ごとに無効にできます (例: quarkus.messaging.health.<channel-name>.liveness.enabled)。
quarkus.messaging.health.enabled 設定プロパティーを false に設定すると、メッセージングのヘルスチェックが完全に無効になります。
Observability
Micrometer Metrics
Quarkus Messaging エクステンションは、メッセージングシステムのヘルスを監視するためのシンプルかつ便利なメトリクスを提供します。Micrometer エクステンション はこれらのメトリクスを公開します。
channel タグで識別されるチャネルごとに、以下のメトリクスを収集できます。
-
quarkus.messaging.message.count: 生成または受信したメッセージの数 -
quarkus.messaging.message.acks: 正常に処理されたメッセージの数 -
quarkus.messaging.message.failures: 処理に失敗したメッセージの数 -
quarkus.messaging.message.duration: メッセージの処理時間
下位互換性のため、チャネルメトリクスはデフォルトでは有効化されていませんが、smallrye.messaging.observation.enabled=true で有効化することができます。
OpenTelemetry Tracing
一部の Quarkus Messaging コネクターは、OpenTelemetry Tracing とすぐに統合されます。OpenTelemetry エクステンション が存在する場合、発信メッセージは現在のトレーススパンを伝播します。着信チャネルでは、受信したメッセージにトレース情報が含まれている場合、メッセージ処理はメッセージスパンを親として継承します。
次の設定を使用して、特定のチャネルのトレースを無効にすることができます。
mp.messaging.incoming.data.tracing-enabled=falseTLS 設定
一部のメッセージングエクステンションは、Quarkus TLS Registry と統合して、基盤となるクライアントを設定します。チャネルで TLS を設定するには、名前付き TLS 設定を tls-configuration-name プロパティーに指定する必要があります。
quarkus.tls.my-tls-config.trust-store=truststore.jks
quarkus.tls.my-tls-config.trust-store-password=secret
mp.messaging.incoming.my-channel.tls-configuration-name=my-tls-config
または、コネクターのすべてのチャネルでグローバルに設定することもできます。
mp.messaging.connector.smallrye-pulsar.tls-configuration-name=my-tls-config現在、次のメッセージングエクステンションは、Quarkus TLS Registry を介した設定をサポートしています。
-
Kafka: Kafka クライアントに
ssl.engine.factory.classプロパティーを提供します。 -
Pulsar: mTLS 認証のみがサポートされます。
-
RabbitMQ
-
AMQP 1.0
-
MQTT
テスト
Dev Services を使用したテスト
ほとんどの Quarkus Messaging エクステンションは、アプリケーションの開発とテストを簡素化する Dev Service を提供します。Dev Service は、Quarkus Messaging エクステンションですぐに使用できるように設定されたブローカーインスタンスを作成します。
テスト中、Quarkus はテストを実行するために個別のブローカーインスタンスを作成します。
プラットフォームエクステンションによって提供される Dev Services のリストを含む Dev Services の詳細については、 Dev Services ガイドを参照してください。
InMemoryConnector を使用したテスト
ブローカーを起動せずにアプリケーションをテストすると便利です。これを実現するには、コネクターで管理されているチャネルを インメモリー に 切り替える ことができます。
| このアプローチは JVM テストでのみ機能します。ネイティブテストでは (インジェクションをサポートしていないため) 使用できません。 |
以下のサンプルアプリケーションをテストするとします。
import org.eclipse.microprofile.reactive.messaging.Channel;
import org.eclipse.microprofile.reactive.messaging.Emitter;
import org.eclipse.microprofile.reactive.messaging.Incoming;
import org.eclipse.microprofile.reactive.messaging.Message;
import org.eclipse.microprofile.reactive.messaging.Outgoing;

import jakarta.enterprise.context.ApplicationScoped;
import jakarta.inject.Inject;

@ApplicationScoped
public class MyMessagingApplication {

    @Inject
    @Channel("words-out")
    Emitter<String> emitter;

    public void sendMessage(String out) {
        emitter.send(out);
    }

    @Incoming("words-in")
    @Outgoing("uppercase")
    public Message<String> toUpperCase(Message<String> message) {
        return message.withPayload(message.getPayload().toUpperCase());
    }

}
まず、以下のテスト依存関係をアプリケーションに追加します。
<dependency>
    <groupId>io.smallrye.reactive</groupId>
    <artifactId>smallrye-reactive-messaging-in-memory</artifactId>
    <scope>test</scope>
</dependency>testImplementation("io.smallrye.reactive:smallrye-reactive-messaging-in-memory")次に、以下のように Quarkus Test Resource を作成します。
public class InMemoryConnectorLifecycleManager implements QuarkusTestResourceLifecycleManager {

    @Override
    public Map<String, String> start() {
        Map<String, String> env = new HashMap<>();
        Map<String, String> props1 = InMemoryConnector.switchIncomingChannelsToInMemory("words-in");   (1)
        Map<String, String> props2 = InMemoryConnector.switchOutgoingChannelsToInMemory("uppercase");  (2)
        Map<String, String> props3 = InMemoryConnector.switchOutgoingChannelsToInMemory("words-out");  (3)
        env.putAll(props1);
        env.putAll(props2);
        env.putAll(props3);
        return env;  (4)
    }

    @Override
    public void stop() {
        InMemoryConnector.clear();  (5)
    }
}| 1 | 着信チャネル words-in (消費されたメッセージ) を in-memory に切り替えます。 |
| 2 | 発信チャネル words-out (生成されたメッセージ) を in-memory に切り替えます。 |
| 3 | 発信チャネル uppercase (処理済みメッセージ) を in-memory に切り替えます。 |
| 4 | in-memory チャネルを使用するようにアプリケーションを設定するために必要なすべてのプロパティーを含む Map をビルドして返します。 |
| 5 | テストが停止したら、InMemoryConnector をクリアします (受信および送信されたすべてのメッセージを破棄します)。 |
上記で作成したテストリソースを使用して @QuarkusTest を作成します。
import io.quarkus.test.common.QuarkusTestResource;
import io.quarkus.test.junit.QuarkusTest;
import io.smallrye.reactive.messaging.memory.InMemoryConnector;
import io.smallrye.reactive.messaging.memory.InMemorySink;
import io.smallrye.reactive.messaging.memory.InMemorySource;

import org.eclipse.microprofile.reactive.messaging.spi.Connector;
import org.junit.jupiter.api.Test;

import jakarta.inject.Inject;

import static org.junit.jupiter.api.Assertions.assertEquals;
import static org.awaitility.Awaitility.await;

@QuarkusTest
@QuarkusTestResource(InMemoryConnectorLifecycleManager.class)
class MyMessagingApplicationTest {

    @Inject
    @Connector("smallrye-in-memory")
    InMemoryConnector connector; (1)

    @Inject
    MyMessagingApplication app;

    @Test
    void test() {
        InMemorySink<String> wordsOut = connector.sink("words-out"); (2)
        InMemorySource<String> wordsIn = connector.source("words-in"); (3)
        InMemorySink<String> uppercaseOut = connector.sink("uppercase"); (4)

        app.sendMessage("Hello"); (5)
        assertEquals("Hello", wordsOut.received().get(0).getPayload()); (6)

        wordsIn.send("Bonjour"); (7)
        await().untilAsserted(() -> assertEquals("BONJOUR", uppercaseOut.received().get(0).getPayload())); (8)
    }
}| 1 | @Connector または @Any 修飾子を使用して、テストクラスに in-memory コネクターを注入します。 |
| 2 | 発信チャネル (words-out) を取得します。チャネルはテストリソースで in-memory に切り替えられている必要があります。 |
| 3 | 着信チャネル (words-in) を取得します。 |
| 4 | 発信チャネル (uppercase) を取得します。 |
| 5 | 注入されたアプリケーション Bean を使用して sendMessage メソッドを呼び出し、チャネル words-out を持つエミッターを使用してメッセージを送信します。 |
| 6 | アプリケーションによって生成されたメッセージを確認するには、words-out in-memory チャネルで received メソッドを使用します。 |
| 7 | メッセージを送信するには、words-in in-memory チャネルで send メソッドを使用します。アプリケーションはこのメッセージを処理し、uppercase チャネルにメッセージを送信します。 |
| 8 | アプリケーションによって生成されたメッセージを確認するには、uppercase チャネルで received メソッドを使用します。 |
|
in-memory コネクターはテスト目的のみに使用されます。in-memory コネクターを使用する際に考慮すべきいくつかの注意点があります。
テストがコンテキストの伝播に依存している場合、 |
チャネルデコレーター
チャネルデコレーター は、メッセージングチャネルに対応するリアクティブストリームをインターセプトおよびデコレートする方法です。これは、ロギング、メトリクス、エラー処理など、チャネルにカスタム動作を追加するのに役立ちます。
したがって、着信チャネルには PublisherDecorator を実装する Bean を、発信チャネルには SubscriberDecorator を実装する Bean を実装することが可能です。両方の API は対称的であるため、同じ Bean で両方のインターフェースを実装できます。これらの Bean は Quarkus によって自動的に検出され、優先度 (最小値から最大値へ) に従って適用されます。
一部のデコレーターは、Quarkus エクステンションによってデフォルトで含まれています。
着信チャネル (PublisherDecorator) の優先順位:
-
io.quarkus.smallrye.reactivemessaging.runtime.ConnectorContextPropagationDecorator(-100): 着信チャネルのコンテキスト伝播をクリアします。 -
io.smallrye.reactive.messaging.providers.locals.ContextDecorator(0): メッセージがメッセージコンテキストでディスパッチされることを保証します。 -
io.quarkus.smallrye.reactivemessaging.runtime.RequestScopedDecorator(100): 一時停止可能なチャネルを処理します。 -
io.smallrye.reactive.messaging.providers.IncomingInterceptorDecorator(500):IncomingInterceptorBean を処理します。 -
io.smallrye.reactive.messaging.providers.metrics.MicrometerDecorator(1000):quarkus-micrometerエクステンションで有効化される Micrometer Metrics サポート。 -
io.smallrye.reactive.messaging.providers.extension.ObservationDecorator(1000): 着信チャネルのメッセージ監視サポート。 -
io.smallrye.reactive.messaging.providers.extension.PausableChannelDecorator(1000): 一時停止可能なチャネルを処理します。 -
io.quarkus.opentelemetry.runtime.tracing.intrumentation.reactivemessaging.ReactiveMessagingTracingIncomingDecorator(1000):quarkus-opentelemetryエクステンションに含まれ、トレース情報を伝播します。
発信チャネル (SubscriberDecorator):
-
io.quarkus.smallrye.reactivemessaging.runtime.ConnectorContextPropagationDecorator(-100): 発信チャネルのコンテキスト伝播をクリアします。 -
io.smallrye.reactive.messaging.providers.extension.OutgoingObservationDecorator(1000): 発信チャネルのメッセージ監視サポート。 -
io.smallrye.reactive.messaging.providers.extension.PausableChannelDecorator(1000): 一時停止可能なチャネルを処理します。 -
io.quarkus.opentelemetry.runtime.tracing.intrumentation.reactivemessaging.ReactiveMessagingTracingOutgoingDecorator(1000):quarkus-opentelemetryエクステンションに含まれ、トレース情報を伝播します。 -
io.smallrye.reactive.messaging.providers.OutgoingInterceptorDecorator(2000):OutgoingInterceptorBean を処理します。
さらに詳しく
このガイドでは、Quarkus Messaging エクステンションの一般的な原則について説明します。
さらに詳しく知りたい場合は、SmallRye Reactive Messaging のドキュメントを確認できます。 これには、これらの各コンセプトなどに関する詳細なドキュメントが含まれています。