AMQP 1.0を使用したQuarkusのメッセージング入門
このガイドでは、QuarkusアプリケーションがQuarkus Messagingを利用してAMQP 1.0とやり取りする方法を示します。
| RabbitMQを使用する場合は、 Quarkus Messaging RabbitMQエクステンション を使用してください。 または、RabbitMQをAMQP 1.0で使用する場合は、RabbitMQブローカでAMQP 1.0プラグインを有効にする必要があります。 RabbitMQへの接続 ドキュメントを参照してください。 |
前提条件
このガイドを完成させるには、以下が必要です:
-
約15分
-
IDE
-
JDK 17+がインストールされ、
JAVA_HOMEが適切に設定されていること -
Apache Maven 3.9.16
-
Docker と Docker Compose、または Podman 、および Docker Compose
-
使用したい場合は、 Quarkus CLI
-
ネイティブ実行可能ファイルをビルドしたい場合、MandrelまたはGraalVM(あるいはネイティブなコンテナビルドを使用する場合はDocker)をインストールし、 適切に設定していること
アーキテクチャ
このガイドでは、AMQP ブローカーと通信する 2 つのアプリケーションを開発します。 Artemis を使用しますが、任意の AMQP 1.0 ブローカーを使用できます。最初のアプリケーションは quote request を AMQP キューに送信し、 quote queue からのメッセージを消費します。2 番目のアプリケーションは quote request を受信し、quote back を送信します。
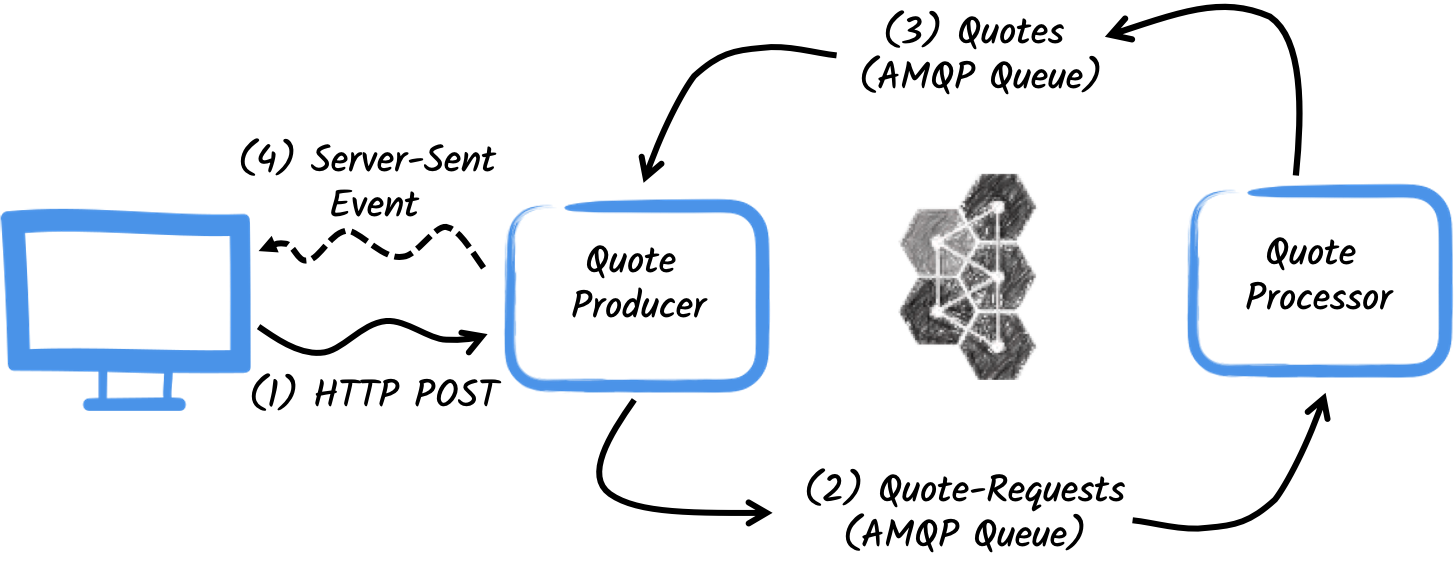
最初のアプリケーションである producer は、ユーザーが HTTP エンドポイントを介していくつかの見積りをリクエストできるようにします。見積りリクエストごとにランダムな識別子が生成されてユーザーに返され、見積りリクエストを pending とします。同時に、生成されたリクエスト ID は quote-requests キューに送信されます。
次に、2 番目のアプリケーションである processor は、 quote-requests キューから読み取り、見積もりにランダムな価格を設定し、 quotes という名前のキューに送信します。
最後に、 producer は見積りを読み取り、サーバーから送信されたイベントを使用してこれらをブラウザーに送信します。したがって、ユーザーには、見積り価格が pending から受信した価格にリアルタイムで更新されていることがわかります。
Maven プロジェクトの作成
まず、プロデューサー と プロセッサー の 2 つのプロジェクトを作成する必要があります。
ターミナルで プロデューサー プロジェクトを作成するには、次のコマンドを実行します。
Windowsユーザーの場合:
-
cmdを使用する場合、(バックスラッシュ
\を使用せず、すべてを同じ行に書かないでください)。 -
Powershellを使用する場合は、
-Dパラメータを二重引用符で囲んでください。例:"-DprojectArtifactId=amqp-quickstart-producer"
このコマンドは、プロジェクト構造を作成し、使用する 2 つの Quarkus エクステンションを選択します。
-
Quarkus REST(旧RESTEasy Reactive)と、そのJacksonサポートによるJSONペイロードの処理
-
Reactive Messaging AMQP コネクター
同じディレクトリーから processor プロジェクトを作成するには、次のコマンドを実行します。
Windowsユーザーの場合:
-
cmdを使用する場合、(バックスラッシュ
\を使用せず、すべてを同じ行に書かないでください)。 -
Powershellを使用する場合は、
-Dパラメータを二重引用符で囲んでください。例:"-DprojectArtifactId=amqp-quickstart-processor"
その時点で、次の構造になっているはずです。
.
├── amqp-quickstart-processor
│  ├── README.md
│  ├── mvnw
│  ├── mvnw.cmd
│  ├── pom.xml
│  └── src
│     └── main
│        ├── docker
│        ├── java
│        └── resources
│           └── application.properties
└── amqp-quickstart-producer
   ├── README.md
   ├── mvnw
   ├── mvnw.cmd
   ├── pom.xml
   └── src
      └── main
         ├── docker
         ├── java
         └── resources
            └── application.properties
お好きな IDE で 2 つのプロジェクトを開きます。
見積りオブジェクト
Quote クラスは、 producer および processor の両方のプロジェクトで使用されます。簡単にするために、ここではクラスを複製します。どちらのプロジェクトでも、次の内容の src/main/java/org/acme/amqp/model/Quote.java ファイルを作成します。
package org.acme.amqp.model;

import io.quarkus.runtime.annotations.RegisterForReflection;

@RegisterForReflection
public class Quote {

    public String id;
    public int price;

    /**
    * Default constructor required for Jackson serializer
    */
    public Quote() { }

    public Quote(String id, int price) {
        this.id = id;
        this.price = price;
    }

    @Override
    public String toString() {
        return "Quote{" +
                "id='" + id + '\'' +
                ", price=" + price +
                '}';
    }
}
Quote オブジェクトの JSON 表現は、AMQP キューに送信されるメッセージ、およびブラウザークライアントに送信されるサーバー送信イベントで使用されます。
Quarkus には、JSON AMQP メッセージを扱う機能が組み込まれています。
|
@RegisterForReflection
|
見積りリクエストの送信
producer プロジェクト内で、生成された src/main/java/org/acme/amqp/producer/QuotesResource.java ファイルを見つけ、コンテンツを次のように更新します。
package org.acme.amqp.producer;

import java.util.UUID;

import jakarta.ws.rs.GET;
import jakarta.ws.rs.POST;
import jakarta.ws.rs.Path;
import jakarta.ws.rs.Produces;
import jakarta.ws.rs.core.MediaType;

import org.acme.amqp.model.Quote;
import org.eclipse.microprofile.reactive.messaging.Channel;
import org.eclipse.microprofile.reactive.messaging.Emitter;

import io.smallrye.mutiny.Multi;

@Path("/quotes")
public class QuotesResource {

    @Channel("quote-requests") Emitter<String> quoteRequestEmitter; (1)

    /**
     * Endpoint to generate a new quote request id and send it to "quote-requests" AMQP queue using the emitter.
     */
    @POST
    @Path("/request")
    @Produces(MediaType.TEXT_PLAIN)
    public String createRequest() {
        UUID uuid = UUID.randomUUID();
        quoteRequestEmitter.send(uuid.toString()); (2)
        return uuid.toString();
    }
}| 1 | リアクティブメッセージングの Emitter を挿入して、 quote-requests チャネルにメッセージを送信します。 |
| 2 | ポストリクエストで、ランダムな UUID を生成し、エミッターを使用してこれを AMQP キューに送信します。 |
quote-requests チャネルは AMQP キューとして管理されます。これは、クラスパス上の唯一のコネクターであるためです。特に明記されていない限り、この例のように、Quarkus はチャネル名を AMQP キュー名として使用します。したがって、この例では、アプリケーションはメッセージを quote-requests キューに送信します。
| 複数のコネクターがある場合は、アプリケーション設定で使用するコネクターを指定する必要があります。 |
見積りリクエストの処理
ここでは、見積りリクエストを使用して価格を提示します。 processor プロジェクト内で、 src/main/java/org/acme/amqp/processor/QuoteProcessor.java ファイルを見つけ、以下を追加します。
package org.acme.amqp.processor;

import java.util.Random;

import jakarta.enterprise.context.ApplicationScoped;

import org.acme.amqp.model.Quote;
import org.eclipse.microprofile.reactive.messaging.Incoming;
import org.eclipse.microprofile.reactive.messaging.Outgoing;

import io.smallrye.reactive.messaging.annotations.Blocking;

/**
 * A bean consuming data from the "request" AMQP queue and giving out a random quote.
 * The result is pushed to the "quotes" AMQP queue.
 */
@ApplicationScoped
public class QuoteProcessor {

    private Random random = new Random();

    @Incoming("requests")       (1)
    @Outgoing("quotes")         (2)
    @Blocking                   (3)
    public Quote process(String quoteRequest) throws InterruptedException {
        // simulate some hard-working task
        Thread.sleep(200);
        return new Quote(quoteRequest, random.nextInt(100));
    }
}| 1 | メソッドが requests チャネルからのアイテムを消費することを示します。 |
| 2 | メソッドによって返されるオブジェクトが quotes チャネルに送信されることを示します。 |
| 3 | 処理が blocking であり、呼び出し元のスレッドで実行できないことを示します。 |
process メソッドは、 quote-requests キューからのすべての AMQP メッセージに対して呼び出され、 Quote オブジェクトを quotes キューに送信します。
quotes-requests キューから requests チャネルへメッセージを消費したいので、この関連付けを設定する必要があります。 src/main/resources/application.properties ファイルを開き、以下を追加します。
mp.messaging.incoming.requests.address=quote-requests設定プロパティは以下のような構造になっています:
mp.messaging.[outgoing|incoming].{channel-name}.property=value
この例では、キューの名前を示すように address 属性を設定します。
見積りの受信
producer プロジェクトに戻ります。引用符を使用するように QuotesResource を変更し、それを HTTP エンドポイントにバインドして、クライアントにイベントを送信しましょう。
import io.smallrye.mutiny.Multi;
//...

@Channel("quotes") Multi<Quote> quotes;     (1)

/**
 * Endpoint retrieving the "quotes" queue and sending the items to a server sent event.
 */
@GET
@Produces(MediaType.SERVER_SENT_EVENTS) (2)
public Multi<Quote> stream() {
    return quotes; (3)
}| 1 | @Channel アノテーションを使用して quotes チャネルを挿入します。 |
| 2 | Server Sent Events を使用してコンテンツが送信されたことを示します。 |
| 3 | ストリーム (Reactive Stream) を返します。 |
HTML ページ
最後に、SSE を使って変換された価格を読み込む HTML ページです。
producer プロジェクト内に、次の内容で src/main/resources/META-INF/resources/quotes.html ファイルを作成します。
<!DOCTYPE html> <html lang="en"> <head> <meta charset="UTF-8"> <title>Quotes</title>
<link rel="stylesheet" type="text/css"
href="https://cdnjs.cloudflare.com/ajax/libs/patternfly/3.24.0/css/patternfly.min.css">
<link rel="stylesheet" type="text/css"
href="https://cdnjs.cloudflare.com/ajax/libs/patternfly/3.24.0/css/patternfly-additions.min.css">
</head>
<body>
<div class="container">
<div class="card">
<div class="card-body">
<h2 class="card-title">Quotes</h2>
<button class="btn btn-info" id="request-quote">Request Quote</button>
<div class="quotes"></div>
</div>
</div>
</div>
</body>
<script src="https://code.jquery.com/jquery-3.6.0.min.js"></script>
<script>
$("#request-quote").click((event) => {
fetch("/quotes/request", {method: "POST"})
.then(res => res.text())
.then(qid => {
var row = $(`<h4 class='col-md-12' id='${qid}'>Quote # <i>${qid}</i> | <strong>Pending</strong></h4>`);
$(".quotes").append(row);
});
});
var source = new EventSource("/quotes");
source.onmessage = (event) => {
var json = JSON.parse(event.data);
$(`#${json.id}`).html(function(index, html) {
return html.replace("Pending", `\$\xA0${json.price}`);
});
};
</script>
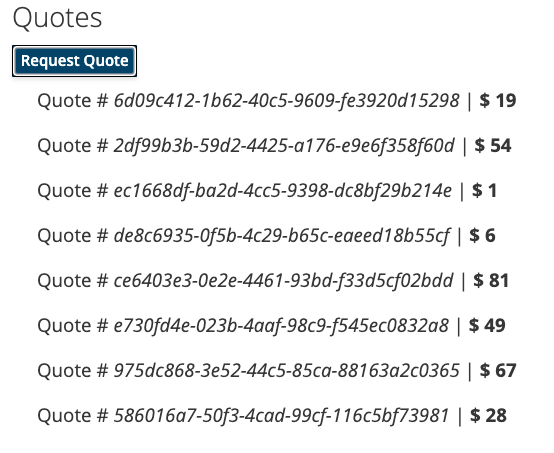
</html>ここでは、特筆すべきものは何もありません。受け取った見積もりごとに、ページが更新されます。
実行
以下を使用して両方のアプリケーションを実行する必要があります。
> mvn -f amqp-quickstart-producer quarkus:devそして、別の端末で以下を実行します。
> mvn -f amqp-quickstart-processor quarkus:devQuarkus は AMQP ブローカーを自動的に起動し、アプリケーションを設定して、異なるアプリケーション間でブローカーインスタンスを共有します。詳細については、Dev Services for AMQP を参照してください。
ブラウザーで http://localhost:8080/quotes.html を開き、ボタンをクリックして見積りをリクエストします。
JVM またはネイティブモードでの実行
開発モードまたはテストモードで実行していない場合は、AMQP ブローカーを起動する必要があります。 Apache ActiveMQ Artemis website の指示に従うか、以下のコンテンツで docker-compose.yaml ファイルを作成することができます。
version: '2'

services:

  artemis:
    image: quay.io/artemiscloud/activemq-artemis-broker:1.0.25
    ports:
      - "8161:8161"
      - "61616:61616"
      - "5672:5672"
    environment:
      AMQ_USER: quarkus
      AMQ_PASSWORD: quarkus
    networks:
      - amqp-quickstart-network

  producer:
    image: quarkus-quickstarts/amqp-quickstart-producer:1.0-${QUARKUS_MODE:-jvm}
    build:
      context: amqp-quickstart-producer
      dockerfile: src/main/docker/Dockerfile.${QUARKUS_MODE:-jvm}
    environment:
      AMQP_HOST: artemis
      AMQP_PORT: 5672
    ports:
      - "8080:8080"
    networks:
      - amqp-quickstart-network

  processor:
    image: quarkus-quickstarts/amqp-quickstart-processor:1.0-${QUARKUS_MODE:-jvm}
    build:
      context: amqp-quickstart-processor
      dockerfile: src/main/docker/Dockerfile.${QUARKUS_MODE:-jvm}
    environment:
      AMQP_HOST: artemis
      AMQP_PORT: 5672
    networks:
      - amqp-quickstart-network

networks:
  amqp-quickstart-network:
    name: amqp-quickstart
AMQP ブローカーの場所がどのように設定されているかに注意してください。 amqp.host および amqp.port (AMQP_HOST および AMQP_PORT 環境変数) プロパティーは場所を設定します。
まず、アプリケーションを停止したことを確認し、次のコマンドを使用して両方のアプリケーションを JVM モードでビルドします。
> mvn -f amqp-quickstart-producer clean package
> mvn -f amqp-quickstart-processor clean package
パッケージ化したら、 docker compose up --build を実行します。UI は http://localhost:8080/quotes.html で公開されています
アプリケーションをネイティブとして実行するには、最初にネイティブ実行可能ファイルをビルドする必要があります。
> mvn -f amqp-quickstart-producer package -Dnative  -Dquarkus.native.container-build=true
> mvn -f amqp-quickstart-processor package -Dnative -Dquarkus.native.container-build=true
-Dquarkus.native.container-build=true は、コンテナー内で実行できる Linux 64 ビットのネイティブ実行可能ファイルをビルドするように Quarkus に指示します。次に、以下を使用してシステムを実行します。
> export QUARKUS_MODE=native
> docker compose up --build
以前と同様に、UI は http://localhost:8080/quotes.html で公開されています
詳細
このガイドでは、Quarkus を使用して AMQP 1.0 とやりとりする方法を示しました。 SmallRye Reactive Messaging を使用して、データストリーミングアプリケーションを構築します。
Kafka クイックスタートを実行した場合、それが同じコードであることに気づいたはずです。唯一の違いは、コネクター設定と JSON マッピングです。