Getting started with Quarkus Messaging and Apache Kafka
In this guide, you will build two applications that exchange messages through Apache Kafka using Quarkus Messaging: a producer that sends quote requests and a processor that replies with prices.
前提条件
このガイドを完成させるには、以下が必要です:
-
約15分
-
IDE
-
JDK 17+がインストールされ、
JAVA_HOMEが適切に設定されていること -
Apache Maven 3.9.16
-
Docker と Docker Compose、または Podman 、および Docker Compose
-
使用したい場合は、 Quarkus CLI
-
ネイティブ実行可能ファイルをビルドしたい場合、MandrelまたはGraalVM(あるいはネイティブなコンテナビルドを使用する場合はDocker)をインストールし、 適切に設定していること
アーキテクチャ
The two applications communicate via Kafka. The first application sends a quote request to Kafka and consumes Kafka messages from the quote topic. The second application receives the quote request and sends a quote back.
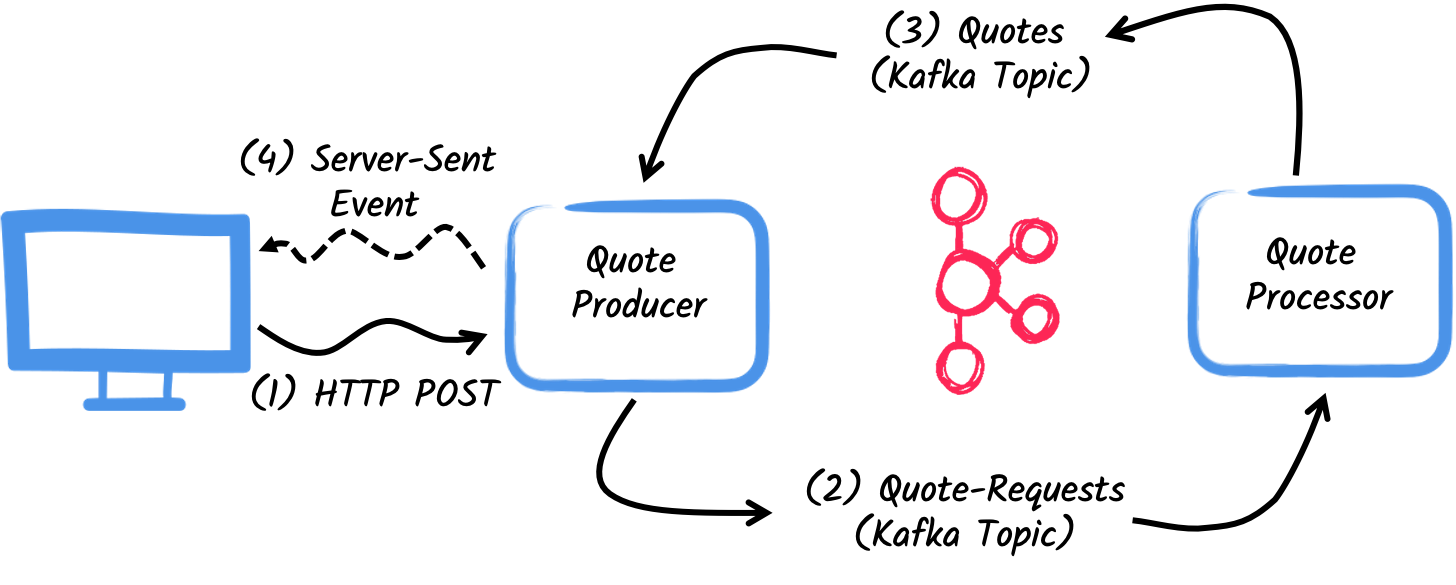
1つ目のアプリケーションである プロデューサー は、ユーザーが HTTP エンドポイントを介していくつかの見積をリクエストできるようにします。見積リクエストごとにランダムな識別子が生成されてユーザーに返され、見積リクエストを 保留 としてマークします。同時に、生成されたリクエスト ID は Kafka トピック quote-requests を介して送信されます。
2 つ目のアプリケーションである processor は、 quote-requests トピックから読み取り、見積にランダムな価格を設定し、 quotes という名前の Kafka トピックに送信します。
最後に、プロデューサー は見積を読み取り、サーバーから送信されたイベントを使用してブラウザーに送信します。したがって、ユーザーには、見積価格が 保留 から受信した価格にリアルタイムで更新されていることがわかります。
ソリューション
Follow the instructions below to create the applications step by step. You can also go directly to the completed example.
git clone https://github.com/quarkusio/quarkus-quickstarts.git で Git リポジトリーをクローンします。または、https://github.com/quarkusio/quarkus-quickstarts/archive/main.zip[アーカイブ] をダウンロードします。
ソリューションは kafka-quickstart ディレクトリ にあります。
Mavenプロジェクトの作成
First, create two projects: the producer and the processor.
producer プロジェクトを作成するには、ターミナルで次のように実行します:
Windowsユーザーの場合:
-
cmdを使用する場合、(バックスラッシュ
\を使用せず、すべてを同じ行に書かないでください)。 -
Powershellを使用する場合は、
-Dパラメータを二重引用符で囲んでください。例:"-DprojectArtifactId=kafka-quickstart-producer"
This command creates the project structure and selects two Quarkus extensions:
-
Quarkus REST (以前の RESTEasy Reactive) とその Jackson サポート (JSON を処理するため) による HTTP エンドポイントの提供。
-
リアクティブメッセージング用の Kafka コネクター
processor プロジェクトを作成するには、同じディレクトリから、次のように実行します:
Windowsユーザーの場合:
-
cmdを使用する場合、(バックスラッシュ
\を使用せず、すべてを同じ行に書かないでください)。 -
Powershellを使用する場合は、
-Dパラメータを二重引用符で囲んでください。例:"-DprojectArtifactId=kafka-quickstart-processor"
その時点で、次の構造になっているはずです。
.
├── kafka-quickstart-processor
│  ├── README.md
│  ├── mvnw
│  ├── mvnw.cmd
│  ├── pom.xml
│  └── src
│     └── main
│        ├── docker
│        ├── java
│        └── resources
│           └── application.properties
└── kafka-quickstart-producer
   ├── README.md
   ├── mvnw
   ├── mvnw.cmd
   ├── pom.xml
   └── src
      └── main
         ├── docker
         ├── java
         └── resources
            └── application.properties
Open the two projects in your IDE.
|
Dev Services
No need to start a Kafka broker in dev mode or for tests. Quarkus starts one automatically. See Dev Services for Kafka for details. |
見積オブジェクト
The Quote class is used in both the producer and processor projects.
For simplicity, duplicate the class.
In both projects, create the src/main/java/org/acme/kafka/model/Quote.java file, with the following content:
package org.acme.kafka.model;

public class Quote {

    public String id;
    public int price;

    /**
    * Default constructor required for Jackson serializer
    */
    public Quote() { }

    public Quote(String id, int price) {
        this.id = id;
        this.price = price;
    }

    @Override
    public String toString() {
        return "Quote{" +
                "id='" + id + '\'' +
                ", price=" + price +
                '}';
    }
}
JSON representation of Quote objects will be used in messages sent to the Kafka topic
and also in the server-sent events sent to web browsers.
Quarkus has built-in capabilities to deal with JSON Kafka messages and automatically generates the required serializers and deserializers.
見積もり依頼の送信
プロデューサー プロジェクト内に、 src/main/java/org/acme/kafka/producer/QuotesResource.java ファイルを作成し、次のコンテンツを追加します。
package org.acme.kafka.producer;

import java.util.UUID;

import jakarta.ws.rs.POST;
import jakarta.ws.rs.Path;
import jakarta.ws.rs.Produces;
import jakarta.ws.rs.core.MediaType;

import org.eclipse.microprofile.reactive.messaging.Channel;
import org.eclipse.microprofile.reactive.messaging.Emitter;

@Path("/quotes")
public class QuotesResource {

    @Channel("quote-requests")
    Emitter<String> quoteRequestEmitter; (1)

    /**
     * Endpoint to generate a new quote request id and send it to "quote-requests" Kafka topic using the emitter.
     */
    @POST
    @Path("/request")
    @Produces(MediaType.TEXT_PLAIN)
    public String createRequest() {
        UUID uuid = UUID.randomUUID();
        quoteRequestEmitter.send(uuid.toString()); (2)
        return uuid.toString(); (3)
    }
}| 1 | Reactive Messaging Emitter を注入して、 quote-requests チャンネルにメッセージを送信します。 |
| 2 | ポストリクエストで、ランダムな UUID を生成し、エミッターを使用してそれを Kafka トピックに送信します。 |
| 3 | 同じ UUID をクライアントに返します。 |
The quote-requests channel is managed as a Kafka topic, as that’s the only connector on the classpath.
If not indicated otherwise, like in this example, Quarkus uses the channel name as topic name.
So, in this example, the application writes into the quote-requests topic.
Quarkus also configures the serializer automatically, because it finds that the Emitter produces String values.
| When you have multiple connectors, you need to indicate which connector to use in the application configuration. |
見積依頼の処理
Now consume the quote request and give out a price.
Inside the processor project, create the src/main/java/org/acme/kafka/processor/QuotesProcessor.java file and add the following content:
package org.acme.kafka.processor;

import java.util.Random;

import jakarta.enterprise.context.ApplicationScoped;

import org.acme.kafka.model.Quote;
import org.eclipse.microprofile.reactive.messaging.Incoming;
import org.eclipse.microprofile.reactive.messaging.Outgoing;

import io.smallrye.reactive.messaging.annotations.Blocking;

/**
 * A bean consuming data from the "quote-requests" Kafka topic (mapped to "requests" channel) and giving out a random quote.
 * The result is pushed to the "quotes" Kafka topic.
 */
@ApplicationScoped
public class QuotesProcessor {

    private Random random = new Random();

    @Incoming("requests") (1)
    @Outgoing("quotes")   (2)
    @Blocking             (3)
    public Quote process(String quoteRequest) throws InterruptedException {
        // simulate some hard working task
        Thread.sleep(200);
        return new Quote(quoteRequest, random.nextInt(100));
    }
}| 1 | メソッドが requests チャネルからのアイテムを消費することを示します。 |
| 2 | メソッドによって返されるオブジェクトが quotes チャネルに送信されることを示します。 |
| 3 | 処理が blocking であり、呼び出し元のスレッドでは実行できないことを示します。 |
For every Kafka record from the quote-requests topic, Reactive Messaging calls the process method, and sends the returned Quote object to the quotes channel.
In this case, configure the channels in the application.properties file:
%dev.quarkus.http.port=8081

# Configure the incoming `quote-requests` Kafka topic
mp.messaging.incoming.requests.topic=quote-requests
mp.messaging.incoming.requests.auto.offset.reset=earliest
設定プロパティは以下のような構造になっています:
mp.messaging.[outgoing|incoming].{channel-name}.property=value
channel-name セグメントは、 @Incoming および @Outgoing アノテーションで設定された値と一致する必要があります。
-
quote-requests→ Kafka topic from which the quote requests are read -
quotes→ Kafka topic to which the quotes are written
|
この設定の詳細については、Kafka ドキュメントの プロデューサー設定 and コンシューマー設定 セクションを参照してください。これらのプロパティーは、 |
mp.messaging.incoming.requests.auto.offset.reset=earliest instructs the application to start reading the topics from the first offset, when there is no committed offset for the consumer group.
In other words, it will also process messages sent before the processor application started.
シリアライザーまたはデシリアライザーを設定する必要はありません。Quarkus はそれらを検出し、何も見つからない場合は、JSON シリアル化を使用してそれらを生成します。
見積の受け取り
Back to the producer project.
Modify the QuotesResource to consume quotes from Kafka and send them back to the client via Server-Sent Events:
import io.smallrye.mutiny.Multi;

...

@Channel("quotes")
Multi<Quote> quotes; (1)

/**
 * Endpoint retrieving the "quotes" Kafka topic and sending the items to a server sent event.
 */
@GET
@Produces(MediaType.SERVER_SENT_EVENTS) (2)
public Multi<Quote> stream() {
    return quotes; (3)
}| 1 | @Channel 修飾子を使用して quotes のチャネルを注入します |
| 2 | Server Sent Events を使用してコンテンツが送信されたことを示します。 |
| 3 | ストリーム (Reactive Stream) を返します。 |
Quarkus は quotes チャネルを quotes Kafka トピックに自動的に関連付けるため、何も設定する必要はありません。また、 Quote クラスのデシリアライザーも生成します。
|
Kafka でのメッセージのシリアライズ
この例では、Jackson を使用して Kafka メッセージをシリアライズ/デシリアライズしました。メッセージのシリアルライズに関するその他のオプションについては、Kafka リファレンスガイド - シリアル化 を参照してください。 A contract-first approach using a schema registry is strongly recommended. See the Using Apache Kafka with Schema Registry and Avro guide or the Using Apache Kafka with Schema Registry and JSON Schema guide. |
HTMLページ
The final piece is an HTML page that requests quotes and displays the prices received over SSE.
プロデューサー プロジェクト内に、次の内容で src/main/resources/META-INF/resources/quotes.html ファイルを作成します。
<!DOCTYPE html>
<html lang="en">
<head>
    <meta charset="UTF-8">
    <title>Prices</title>

    <link rel="stylesheet" type="text/css"
          href="https://cdnjs.cloudflare.com/ajax/libs/patternfly/3.24.0/css/patternfly.min.css">
    <link rel="stylesheet" type="text/css"
          href="https://cdnjs.cloudflare.com/ajax/libs/patternfly/3.24.0/css/patternfly-additions.min.css">
</head>
<body>
<div class="container">
    <div class="card">
        <div class="card-body">
            <h2 class="card-title">Quotes</h2>
            <button class="btn btn-info" id="request-quote">Request Quote</button>
            <div class="quotes"></div>
        </div>
    </div>
</div>
</body>
<script src="https://code.jquery.com/jquery-3.6.0.min.js"></script>
<script>
    $("#request-quote").click((event) => {
        fetch("/quotes/request", {method: "POST"})
        .then(res => res.text())
        .then(qid => {
            var row = $(`<h4 class='col-md-12' id='${qid}'>Quote # <i>${qid}</i> | <strong>Pending</strong></h4>`);
            $(".quotes").prepend(row);
        });
    });

    var source = new EventSource("/quotes");
    source.onmessage = (event) => {
      var json = JSON.parse(event.data);
      $(`#${json.id}`).html((index, html) => {
        return html.replace("Pending", `\$\xA0${json.price}`);
      });
    };
</script>
</html>
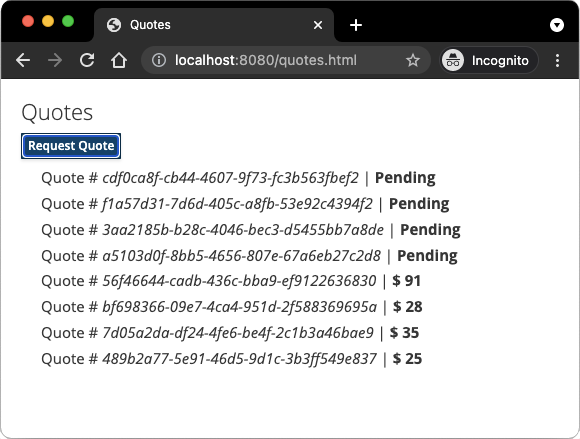
When the user clicks the button, an HTTP request is made to request a quote, and a pending quote is added to the list. On each quote received over SSE, the corresponding item in the list is updated.
実行
Run both applications. In one terminal, run:
mvn -f producer quarkus:dev別の端末で、次を実行します。
mvn -f processor quarkus:devQuarkus は、Kafka ブローカーを自動的に起動し、アプリケーションを設定して、異なるアプリケーション間で Kafka ブローカーインスタンスを共有します。詳細については、Dev Services for Kafka を参照してください。
http://localhost:8080/quotes.html をブラウザで開き、ボタンをクリックして見積を依頼してください。
JVM またはネイティブモードでの実行
開発モードまたはテストモードで実行していない場合は、Kafka ブローカーを起動する必要があります。 Apache Kafka Web サイト に記載された手順に従うか、次の内容で docker-compose.yaml ファイルを作成できます。
services:

  kafka:
    image: quay.io/strimzi/kafka:latest-kafka-4.1.0
    command: [
      "sh", "-c",
      "./bin/kafka-storage.sh format --standalone -t $$(./bin/kafka-storage.sh random-uuid) -c ./config/server.properties && ./bin/kafka-server-start.sh ./config/server.properties --override advertised.listeners=$${KAFKA_ADVERTISED_LISTENERS}"
    ]
    ports:
      - "9092:9092"
    environment:
      LOG_DIR: "/tmp/logs"
      KAFKA_ADVERTISED_LISTENERS: 'PLAINTEXT://kafka:9092'
    networks:
      - kafka-quickstart-network

  producer:
    image: quarkus-quickstarts/kafka-quickstart-producer:1.0-${QUARKUS_MODE:-jvm}
    build:
      context: producer
      dockerfile: src/main/docker/Dockerfile.${QUARKUS_MODE:-jvm}
    depends_on:
      - kafka
    environment:
      KAFKA_BOOTSTRAP_SERVERS: kafka:9092
    ports:
      - "8080:8080"
    networks:
      - kafka-quickstart-network

  processor:
    image: quarkus-quickstarts/kafka-quickstart-processor:1.0-${QUARKUS_MODE:-jvm}
    build:
      context: processor
      dockerfile: src/main/docker/Dockerfile.${QUARKUS_MODE:-jvm}
    depends_on:
      - kafka
    environment:
      KAFKA_BOOTSTRAP_SERVERS: kafka:9092
    networks:
      - kafka-quickstart-network

networks:
  kafka-quickstart-network:
    name: kafkaquickstart
最初に、次のコマンドを使用して両方のアプリケーションを JVM モードでビルドします。
mvn -f producer package
mvn -f processor package
パッケージ化したら、 docker-compose up を実行します。
| This is a development cluster, do not use in production. |
You can also build and run the applications as native executables. First, compile both applications as native:
mvn -f producer package -Dnative -Dquarkus.native.container-build=true
mvn -f processor package -Dnative -Dquarkus.native.container-build=true
次のコマンドでシステムを実行します。
export QUARKUS_MODE=native
docker-compose up --build
さらに詳しく
This guide demonstrated how to interact with Kafka using Quarkus and SmallRye Reactive Messaging to build data streaming applications.
For the full list of features and configuration options, see the Reference guide for Apache Kafka Extension.
| The Quarkus Kafka extension also supports using Kafka clients directly. |

