Using JDK Flight Recorder
This guide explains how Flight Recorder can be extended to provide additional insight into your Quarkus application. JFR records various information from the Java standard API and JVM as events. By adding the Quarkus JFR extension, you can add custom Quarkus events to JFR. This will help you solve potential problems in your application.
このドキュメントは、このコンポーネントとその他のオブザーバビリティ関連コンポーネントを特集した Quarkus のオブザーバビリティリファレンス ガイド の一部です。
JFR はファイルをダンプするように事前設定することができ、アプリケーションが終了すると JFR はファイルを出力します。 ファイルには、Quarkus カスタムイベントも追加された JFR イベントストリームの内容が含まれます。 このファイルは、アプリケーションが予期せず終了した場合でも、当然ながらいつでも取得可能です。
要件
このガイドを完成させるには、以下が必要です:
-
約15分
-
IDE
-
JDK 17+がインストールされ、
JAVA_HOMEが適切に設定されていること -
Apache Maven 3.9.12
-
使用したい場合は、 Quarkus CLI
-
ネイティブ実行可能ファイルをビルドしたい場合、MandrelまたはGraalVM(あるいはネイティブなコンテナビルドを使用する場合はDocker)をインストールし、 適切に設定していること
Maven プロジェクトの作成
まず、新しいプロジェクトが必要です。以下のコマンドで新規プロジェクトを作成します。
Windowsユーザーの場合:
-
cmdを使用する場合、(バックスラッシュ
\を使用せず、すべてを同じ行に書かないでください)。 -
Powershellを使用する場合は、
-Dパラメータを二重引用符で囲んでください。例:"-DprojectArtifactId=jfr-quickstart"
このコマンドは Maven プロジェクトを生成し、Quarkus JFR エクステンションをインポートします。 これには、デフォルトの JFR サポートが含まれます。
Quarkus プロジェクトがすでに設定されている場合は、プロジェクトのベースディレクトリーで以下のコマンドを実行して、 プロジェクトにJFR エクステンションを追加できます。
quarkus extension add quarkus-jfr./mvnw quarkus:add-extension -Dextensions='quarkus-jfr'./gradlew addExtension --extensions='quarkus-jfr'これにより、ビルドファイルに次の内容が追加されます。
<dependency>
    <groupId>io.quarkus</groupId>
    <artifactId>quarkus-jfr</artifactId>
</dependency>implementation("io.quarkus:quarkus-jfr")Jakarta REST リソースの調査
次の内容を含む src/main/java/org/acme/jfr/JfrResource.java ファイルを作成します。
package org.acme.jfr;

import jakarta.ws.rs.GET;
import jakarta.ws.rs.Path;
import jakarta.ws.rs.Produces;
import jakarta.ws.rs.core.MediaType;

@Path("/hello")
public class JfrResource {

    @GET
    @Produces(MediaType.TEXT_PLAIN)
    public String hello() {
        return "hello";
    }
}
アプリケーションには JFR 固有のコードが含まれていないことに注意してください。デフォルトでは、このエンドポイントに送信されるリクエストは、 コードを変更することなく JFR に記録されます。
Quarkus アプリケーションと JFR の実行
これでアプリケーションを実行する準備が整いました。 Java 仮想マシンの起動から JFR が有効化されるように設定されたアプリケーションを起動できます。
quarkus dev -Djvm.args="-XX:StartFlightRecording=name=quarkus,dumponexit=true,filename=myrecording.jfr"./mvnw quarkus:dev -Djvm.args="-XX:StartFlightRecording=name=quarkus,dumponexit=true,filename=myrecording.jfr"./gradlew --console=plain quarkusDev -Djvm.args="-XX:StartFlightRecording=name=quarkus,dumponexit=true,filename=myrecording.jfr"With the JDK Flight Recorder and the application running, we can make a request to the provided endpoint:
$ curl http://localhost:8080/hello
hello
JFR に情報を書き込むために必要なのはこれだけです。
JFR ダンプファイルを開く
JFR ダンプは、 jfr CLI と JDK Mission Control (JMC) の 2 つのツールを使用して開くことができます。
JFR API を使用して読み取ることも可能ですが、この点についてはこのガイドでは説明の対象外となります。
jfr CLI
jfr CLI は OpenJDK に含まれるツールです。実行可能ファイルは $JAVA_HOME/bin/jfr です。
以下のコマンドを実行すると、jfr CLI を使用してダンプファイル内の Quarkus に関連するイベントに限定されたリストを表示できます。
jfr print --categories quarkus myrecording.jfrJDK Mission Control
JMC は基本的に JFR の GUI です。 一部の Java ディストリビューションには JMC が含まれていますが、含まれていない場合は、手動でダウンロードする必要があります。
JMC を使用してイベントのリストを表示するには、まず以下のように JMC に JFR ファイルをロードします。
jmc -open myrecording.jfrJFR ファイルを開いた後、2 つのオプションがあります。 1 つはイベントを表形式のリストとして表示する方法です。もう 1 つは、イベントが発生したスレッドを時系列順に表示する方法です。
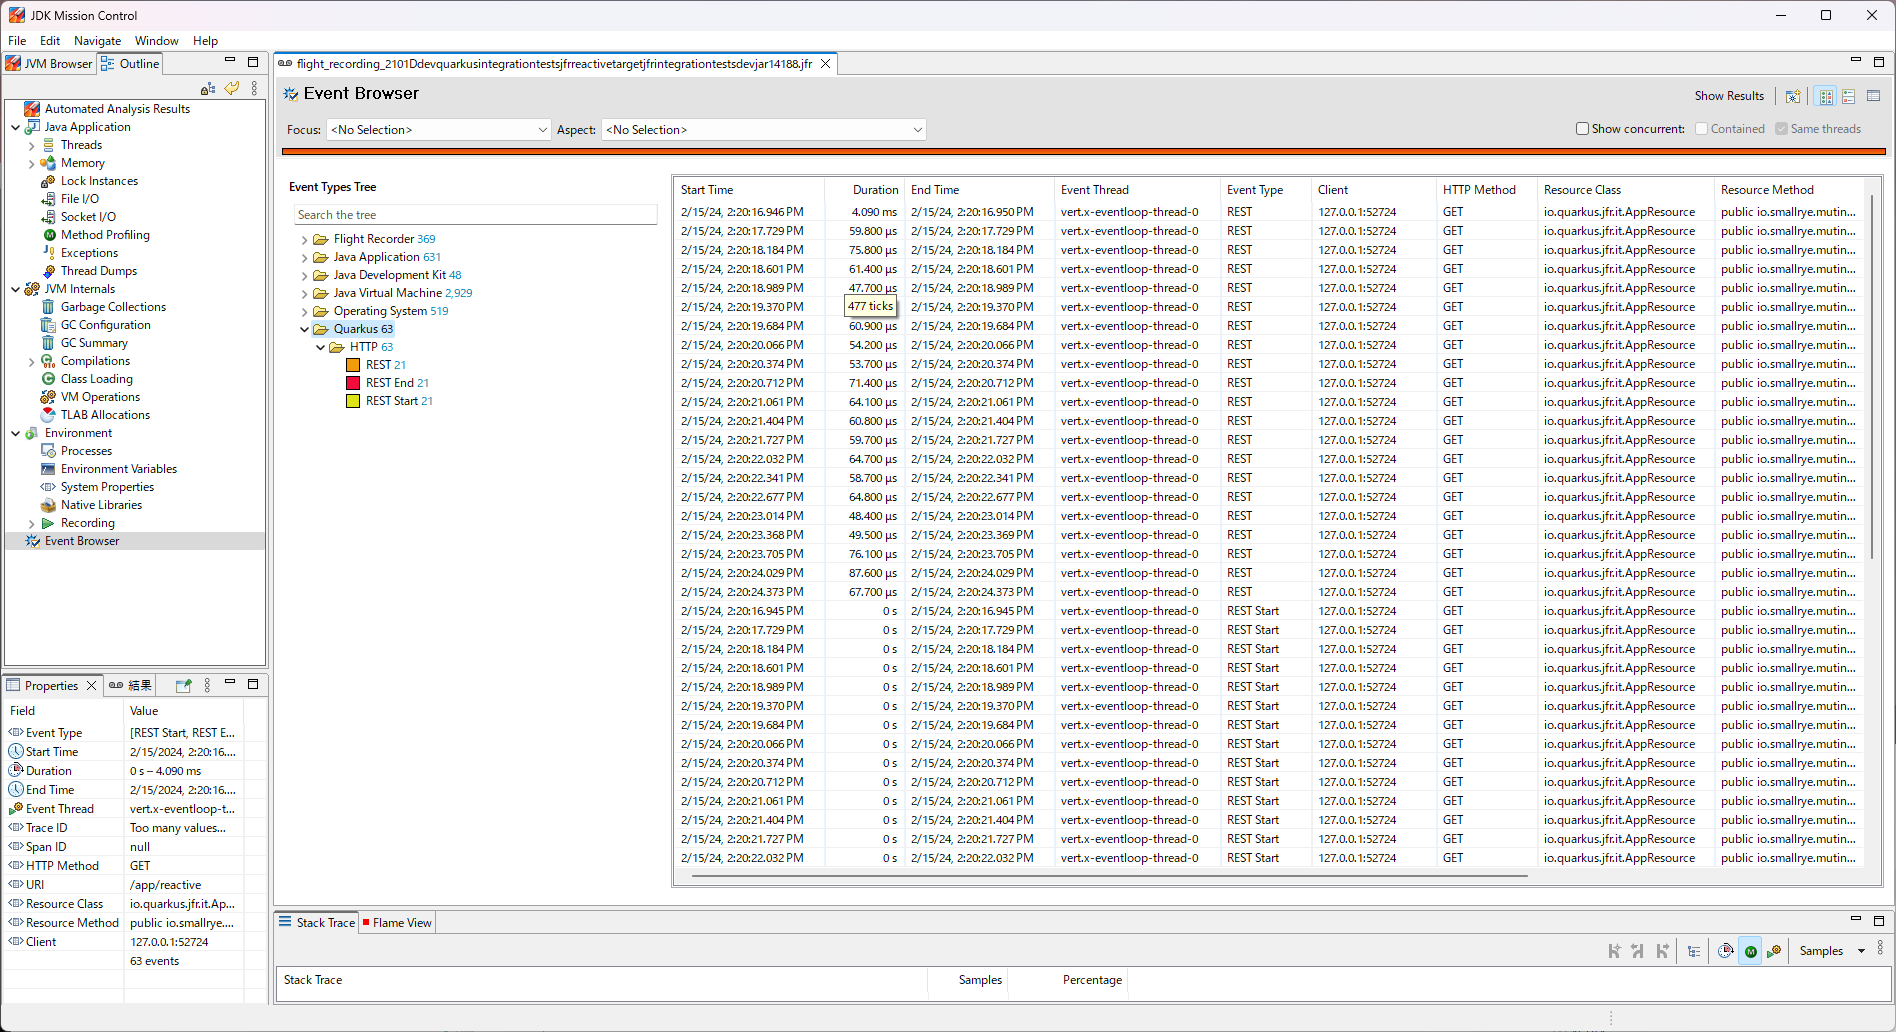
Quarkus イベントを表形式で表示するには、JMC の左側にある Event Browser を選択し、JMC の右側にある Quarkus イベントタイプツリーを開きます。

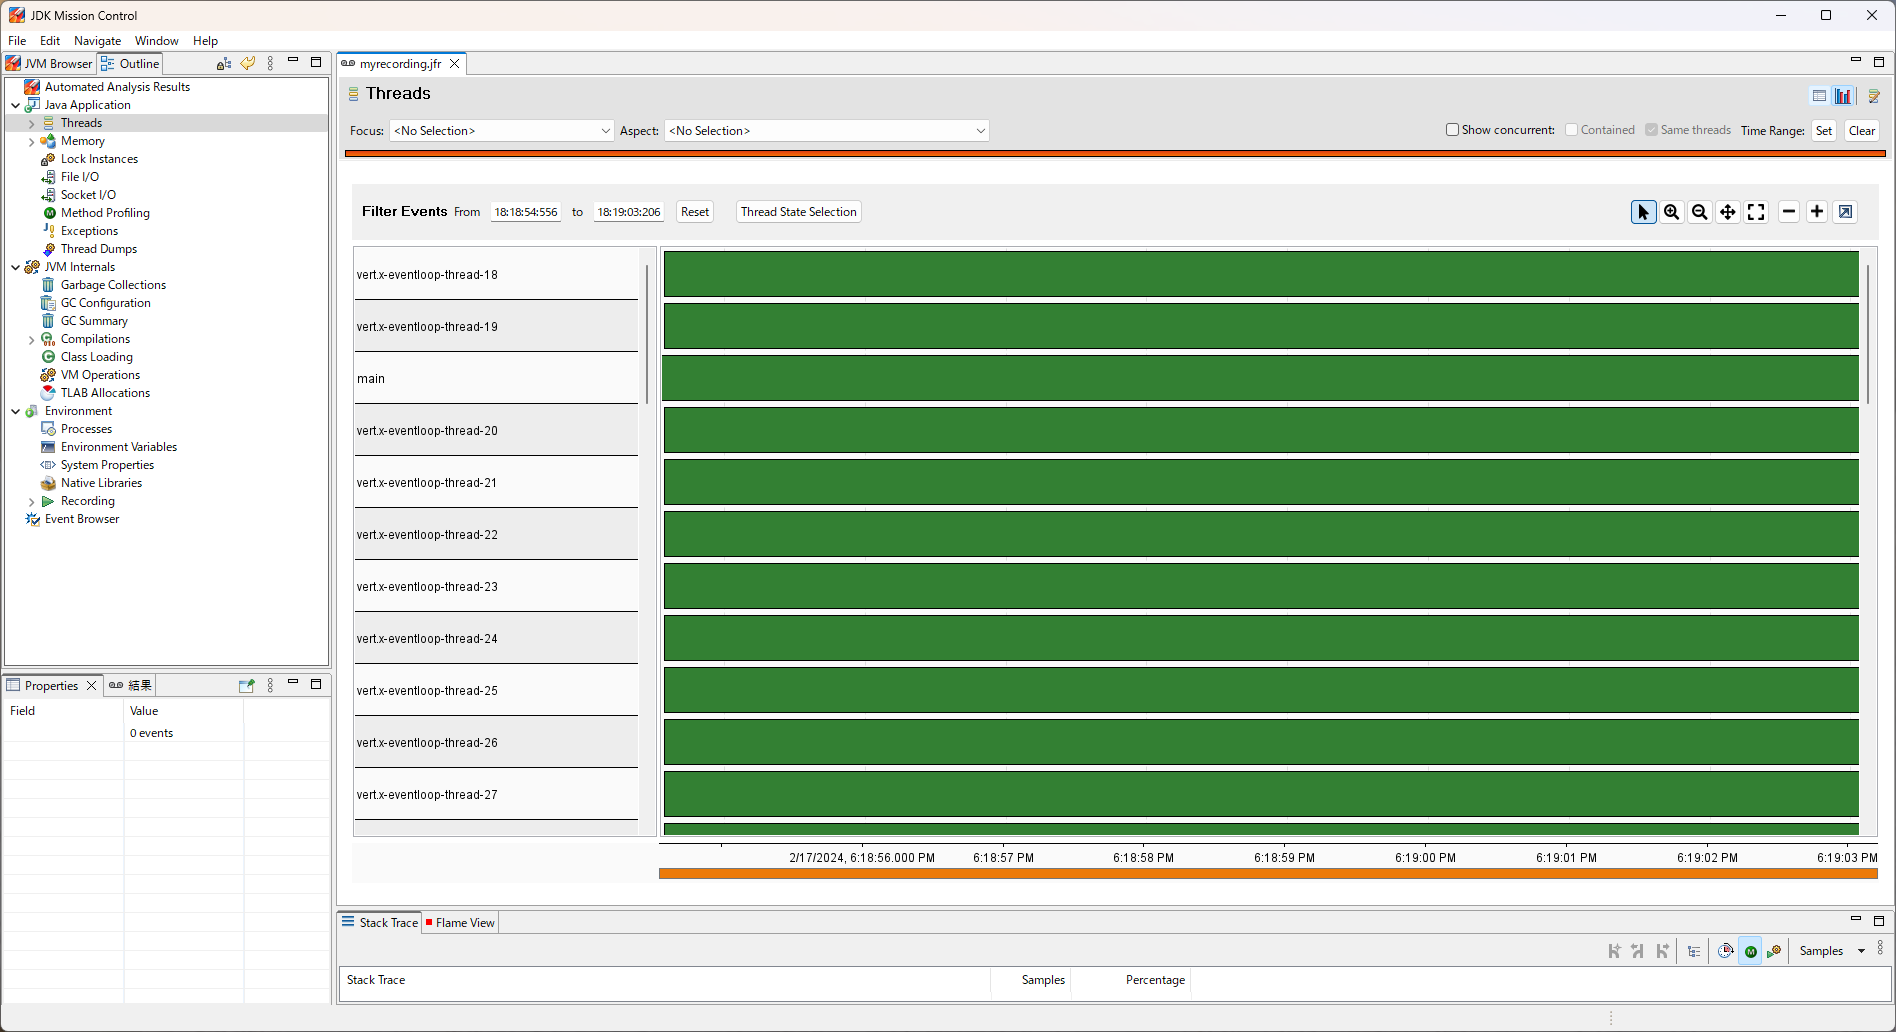
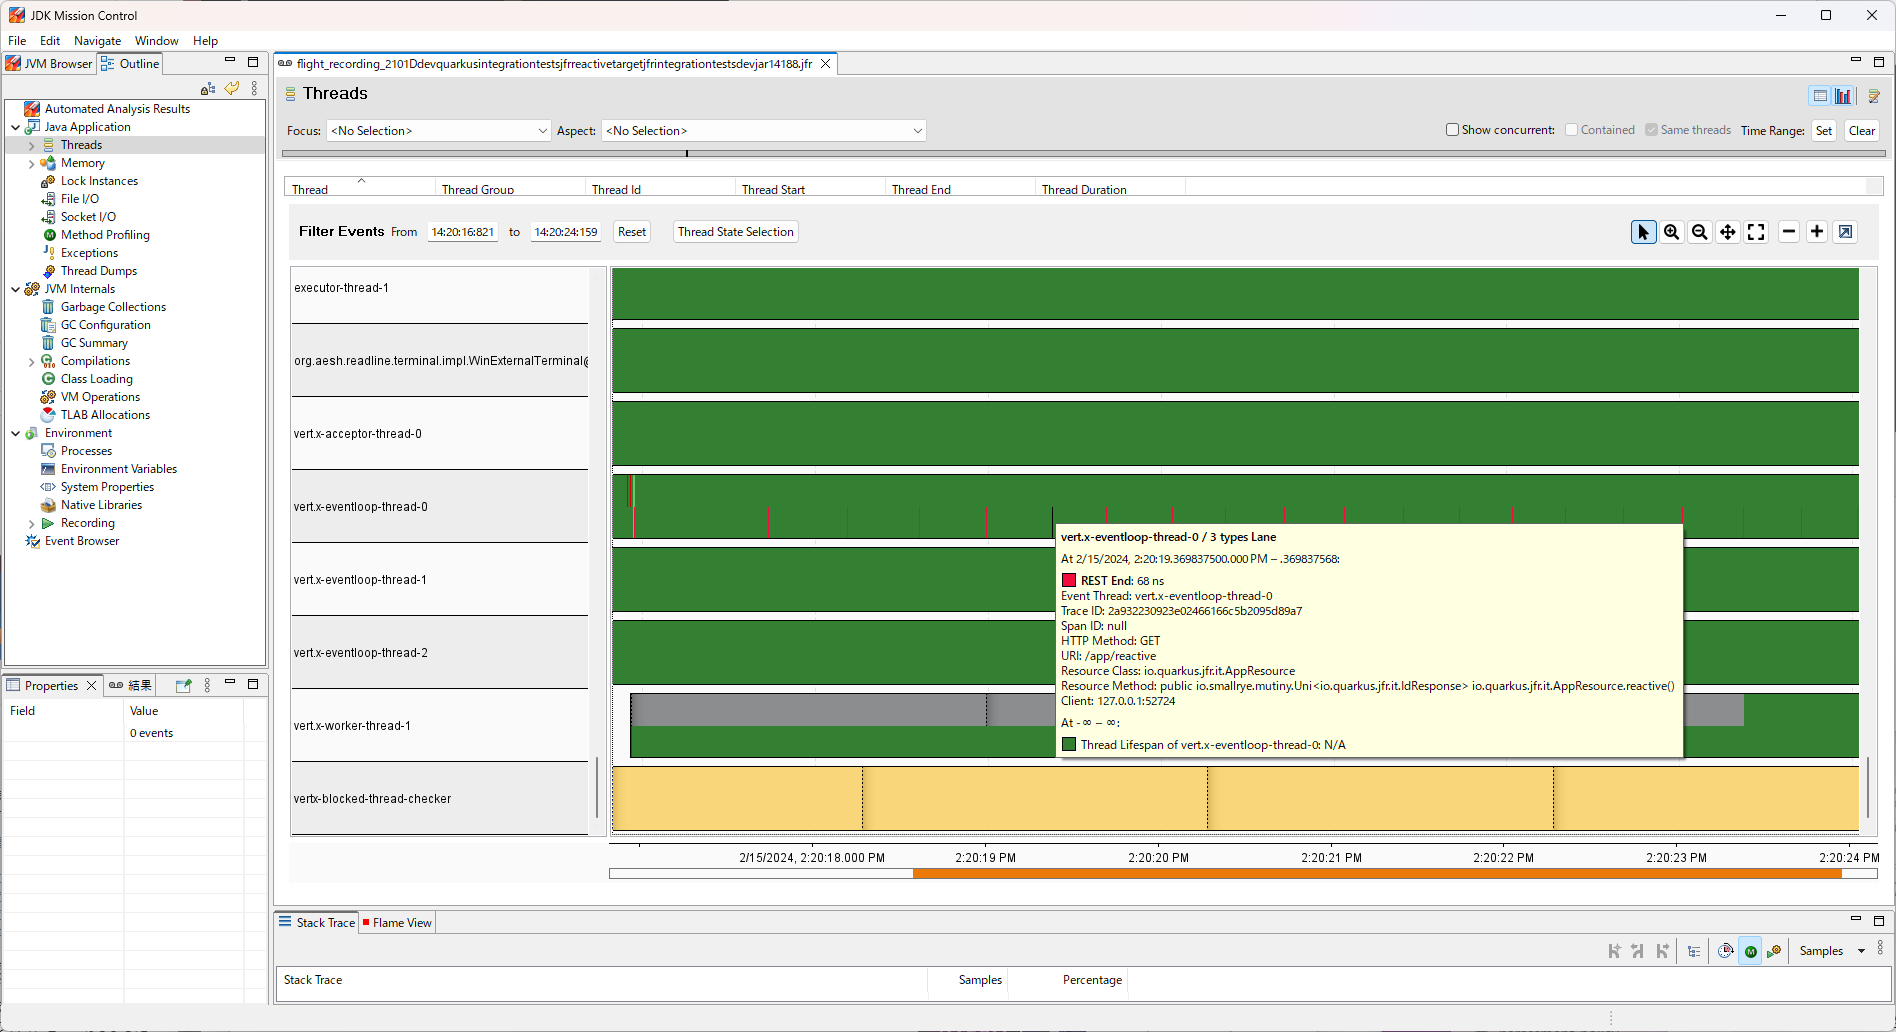
スレッド上の Quarkus イベントを時系列順に表示するには、JMC の左側にある Java application と Threads を選択します。

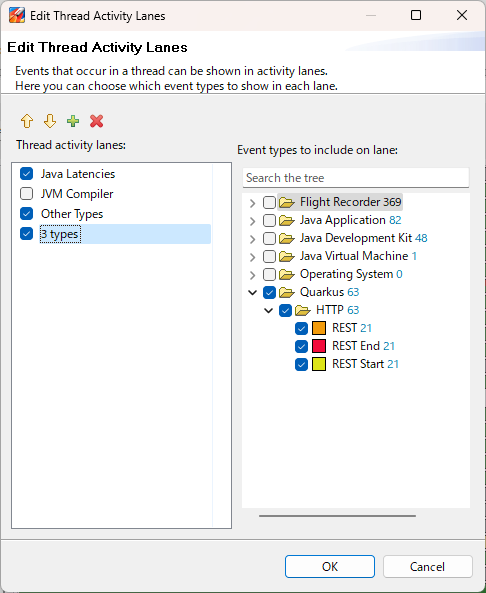
標準設定では、Quarkus イベントは表示されません。 Quarkus イベントを表示するには、3 つのタスクを実行する必要があります。
-
右クリックして
Edit Thread Activity Lanes…を選択します。 -
プラスボタンを選択して左側に新しいレーンを追加し、そのレーンを表示するにはそのボックスにチェックマークを入れます。
-
そのレーンに表示されるイベントタイプとして Quarkus を選択し、OK を押します。

これで、スレッドごとに Quarkus イベントを表示できます。

|
このエクステンションは、複数の JFR イベントを同時に記録できます (異なるスレッドから発行されたもの、またはリアクティブ実行モデルの場合は同じスレッドから発行されたもの)。 したがって、JMC ではイベントが重複する可能性があります。 これにより、表示したいイベントを表示することが難しくなる可能性があります。 これを回避するには、Request IDs を使用してイベントをフィルタリングし、表示したいリクエストに関する情報のみを表示します。 |
イベント
リクエストの特定
このエクステンションは OpenTelemetry エクステンションと連携します。 このエクステンションによって記録されるイベントには、トレース ID とスパン ID があります。これらはそれぞれ OpenTelemetry ID とともに記録されます。
つまり、OpenTelemetry 実装によって提供される UI から対象のトレース ID とスパン ID を特定した後、それらの ID を使用して JFR 内の詳細にすぐに移動できます。
OpenTelemetry エクステンションを有効化していない場合、このエクステンションはリクエストごとに ID を作成し、それを traceId として JFR イベントにリンクします。 この場合、スパン ID は null になります。
現時点では、Quarkus は REST イベントのみを記録しますが、将来的にイベントを追加する際には、この ID を使用して各イベントを相互にリンクする予定です。
イベント実施ポリシー
JFR がイベントの記録を開始する場合、イベントはまだ JFR に記録されませんが、そのイベントをコミットすると記録されます。 したがって、ダンプ時に記録が開始されたがまだコミットされていないイベントはダンプされません。 これは JFR の設計上避けることができません。 つまり、処理が長時間にわたる場合でも、イベントが永続的に記録されるわけではありません。 したがって、処理が長時間かかることに気付くことはありません。
この問題を解決するために、Quarkus は処理の開始時と終了時に開始イベントと終了イベントを記録することもできます。 これらのイベントはデフォルトでは無効化されています。 ただし、以下で説明するように、JFR でこれらのイベントを有効化できます。
REST API イベント
このイベントは、Quarkus REST または RESTEasy エクステンションのいずれかが有効化されている場合に記録されます。 REST サーバーの処理が完了するとすぐに、以下の 3 つの JFR イベントが記録されます。
- REST
-
REST サーバープロセスの開始から終了までの時間を記録します。
- RestStart
-
REST サーバープロセスの開始を記録します。
- RestEnd
-
REST サーバープロセスの終了を記録します。
これらのイベントには次の情報が含まれます。
-
HTTP メソッド
-
URI
-
リソースクラス
-
リソースメソッド
-
クライアント
HTTP メソッドは、クライアントがアクセスした HTTP メソッドを記録します。 これにより、GET、POST、DELETE などの HTTP メソッドやその他の一般的な HTTP メソッドの文字列が記録されます。
URI は、クライアントがアクセスした URI パスを記録します。 これにはホスト名やポート番号は含まれません。
リソースクラスは実行されたクラスを記録します。 HTTP メソッドと URI によって、リソースクラスが期待どおりに実行されたかどうかを確認できます。
リソースメソッドは実行されたメソッドを記録します。 HTTP メソッドと URI によって、リソースメソッドが期待どおりに実行されたかどうかを確認できます。
クライアントはアクセスしているクライアントに関する情報を記録します。
Runtime Event
This event is recorded by default. The following three JFR events are recorded in JFR chunks.
- QuarkusRuntime
-
Records information about Quarkus running. This event includes the Quarkus version, its profiles, and the mode in which it is running.
- QuarkusApplication
-
Records information about Quarkus application running. This event includes the name of the application and its version.
- エクステンション
-
Records information about extensions included in the running Quarkus. This event includes the name of the extensions installed in Quarkus.
ネイティブイメージ
Native executables supports JDK Flight Recorder. This extension also supports native executables.
ネイティブ実行可能ファイルで JFR を有効化するには、通常、 --enable-monitoring を使用してビルドします。
ただし、設定プロパティー quarkus.native.monitoring に jfr を追加することで、Quarkus ネイティブ実行可能ファイルで JFR を有効化できます。
この設定をセットアップするには、 application.properties に含めるか、ビルド時に指定するかの 2 つの方法があります。
最初の方法では、最初に application.properties を設定します。
quarkus.native.monitoring=jfr次に、通常どおりネイティブ実行可能ファイルをビルドします。
quarkus build --native./mvnw install -Dnative./gradlew build -Dquarkus.native.enabled=true2 番目の方法では、ビルド時に -Dquarkus.native.monitoring=jfr を渡します。
quarkus build --native -Dquarkus.native.monitoring=jfr./mvnw install -Dnative -Dquarkus.native.monitoring=jfr./gradlew build -Dquarkus.native.enabled=true -Dquarkus.native.monitoring=jfrネイティブ実行可能ファイルのビルドが完了したら、以下のように JFR を使用してネイティブアプリケーションを実行できます。
target/your-application-runner -XX:StartFlightRecording=name=quarkus,dumponexit=true,filename=myrecording.jfr|
現時点では、Mandrel と GraalVM は Windows ネイティブ実行可能ファイルの JFR を記録できないことに注意してください。 |
JFR 設定
JFR CLI を使用して、JFR が記録するイベントを設定できます。
設定ファイルである JFC ファイルは XML 形式なので、テキストエディターで変更できます。
ただし、OpenJDK にデフォルトで含まれている jfr configure を使用することを推奨します。
ここでは、RestStart イベントと RESTEnd イベントが記録される (デフォルトでは記録されません) 設定ファイルを作成します。
jfr configure --input default.jfc +quarkus.RestStart#enabled=true +quarkus.RestEnd#enabled=true --output custom-rest.jfcこれにより、RestStart と RestEnd の記録が有効になっている設定ファイルとして custom-rest.jfc が作成されます。
これで、新しい設定でアプリケーションを実行する準備が整いました。 Java 仮想マシンの起動から JFR が有効になるように設定されたアプリケーションを起動します。
quarkus dev -Djvm.args="-XX:StartFlightRecording=name=quarkus,settings=./custom-rest.jfc,dumponexit=true,filename=myrecording.jfr"./mvnw quarkus:dev -Djvm.args="-XX:StartFlightRecording=name=quarkus,settings=./custom-rest.jfc,dumponexit=true,filename=myrecording.jfr"./gradlew --console=plain quarkusDev -Djvm.args="-XX:StartFlightRecording=name=quarkus,settings=./custom-rest.jfc,dumponexit=true,filename=myrecording.jfr"新しいイベントの追加
This section is for extension authors who want to add new JFR events.
Depending on the API module
The Quarkus JFR extension separates the public API from the runtime implementation. As a result, other extensions can implement JFR-based instrumentation by depending only on the JFR API module, without adding a dependency on the Quarkus JFR extension implementation itself.
At deployment time, an extension can detect whether the application has enabled the Quarkus JFR extension by using Quarkus capabilities:
import io.quarkus.deployment.Capabilities;
import io.quarkus.deployment.Capability;
import io.quarkus.deployment.annotations.BuildStep;
import io.quarkus.deployment.annotations.BuildSteps;

@BuildSteps
class MyProcessor {

    @BuildStep
    void step(Capabilities capabilities) {
        if (capabilities.isPresent(Capability.JFR)) {
            // The Quarkus JFR extension is enabled
            // Register JFR-related build items, bytecode transformations, etc.
        }
    }
}
This pattern allows your extension to: * compile against stable API types only, and * activate JFR instrumentation only when the Quarkus JFR extension is present in the application.
Associating events by request
新しいイベントは既存のイベントに関連付けることを推奨します。 関連付けは、長い時間がかかっているプロセスの詳細を確認するときに役立ちます。 たとえば、一般的な REST アプリケーションは、処理に必要なデータをデータストアから取得します。 REST イベントがデータストアイベントに関連付けられていない場合、各 REST リクエストでどのデータストアイベントが処理されたかを知ることはできません。 2 つのイベントが関連付けられると、各 REST リクエストでどのデータストアイベントが処理されたかがすぐにわかります。
|
データストアイベントはまだ実装されていません。 |
Quarkus JFR エクステンションは、イベントの関連付けのためのリクエスト ID を提供します。 リクエスト ID の詳細は、リクエストの特定 を参照してください。
In code, you typically need the following two steps.
1) Add trace/span identifiers to your event
Implement traceId and spanId on the new event as follows.
The @TraceIdRelational and @SpanIdRelational annotations mark these fields as relational identifiers used for association.
import io.quarkus.jfr.api.SpanIdRelational;
import io.quarkus.jfr.api.TraceIdRelational;
import jdk.jfr.Description;
import jdk.jfr.Event;
import jdk.jfr.Label;

public class NewEvent extends Event {

    @Label("Trace ID")
    @Description("Trace ID to identify the request")
    @TraceIdRelational
    protected String traceId;

    @Label("Span ID")
    @Description("Span ID to identify the request if necessary")
    @SpanIdRelational
    protected String spanId;

    // other properties which you want to add
    // setters and getters
}
2) Populate the identifiers from the IdProducer
Obtain the values to store in the event from an IdProducer and set them just before committing the event.
import io.quarkus.jfr.api.IdProducer;

public class NewInterceptor {

    @Inject
    IdProducer idProducer;

    private void recordedInvoke() {
        NewEvent event = new NewEvent();
        event.begin();

        // The process you want to measure

        event.end();
        if (event.shouldCommit()) {
            event.setTraceId(idProducer.getTraceId());
            event.setSpanId(idProducer.getSpanId());
            // call other setters which you want to add
            event.commit();
        }
    }
}
設定リファレンス
ビルド時に固定された設定プロパティー。その他の設定プロパティーはすべて実行時にオーバーライド可能です。
Configuration property |
タイプ |
デフォルト |
|---|---|---|
If false, only quarkus-jfr events are not recorded even if JFR is enabled. In this case, Java standard API and virtual machine information will be recorded according to the setting. Default value is Environment variable: Show more |
ブーリアン |
|
If false, only REST events in quarkus-jfr are not recorded even if JFR is enabled. In this case, other quarkus-jfr, Java standard API and virtual machine information will be recorded according to the setting. Default value is Environment variable: Show more |
ブーリアン |
|
If false, only Runtime events in quarkus-jfr are not recorded even if JFR is enabled. In this case, other quarkus-jfr, Java standard API and virtual machine information will be recorded according to the setting. Default value is Environment variable: Show more |
ブーリアン |
|
