WebAuthn を使用したセキュリティ
実験的このガイドでは、Quarkus アプリケーションで、パスワードの代わりに WebAuthn 認証を使用する方法を 説明します。
|
この技術は、experimentalと考えられています。 experimental モードでは、アイデアを成熟させるために早期のフィードバックが求められます。ソリューションが成熟するまでの間、プラットフォームの安定性や長期的な存在を保証するものではありません。フィードバックは メーリングリスト や GitHubの課題管理 で受け付けています。 とりうるステータスの完全なリストについては、 FAQの項目 を参照してください。 |
前提条件
このガイドを完成させるには、以下が必要です:
-
約15分
-
IDE
-
JDK 17+がインストールされ、
JAVA_HOMEが適切に設定されていること -
Apache Maven 3.9.16
-
使用したい場合は、 Quarkus CLI
-
ネイティブ実行可能ファイルをビルドしたい場合、MandrelまたはGraalVM(あるいはネイティブなコンテナビルドを使用する場合はDocker)をインストールし、 適切に設定していること
-
WebAuthn または PassKeys 対応デバイス、または それらのエミュレーター。
WebAuthn の紹介
WebAuthn は、パスワードを置き換えるために設計された認証メカニズムです。つまり、新しいユーザーを登録したり、ログインさせたりするサービスを記述するたびに、パスワードを要求する代わりに、WebAuthn を使用し、それがパスワードの代わりになります。
WebAuthn はパスワードを本人確認の証明に置き換えます。実際には、ユーザーは、パスワードを考えたり、保存したり、覚えたりする代わりに、あなたのサービスやウェブサイト専用の本人確認の証明を生成するハードウェアトークンを使用します。これは、ユーザーに携帯電話で親指を押してもらったり、コンピューターで YubiKey のボタンを押してもらったりすることで実現できます。
そのため、ユーザーを登録する際、ブラウザーを使用してユーザー情報 (ユーザー名、自分の名前など) を入力し、 本人確認のためにパスワードを入力する代わりに、WebAuthn ブラウザー API を呼び出すボタンをクリックします。WebAuthn ブラウザー API は、何か (ボタンを押す、指紋を使うなど) をするよう求めます。すると、ブラウザーはパスワードの代わりに、サービスに送信できる本人確認の証明を生成します。
この本人確認の証明は、登録時に主に公開鍵で構成されます。実際には多くの情報が含まれていますが、最も興味深いのは公開鍵です。この公開鍵は、あなたのデバイスやブラウザーに保存されるものではありません。 それは、対象となるサービス (その URI に紐付けられた) のために特別に生成され、ハードウェア認証デバイスから導出されます。 したがって、ハードウェア認証デバイスと対象サービスとの関連付けは、常に同じ秘密鍵と公開鍵のペアを導出し、それらのいずれもどこにも保存されません。例えば、YubiKey を別のコンピューターに持ち運んでも、同じ対象サービスに対して同じ秘密鍵/公開鍵を生成し続けることができます。
そのため、登録する際、パスワードの代わりに(主に)公開鍵を送信し、サービスはその情報を新しいユーザーアカウントの WebAuthn 認証情報として保存し、これが後にあなたを識別するものとなります。
次に、そのサービスにログインする必要がある場合、パスワード (存在しないことを覚えていますか?) を入力する代わりに、 ログインフォームのボタンを押すと、ブラウザーが何かをするように求め、パスワードの代わりに署名をサービスに送信します。その署名には、認証デバイスハードウェアと対象サービスから導出される秘密鍵が必要なため、サービスがそれを受け取ると、 認証情報として保存した公開鍵の署名と一致するかどうかを検証できます。
まとめると、登録時にはパスワードの代わりに生成された公開鍵を送信し、ログイン時にはその公開鍵に対する署名を送信することで、ユーザーが登録時と同一人物であることを確認できます。
実際にはもう少し複雑で、ハードウェア認証デバイスを使用する前にサーバーとのハンドシェイク(チャレンジを要求するなど)が必要なため、常に2つの呼び出しがあなたのサービスに対して行われます。1つはログインまたは登録前、ハードウェア認証デバイスを呼び出す前、そしてもう1つは通常のログインまたは登録です。
また、公開鍵以外にも多くのフィールドを保存する必要がありますが、それについては私たちがサポートします。
PassKeys との関係や、それがサポートされているか疑問に思うかもしれませんが、 はい、もちろんです。PassKeys は、認証デバイスがその認証情報を共有および同期できる方法であり、 これを当社の WebAuthn 認証で使用できます。
WebAuthn 仕様では、サーバーとの通信に HTTPS を使用する必要がありますが、
一部のブラウザーは localhost を許可しています。開発モードで HTTPS を使用する必要がある場合、
常に quarkus-ngrok エクステンションを使用できます。
|
アーキテクチャー
この例では、4つのエンドポイントを提供する非常にシンプルなマイクロサービスを構築します。
-
/api/public -
/api/public/me -
/api/users/me -
/api/admin
/api/public エンドポイントは匿名でアクセスできます。
/api/public/me エンドポイントは匿名でアクセスでき、現在のユーザー名があればそれを返し、なければ <not logged in> を返します。
/api/admin エンドポイントは RBAC (ロールベースのアクセス制御) で保護されており、admin ロールが付与されたユーザーのみがアクセスできます。このエンドポイントでは、アクセス制約を宣言的に強制するために @RolesAllowed アノテーションを使用します。
/api/users/me エンドポイントも RBAC (ロールベースのアクセス制御) で保護されており、user ロールが付与されたユーザーのみがアクセスできます。応答として、ユーザーに関する詳細情報を含む JSON ドキュメントを返します。
ソリューション
次のセクションの手順に従って、アプリケーションを段階的に作成することをお勧めします。 ただし、完成した例に直接進むこともできます。
Git リポジトリーをクローンします: git clone https://github.com/quarkusio/quarkus-quickstarts.git 、または アーカイブ をダウンロードします。
ソリューションは security-webauthn-quickstart ディレクトリー にあります。
Maven プロジェクトの作成
まず、新しいプロジェクトが必要です。以下のコマンドで新しいプロジェクトを作成します。
Windowsユーザーの場合:
-
cmdを使用する場合、(バックスラッシュ
\を使用せず、すべてを同じ行に書かないでください)。 -
Powershellを使用する場合は、
-Dパラメータを二重引用符で囲んでください。例:"-DprojectArtifactId=security-webauthn-quickstart"
|
選択したデータベースコネクターライブラリーを追加することを忘れないでください。ここでは、PostgreSQL をアイデンティティーストアとして使用しています。 |
このコマンドは Maven プロジェクトを生成し、security-webauthn エクステンションをインポートします。
これにより、WebAuthn を使用してユーザーを認証できます。
Quarkus プロジェクトがすでに設定されている場合、プロジェクトのベースディレクトリーで以下のコマンドを実行することで、security-webauthn エクステンションをプロジェクトに追加できます。
quarkus extension add security-webauthn./mvnw quarkus:add-extension -Dextensions='security-webauthn'./gradlew addExtension --extensions='security-webauthn'これにより、ビルドファイルに以下が追加されます。
<dependency>
    <groupId>io.quarkus</groupId>
    <artifactId>quarkus-security-webauthn</artifactId>
</dependency>implementation("io.quarkus:quarkus-security-webauthn")アプリケーションの記述
まず、/api/public エンドポイントを実装することから始めましょう。以下のソースコードからわかるように、これは単なる通常の Jakarta REST リソースです。
package org.acme.security.webauthn;

import java.security.Principal;

import jakarta.ws.rs.GET;
import jakarta.ws.rs.Path;
import jakarta.ws.rs.Produces;
import jakarta.ws.rs.core.Context;
import jakarta.ws.rs.core.MediaType;
import jakarta.ws.rs.core.SecurityContext;

@Path("/api/public")
public class PublicResource {

    @GET
    @Produces(MediaType.TEXT_PLAIN)
    public String publicResource() {
        return "public";
   }

    @GET
    @Path("/me")
    @Produces(MediaType.TEXT_PLAIN)
    public String me(@Context SecurityContext securityContext) {
        Principal user = securityContext.getUserPrincipal();
        return user != null ? user.getName() : "<not logged in>";
    }
}
/api/admin エンドポイントのソースコードも非常にシンプルです。ここでの主な違いは、admin ロールが付与されたユーザーのみがエンドポイントにアクセスできるように @RolesAllowed アノテーションを使用していることです。
package org.acme.security.webauthn;

import jakarta.annotation.security.RolesAllowed;
import jakarta.ws.rs.GET;
import jakarta.ws.rs.Path;
import jakarta.ws.rs.Produces;
import jakarta.ws.rs.core.MediaType;

@Path("/api/admin")
public class AdminResource {

    @GET
    @RolesAllowed("admin")
    @Produces(MediaType.TEXT_PLAIN)
    public String adminResource() {
         return "admin";
    }
}最後に、/api/users/me エンドポイントについて考えてみましょう。以下のソースコードからわかるように、user ロールを持つユーザーのみを信頼しています。
SecurityContext を使用して、現在認証されている Principal にアクセスし、ユーザーの名前を返します。この情報はデータベースからロードされます。
package org.acme.security.webauthn;

import jakarta.annotation.security.RolesAllowed;
import jakarta.ws.rs.GET;
import jakarta.ws.rs.Path;
import jakarta.ws.rs.core.Context;
import jakarta.ws.rs.core.SecurityContext;

@Path("/api/users")
public class UserResource {

    @GET
    @RolesAllowed("user")
    @Path("/me")
    public String me(@Context SecurityContext securityContext) {
        return securityContext.getUserPrincipal().getName();
    }
}
WebAuthn 認証情報の保存
これで、WebAuthn 認証情報がデータベースに 2 つのエンティティーでどのように保存されるかを説明できます。ユーザーごとに認証情報を 1 つだけ保存するようにモデルを簡略化したことに注意してください (実際には複数の WebAuthn 認証情報やロールなどの他のデータを持つことも可能ですが)。
package org.acme.security.webauthn;

import java.util.List;
import java.util.UUID;

import io.quarkus.hibernate.orm.panache.PanacheEntityBase;
import io.quarkus.security.webauthn.WebAuthnCredentialRecord;
import io.quarkus.security.webauthn.WebAuthnCredentialRecord.RequiredPersistedData;
import jakarta.persistence.Entity;
import jakarta.persistence.Id;
import jakarta.persistence.OneToOne;

@Entity
public class WebAuthnCredential extends PanacheEntityBase {

	@Id
    public String credentialId;

    public byte[] publicKey;
    public long publicKeyAlgorithm;
    public long counter;
    public UUID aaguid;

    // this is the owning side
    @OneToOne
    public User user;

    public WebAuthnCredential() {
    }

    public WebAuthnCredential(WebAuthnCredentialRecord credentialRecord, User user) {
        RequiredPersistedData requiredPersistedData =
            credentialRecord.getRequiredPersistedData();
        aaguid = requiredPersistedData.aaguid();
        counter = requiredPersistedData.counter();
        credentialId = requiredPersistedData.credentialId();
        publicKey = requiredPersistedData.publicKey();
        publicKeyAlgorithm = requiredPersistedData.publicKeyAlgorithm();
        this.user = user;
        user.webAuthnCredential = this;
    }

    public WebAuthnCredentialRecord toWebAuthnCredentialRecord() {
        return WebAuthnCredentialRecord
                .fromRequiredPersistedData(
                        new RequiredPersistedData(user.username, credentialId,
                                                  aaguid, publicKey,
                                                  publicKeyAlgorithm, counter));
    }

    public static List<WebAuthnCredential> findByUsername(String username) {
        return list("user.username", username);
    }

    public static WebAuthnCredential findByCredentialId(String credentialId) {
        return findById(credentialId);
    }
}
そして、ユーザーエンティティー:
package org.acme.security.webauthn;

import io.quarkus.hibernate.orm.panache.PanacheEntity;
import jakarta.persistence.Column;
import jakarta.persistence.Entity;
import jakarta.persistence.OneToOne;
import jakarta.persistence.Table;

@Table(name = "user_table")
@Entity
public class User extends PanacheEntity {

    @Column(unique = true)
    public String username;

    // non-owning side, so we can add more credentials later
    @OneToOne(mappedBy = "user")
    public WebAuthnCredential webAuthnCredential;

    public static User findByUsername(String username) {
        return User.find("username", username).firstResult();
    }
}Quarkus WebAuthn へのエンティティー公開
Quarkus WebAuthn エクステンションが認証情報をロードして保存できるようにするには、WebAuthnUserProvider を実装する Bean を
定義する必要があります。ここで、データモデルを WebAuthn セキュリティモデルに変換する方法を Quarkus に伝えます。
import java.util.Collections;
import java.util.List;
import java.util.Set;

import io.quarkus.security.webauthn.WebAuthnCredentialRecord;
import io.quarkus.security.webauthn.WebAuthnUserProvider;
import io.smallrye.common.annotation.Blocking;
import io.smallrye.mutiny.Uni;
import jakarta.enterprise.context.ApplicationScoped;
import jakarta.transaction.Transactional;

@Blocking
@ApplicationScoped
public class MyWebAuthnSetup implements WebAuthnUserProvider {

    @Transactional
    @Override
    public Uni<List<WebAuthnCredentialRecord>> findByUsername(String userId) {
        return Uni.createFrom().item(
            WebAuthnCredential.findByUsername(userId)
                              .stream()
                              .map(WebAuthnCredential::toWebAuthnCredentialRecord)
                              .toList());
    }

    @Transactional
    @Override
    public Uni<WebAuthnCredentialRecord> findByCredentialId(String credId) {
        WebAuthnCredential creds = WebAuthnCredential.findByCredentialId(credId);
        if(creds == null)
            return Uni.createFrom()
                      .failure(new RuntimeException("No such credential ID"));
        return Uni.createFrom().item(creds.toWebAuthnCredentialRecord());
    }

    @Transactional
    @Override
    public Uni<Void> store(WebAuthnCredentialRecord credentialRecord) {
        User newUser = new User();
        // We can only store one credential per username thanks to the unicity constraint
        // which will cause this transaction to fail and throw if the username already exists
        newUser.username = credentialRecord.getUsername();
        WebAuthnCredential credential = new WebAuthnCredential(credentialRecord, newUser);
        credential.persist();
        newUser.persist();
        return Uni.createFrom().voidItem();
    }

    @Transactional
    @Override
    public Uni<Void> update(String credentialId, long counter) {
        WebAuthnCredential credential =
            WebAuthnCredential.findByCredentialId(credentialId);
        credential.counter = counter;
        return Uni.createFrom().voidItem();
    }

    @Override
    public Set<String> getRoles(String userId) {
        if(userId.equals("admin")) {
            return Set.of("user", "admin");
        }
        return Collections.singleton("user");
    }
}
警告: 独自の WebAuthnUserProvider.store メソッドを実装する際、すでに存在する username に対して新しい認証情報の作成を
絶対に許可しないようにしてください。そうしないと、サードパーティーが既存のユーザーになりすまし、
自分の認証情報を既存のアカウントに追加することを許可するリスクがあります。
既存のユーザーが複数の WebAuthn 認証情報を登録できるようにしたい場合、新しい認証情報を追加したいのと同じ username で現在ログインしていることを WebAuthnUserProvider.store メソッド内で確認する必要があります。その他のすべての場合において、このメソッドから失敗した Uni を返すようにしてください。
この具体的な例では、ユーザー名の一意性制約を使用してこれをチェックしており、ユーザーがすでに存在する場合、トランザクションは失敗します。
設定
ログインと登録をデフォルトの Quarkus WebAuthn エンドポイントに委譲したいため、設定内 (src/main/resources/application.properties) でそれらを有効にする必要があります。
quarkus.webauthn.enable-login-endpoint=true
quarkus.webauthn.enable-registration-endpoint=true
HTML アプリケーションの作成
次に、すべての API へのリンクと、新規ユーザー登録、ログイン、ログアウトを行うための Web ページを src/main/resources/META-INF/resources/index.html に記述する必要があります。
<!DOCTYPE html>
<html lang="en">
  <head>
    <meta charset="UTF-8">
    <title>Login</title>
    <script src="/q/webauthn/webauthn.js" type="text/javascript" charset="UTF-8"></script>
    <style>
     .container {
      display: grid;
      grid-template-columns: auto auto auto;
     }
     button, input {
      margin: 5px 0;
     }
     .item {
      padding: 20px;
     }
     nav > ul {
       list-style-type: none;
       margin: 0;
       padding: 0;
       overflow: hidden;
       background-color: #333;
     }

     nav > ul > li {
       float: left;
     }

     nav > ul > li > a {
       display: block;
       color: white;
       text-align: center;
       padding: 14px 16px;
       text-decoration: none;
     }

     nav > ul > li > a:hover {
       background-color: #111;
     }
    </style>
  </head>

  <body>
    <nav>
     <ul>
      <li><a href="/api/public">Public API</a></li>
      <li><a href="/api/users/me">User API</a></li>
      <li><a href="/api/admin">Admin API</a></li>
      <li><a href="/q/webauthn/logout">Logout</a></li>
     </ul>
    </nav>
    <div class="container">
     <div class="item">
      <h1>Status</h1>
      <div id="result"></div>
     </div>
     <div class="item">
      <h1>Login</h1>
      <p>
       <button id="login">Login</button>
      </p>
     </div>
     <div class="item">
      <h1>Register</h1>
      <p>
       <input id="usernameRegister" placeholder="User name"/><br/>
       <input id="firstName" placeholder="First name"/><br/>
       <input id="lastName" placeholder="Last name"/><br/>
       <button id="register">Register</button>
      </p>
     </div>
    </div>
    <script type="text/javascript">
      const webAuthn = new WebAuthn();

      const result = document.getElementById('result');

      fetch('/api/public/me')
        .then(response => response.text())
        .then(username => result.append("User: "+username));

      const loginButton = document.getElementById('login');

      loginButton.addEventListener("click", (e) => {
        result.replaceChildren();
        webAuthn.login()
          .then(x => fetch('/api/public/me'))
          .then(response => response.text())
          .then(username => {
            result.append("User: "+username);
          })
          .catch(err => {
            result.append("Login failed: "+err);
          });
        return false;
      });

      const registerButton = document.getElementById('register');

      registerButton.addEventListener("click", (e) => {
        var username = document.getElementById('usernameRegister').value;
        var firstName = document.getElementById('firstName').value;
        var lastName = document.getElementById('lastName').value;
        result.replaceChildren();
        webAuthn.register({ username: username, displayName: firstName + " " + lastName })
          .then(body => {
            result.append("User: "+username);
          })
          .catch(err => {
            result.append("Registration failed: "+err);
          });
        return false;
      });
    </script>
  </body>
</html>
アプリケーションの試用
これでアプリケーションは保護され、アイデンティティーはデータベースによって提供されます。
次のように dev mode でアプリケーションを実行します。
quarkus dev./mvnw quarkus:dev./gradlew --console=plain quarkusDevこれにより PostgreSQL Dev Service コンテナーが起動し、ブラウザで http://localhost:8080 が開きます。
初期状態では、クレデンシャルは登録されておらず、現在のユーザーもいません。
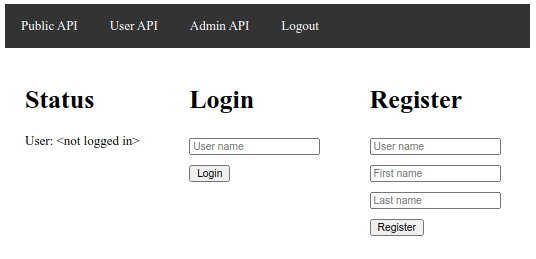
現在のユーザーは左側に表示され、上部のメニューを使用してパブリック API へのアクセスを試すことができます。これは機能しますが、ユーザー API と管理 API は失敗し、現在のページにリダイレクトされます。
まず、右側の Register フォームにユーザー名、氏名を入力し、Register ボタンを押して、WebAuthn クレデンシャルを登録します。
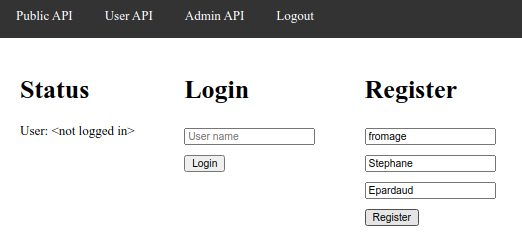
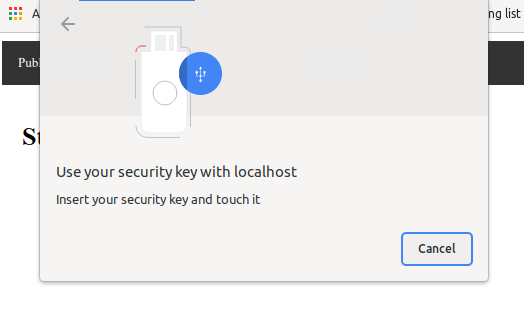
ブラウザーが WebAuthn オーセンティケーターを有効化するよう求めてきます (WebAuthn 対応のブラウザーと、場合によってはデバイスが必要です。または、 それらのエミュレーター を使用することもできます)。
その後、ログインし、ユーザー API にアクセスできるようになったことを確認できます。
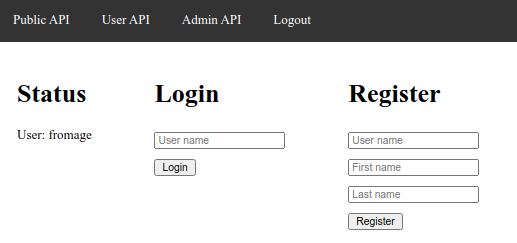
この段階で Logout できます。
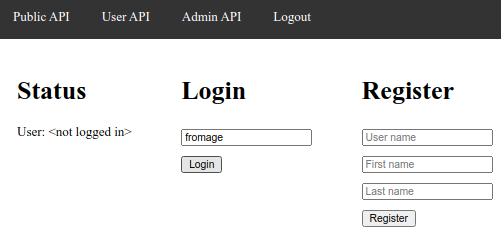
その後、Login ボタンを押せば、ログイン状態になります。
admin API は、admin のユーザー名で登録した場合のみアクセス可能です。
WebAuthn 認証のフローの説明
ユーザーとクレデンシャルの作成をどのように処理するかについて、2 つの操作モードがあります。
デフォルトでは、これまでに見てきたソリューションは、このエクステンションが標準で提供する WebAuthn エンドポイント を通じて、ユーザーおよびクレデンシャルの作成とログインを自動的に処理します。
このシナリオでは、Quarkus にクレデンシャルの検索、保存、および更新方法を伝えるために、WebAuthnUserProvider の提供のみを実行します (詳細は Quarkus WebAuthn へのエンティティー公開 を参照)。
したがって、クライアントで登録をトリガーするには、サーバーからチャレンジを取得する必要があります (登録チャレンジの取得 を参照)。取得したチャレンジはクライアントに返され、クライアントはそれを使用して新しいクレデンシャルを作成し、それをサーバーに送信します (登録のトリガー を参照)。サーバーは、クレデンシャルを保存し、ユーザーをログインさせます。

その後、クライアントでログインをトリガーするには、サーバーからチャレンジを取得する必要があります (ログインチャレンジの取得 を参照)。取得したチャレンジはクライアントに返され、クライアントはそれを使用して必要なクレデンシャルを取得し、それらの証明をサーバーに送信します (ログインのトリガー を参照)。サーバーはクレデンシャルを更新し、ユーザーをログインさせます。

登録とログインフローをカスタマイズしたい場合は、独自のロジックを使用して、ユーザーとクレデンシャルの作成およびログインも自身で処理できます (ログインおよび登録エンドポイントのハンドリング を参照)。
WebAuthn エンドポイント
Quarkus WebAuthn エクステンションには、これらの REST エンドポイントがあらかじめ定義されています。
登録チャレンジの取得
GET /q/webauthn/register-options-challenge?username=<username>&displayName=<displayName>: 登録チャレンジをセットアップして取得する
クエリーパラメーター
-
usernameはユーザー名です。必須です。 -
displayNameは、判読しやすいユーザーアカウントの名前です。オプションです。
これにより、チャレンジ用の Cookie が設定され、後で登録手順で使用されます。
{
 "rp": {
   "name": "Quarkus server"
  },
 "user": {
   "id": "ryPi43NJSx6LFYNitrOvHg",
   "name": "FroMage",
   "displayName": "Mr Nice Guy"
  },
  "challenge": "6tkVLgYzp5yJz_MtnzCy6VRMkHuN4f4C-_hukRmsuQ_MQl7uxJweiqH8gaFkm_mEbKzlUbOabJM3nLbi08i1Uw",
  "pubKeyCredParams": [
    {
     "alg": -7,
     "type":"public-key"
    },
    {
     "alg": -257,
     "type": "public-key"
    }
  ],
  "authenticatorSelection": {
    "requireResidentKey": true,
    "residentKey": "required",
    "userVerification": "required"
  },
  "timeout": 300000,
  "attestation": "none",
  "extensions": {
   "txAuthSimple": ""
  }
 }
登録のトリガー
POST /q/webauthn/register?username=<username>: 登録をトリガーする
クエリーパラメーター
-
usernameはユーザー名です。必須です。
これは、登録チャレンジによって設定されたチャレンジ Cookie を使用し、それをクリアします。また、WebAuthnUserProvider を使用して新しいクレデンシャルを保存し、session cookie をセットアップしてログインできるようにします。
これは、quarkus.webauthn.enable-registration-endpoint 設定が true に設定されている場合にのみ有効になります。
|
{
 "id": "boMwU-QwZ_RsToPTG3iC50g8-yiKbLc3A53tgWMhzbNEQAJIlbWgchmwbt5m0ssqQNR0IM_WxCmcfKWlEao7Fg",
 "rawId": "boMwU-QwZ_RsToPTG3iC50g8-yiKbLc3A53tgWMhzbNEQAJIlbWgchmwbt5m0ssqQNR0IM_WxCmcfKWlEao7Fg",
 "response": {
  "attestationObject": "<DATA>",
  "clientDataJSON":"<DATA>"
 },
 "type": "public-key"
}
これは、ボディを持たない 204 を返却します。
ログインチャレンジの取得
GET /q/webauthn/login-options-challenge?username=<username>: ログインチャレンジをセットアップして取得する
クエリーパラメーター
-
usernameはユーザー名です。 Discoverable Credentials (PassKeys 付き) の場合はオプションです。
これにより、チャレンジ用の Cookie が設定され、後でログイン手順で使用されます。
{
 "challenge": "RV4hqKHezkWSxpOICBkpx16yPJFGMZrkPlJP-Wp8w4rVl34VIzCT7AP0Q5Rv-3JCU3jwu-j3VlOgyNMDk2AqDg",
 "timeout": 300000,
 "userVerification": "required",
 "extensions": {
  "txAuthSimple": ""
 },
 "allowCredentials": [
  {
   "type": "public-key",
   "id": "boMwU-QwZ_RsToPTG3iC50g8-yiKbLc3A53tgWMhzbNEQAJIlbWgchmwbt5m0ssqQNR0IM_WxCmcfKWlEao7Fg",
   "transports": [
    "usb",
    "nfc",
    "ble",
    "internal"
   ]
  }
 ]
}
ログインのトリガー
これは、ログインチャレンジによって設定されたチャレンジ Cookie を使用し、それをクリアします。また、WebAuthnUserProvider を使用してクレデンシャルを探して更新し、session cookie をセットアップしてログインできるようにします。
これは、quarkus.webauthn.enable-login-endpoint 設定が true に設定されている場合にのみ有効になります。
|
{
 "id": "boMwU-QwZ_RsToPTG3iC50g8-yiKbLc3A53tgWMhzbNEQAJIlbWgchmwbt5m0ssqQNR0IM_WxCmcfKWlEao7Fg",
 "rawId": "boMwU-QwZ_RsToPTG3iC50g8-yiKbLc3A53tgWMhzbNEQAJIlbWgchmwbt5m0ssqQNR0IM_WxCmcfKWlEao7Fg",
 "response": {
  "clientDataJSON": "<DATA>",
  "authenticatorData": "<DATA>",
  "signature": "<DATA>",
  "userHandle": ""
 },
 "type": "public-key"
}
これは、ボディを持たない 204 を返却します。
ログアウト
GET /q/webauthn/logout :ログアウトします。
これにより、session cookie がクリアされ、ログアウトできます。
これは、アプリケーションのルート URI への 302 リダイレクトを返します。
関連オリジン
GET /.well-known/webauthn: 関連オリジン のリストを取得する
これは Quarkus がデプロイされている現在のオリジンにデフォルト設定されますが、設定 可能です。
{
  "origins": [
    "https://shopping.com",
    "https://shopping.co.uk",
    "https://shopping.co.jp",
    "https://shopping.ie",
    "https://shopping.ca",
    "https://shopping.net",
    "https://shopping.org",
    "https://shopping.github.io"
  ]
}
WebAuthn JavaScript ライブラリー
ブラウザーで WebAuthn を設定するには多くの JavaScript が必要となるため、Quarkus WebAuthn エクステンションには、/q/webauthn/webauthn.js にて WebAuthn エンドポイントと通信するための JavaScript ライブラリーが付属しています。以下のようにセットアップできます。
<script src="/q/webauthn/webauthn.js" type="text/javascript" charset="UTF-8"></script>
<script type="text/javascript">
  // keep the default /q/webauthn endpoints
  const webAuthn = new WebAuthn();
  // use the webAuthn APIs here
</script>
または、エンドポイントをカスタマイズする必要がある場合は、次のようになります。
<script src="/q/webauthn/webauthn.js" type="text/javascript" charset="UTF-8"></script>
<script type="text/javascript">
  // configure where our endpoints are
  const webAuthn = new WebAuthn({
    registerOptionsChallengePath: '/q/webauthn/register-options-challenge',
    loginOptionsChallengePath: '/q/webauthn/login-options-challenge',
    registerPath: '/q/webauthn/register',
    loginPath: '/q/webauthn/login'
  });
  // use the webAuthn APIs here
</script>
CSRF の考慮事項
Quarkus が提供するエンドポイントを使用する場合、xdoc:security-csrf-prevention.adoc[CSRF] によって保護されませんが、独自のエンドポイントを定義し、この JavaScript ライブラリーを使用してアクセスする場合は、ヘッダー経由で CSRF を設定する必要があります。
<script src="/q/webauthn/webauthn.js" type="text/javascript" charset="UTF-8"></script>
<script type="text/javascript">
  // configure where our endpoints are
  const webAuthn = new WebAuthn({
    'csrf': {
      'header': '{inject:csrf.headerName}',
      'value': '{inject:csrf.token}'
	}
  });
  // use the webAuthn APIs here
</script>
登録の呼び出し
webAuthn.register メソッドは、登録チャレンジエンドポイントを呼び出し、次にオーセンティケーターを呼び出して、その登録のための登録エンドポイントを呼び出し、 Promise オブジェクト を返します。
webAuthn.register({ username: username, displayName: firstName + " " + lastName })
  .then(body => {
    // do something now that the user is registered
  })
  .catch(err => {
    // registration failed
  });
ログインの呼び出し
webAuthn.login メソッドは、ログインチャレンジエンドポイントを呼び出し、次にオーセンティケーターを呼び出して、そのログインのためのログインエンドポイントを呼び出し、 Promise オブジェクト を返します。
webAuthn.login({ username: username }) (1)
  .then(body => {
    // do something now that the user is logged in
  })
  .catch(err => {
    // login failed
});| 1 | Discoverable Credentials (PassKeys 付き) の場合、ユーザー名はオプションです。 |
登録チャレンジとオーセンティケーターのみを呼び出す
webAuthn.registerClientSteps メソッドは、登録チャレンジエンドポイントを呼び出し、次にオーセンティケーターを呼び出して、登録エンドポイントへの送信に適した JSON オブジェクトを含む Promise オブジェクト を返します。この JSON オブジェクトを使用して、たとえば、認証情報を非表示フォームの input 要素に保存し、通常の HTML フォームの一部として送信できます。
webAuthn.registerClientSteps({ username: username, displayName: firstName + " " + lastName })
  .then(body => {
    // store the registration JSON in form elements
    document.getElementById('webAuthnId').value = body.id;
    document.getElementById('webAuthnRawId').value = body.rawId;
    document.getElementById('webAuthnResponseAttestationObject').value = body.response.attestationObject;
    document.getElementById('webAuthnResponseClientDataJSON').value = body.response.clientDataJSON;
    document.getElementById('webAuthnType').value = body.type;
  })
  .catch(err => {
    // registration failed
  });
ログインチャレンジとオーセンティケーターのみを呼び出す
webAuthn.loginClientSteps メソッドは、ログインチャレンジエンドポイントを呼び出し、次にオーセンティケーターを呼び出して、ログインエンドポイントへの送信に適した JSON オブジェクトを含む Promise オブジェクト を返します。この JSON オブジェクトを使用して、たとえば、認証情報を非表示フォームの input 要素に保存し、通常の HTML フォームの一部として送信できます。
webAuthn.loginClientSteps({ username: username }) (1)
  .then(body => {
    // store the login JSON in form elements
    document.getElementById('webAuthnId').value = body.id;
    document.getElementById('webAuthnRawId').value = body.rawId;
    document.getElementById('webAuthnResponseClientDataJSON').value = body.response.clientDataJSON;
    document.getElementById('webAuthnResponseAuthenticatorData').value = body.response.authenticatorData;
    document.getElementById('webAuthnResponseSignature').value = body.response.signature;
    document.getElementById('webAuthnResponseUserHandle').value = body.response.userHandle;
    document.getElementById('webAuthnType').value = body.type;
  })
  .catch(err => {
    // login failed
});| 1 | Discoverable Credentials (PassKeys 付き) の場合、ユーザー名はオプションです。 |
ログインおよび登録エンドポイントのハンドリング
ユーザーを登録するために、ユーザー名だけでなく、追加のデータを要求したり、カスタムバリデーションでログインや登録を処理したりする必要がある場合があります。そのため、デフォルトの WebAuthn ログインおよび登録エンドポイントでは不十分なことがあります。
この場合、JavaScript ライブラリーの WebAuthn.loginClientSteps と WebAuthn.registerClientSteps メソッドを使用して、オーセンティケーターデータを非表示フォーム要素に保存し、それらをフォームのペイロードの一部としてサーバーのカスタムログインまたは登録エンドポイントに送信できます。
フォーム入力要素に保存する場合、WebAuthnLoginResponse および WebAuthnRegistrationResponse クラスを使用し、それらに @BeanParam を付与することで WebAuthnSecurity.login および WebAuthnSecurity.register メソッドを使用して、/q/webauthn/login および /q/webauthn/register エンドポイントを置き換えることができます。
ほとんどの場合、カスタムロジックが不要であるため、/q/webauthn/login-options-challenge および /q/webauthn/register-options-challenge のチャレンジ開始エンドポイントを使い続けることができます。
この場合、登録フローは少し異なります。認証情報の保存とセッション Cookie のセットアップを処理する独自の登録エンドポイントを作成するためです。

同様に、ログインフローも少し異なります。独自のログインエンドポイントを作成するためです。このログインエンドポイントは、認証情報の更新とセッション Cookie のセットアップを処理します。

ユーザーおよびクレデンシャルの作成やログインを自身のエンドポイントで処理する場合、WebAuthnUserProvider にエンティティーの読み取り専用ビューを提供することのみが必要です。そのため、store および update メソッドは省略できます。
package org.acme.security.webauthn;

import java.util.List;

import io.quarkus.security.webauthn.WebAuthnCredentialRecord;
import io.quarkus.security.webauthn.WebAuthnUserProvider;
import io.smallrye.common.annotation.Blocking;
import io.smallrye.mutiny.Uni;
import jakarta.enterprise.context.ApplicationScoped;
import jakarta.transaction.Transactional;
import model.WebAuthnCredential;

@Blocking
@ApplicationScoped
public class MyWebAuthnSetup implements WebAuthnUserProvider {

    @Transactional
    @Override
    public Uni<List<WebAuthnCredentialRecord>> findByUsername(String username) {
        return Uni.createFrom().item(
            WebAuthnCredential.findByUsername(username)
                              .stream()
                              .map(WebAuthnCredential::toWebAuthnCredentialRecord)
                              .toList());
    }

    @Transactional
    @Override
    public Uni<WebAuthnCredentialRecord> findByCredentialId(String credentialId) {
        WebAuthnCredential creds = WebAuthnCredential.findByCredentialId(credentialId);
        if(creds == null)
            return Uni.createFrom()
                      .failure(new RuntimeException("No such credential ID"));
        return Uni.createFrom().item(creds.toWebAuthnCredentialRecord());
    }

    @Override
    public Set<String> getRoles(String userId) {
        if(userId.equals("admin")) {
            return Set.of("user", "admin");
        }
        return Collections.singleton("user");
    }
}
独自のログインおよび登録エンドポイントを設定する場合、デフォルトのエンドポイントを有効にする必要はありません。これにより、quarkus.webauthn.enable-login-endpoint および quarkus.webauthn.enable-registration-endpoint 設定を削除できます。
|
ありがたいことに、WebAuthnSecurity Bean を使用して、登録およびログインエンドポイントの WebAuthn 固有の部分を処理し、独自のロジックに集中できます。
package org.acme.security.webauthn;

import jakarta.inject.Inject;
import jakarta.transaction.Transactional;
import jakarta.ws.rs.BeanParam;
import jakarta.ws.rs.POST;
import jakarta.ws.rs.Path;
import jakarta.ws.rs.core.Response;
import jakarta.ws.rs.core.Response.Status;

import org.jboss.resteasy.reactive.RestForm;

import io.quarkus.security.webauthn.WebAuthnCredentialRecord;
import io.quarkus.security.webauthn.WebAuthnLoginResponse;
import io.quarkus.security.webauthn.WebAuthnRegisterResponse;
import io.quarkus.security.webauthn.WebAuthnSecurity;
import io.vertx.ext.web.RoutingContext;

@Path("")
public class LoginResource {

    @Inject
    WebAuthnSecurity webAuthnSecurity;

    // Provide an alternative implementation of the /q/webauthn/login endpoint
    @Path("/login")
    @POST
    @Transactional
    public Response login(@BeanParam WebAuthnLoginResponse webAuthnResponse,
                          RoutingContext ctx) {
        // Input validation
        if(!webAuthnResponse.isSet() || !webAuthnResponse.isValid()) {
            return Response.status(Status.BAD_REQUEST).build();
        }

        try {
            WebAuthnCredentialRecord credentialRecord = this.webAuthnSecurity.login(webAuthnResponse, ctx).await().indefinitely();
            User user = User.findByUsername(credentialRecord.getUsername());
            if(user == null) {
                // Invalid user
                return Response.status(Status.BAD_REQUEST).build();
            }
            // bump the auth counter
            user.webAuthnCredential.counter = credentialRecord.getCounter();
            // make a login cookie
            this.webAuthnSecurity.rememberUser(credentialRecord.getUsername(), ctx);
            return Response.ok().build();
        } catch (Exception exception) {
            // handle login failure - make a proper error response
            return Response.status(Status.BAD_REQUEST).build();
        }
    }

    // Provide an alternative implementation of the /q/webauthn/register endpoint
    @Path("/register")
    @POST
    @Transactional
    public Response register(@RestForm String username,
                             @BeanParam WebAuthnRegisterResponse webAuthnResponse,
                             RoutingContext ctx) {
        // Input validation
        if(username == null || username.isEmpty()
           || !webAuthnResponse.isSet() || !webAuthnResponse.isValid()) {
            return Response.status(Status.BAD_REQUEST).build();
        }

        User user = User.findByUsername(username);
        if(user != null) {
            // Duplicate user
            return Response.status(Status.BAD_REQUEST).build();
        }
        try {
            // store the user
            WebAuthnCredentialRecord credentialRecord =
                webAuthnSecurity.register(username, webAuthnResponse, ctx).await().indefinitely();
            User newUser = new User();
            newUser.username = credentialRecord.getUsername();
            WebAuthnCredential credential =
                new WebAuthnCredential(credentialRecord, newUser);
            credential.persist();
            newUser.persist();
            // make a login cookie
            this.webAuthnSecurity.rememberUser(newUser.username, ctx);
            return Response.ok().build();
        } catch (Exception ignored) {
            // handle login failure
            // make a proper error response
            return Response.status(Status.BAD_REQUEST).build();
        }
    }
}
WebAuthnSecurity メソッドは、session cookie の設定や読み取りを行わないため、それは自身で管理する必要がありますが、JWT など他の方法を使用してユーザーを保存できます。ログイン Cookie を手動で設定したい場合は、同じ WebAuthnSecurity クラスの WebAuthnSecurity.rememberUser および WebAuthnSecurity.logout メソッドを使用できます。
|
ブロッキングバージョン
データベースへのブロッキングデータアクセスを使用している場合、WebAuthnSecurity メソッドは、.await().indefinitely() で安全にブロックできます。なぜなら、register および login メソッドでは、WebAuthnUserProvider を介したデータアクセス以外は非同期処理が行われないからです。
Quarkus WebAuthn エンドポイントがその呼び出しをワーカープールに委任するには、WebAuthnUserProvider クラスに @Blocking アノテーションを追加する必要があります。
仮想スレッドバージョン
データベースへのブロッキングデータアクセスを使用している場合、WebAuthnSecurity メソッドは、.await().indefinitely() で安全にブロックできます。なぜなら、register および login メソッドでは、WebAuthnUserProvider を介したデータアクセス以外は非同期処理が行われないからです。
Quarkus WebAuthn エンドポイントがその呼び出しをワーカープールに委任するには、WebAuthnUserProvider クラスに @RunOnVirtualThread アノテーションを追加する必要があります。
WebAuthn のテスト
通常、ハードウェアトークンが必要なため、WebAuthn のテストは複雑です。そのため、quarkus-test-security-webauthn というヘルパーライブラリーを作成しました。
<dependency>
    <groupId>io.quarkus</groupId>
    <artifactId>quarkus-test-security-webauthn</artifactId>
    <scope>test</scope>
</dependency>testImplementation("io.quarkus:quarkus-test-security-webauthn")これにより、WebAuthnHardware を使用して、オーセンティケーターのトークンをエミュレートしたり、WebAuthnEndpointHelper ヘルパーメソッドを使用して WebAuthn エンドポイントを呼び出したり、カスタムエンドポイント用にフォームデータを埋めることができます。
package org.acme.security.webauthn.test;

import static io.restassured.RestAssured.given;

import java.net.URL;
import java.util.function.Consumer;

import org.hamcrest.Matchers;
import org.junit.jupiter.api.Test;

import io.quarkus.test.common.http.TestHTTPResource;
import io.quarkus.test.junit.QuarkusTest;
import io.quarkus.test.security.webauthn.WebAuthnEndpointHelper;
import io.quarkus.test.security.webauthn.WebAuthnHardware;
import io.restassured.RestAssured;
import io.restassured.filter.Filter;
import io.restassured.filter.cookie.CookieFilter;
import io.restassured.specification.RequestSpecification;
import io.vertx.core.json.JsonObject;

@QuarkusTest
public class WebAuthnResourceTest {

    enum User {
        USER, ADMIN;
    }
    enum Endpoint {
        DEFAULT, MANUAL;
    }

    @TestHTTPResource
    URL url;

    @Test
    public void testWebAuthnUser() {
        testWebAuthn("FroMage", User.USER, Endpoint.DEFAULT);
        testWebAuthn("scooby", User.USER, Endpoint.MANUAL);
    }

    @Test
    public void testWebAuthnAdmin() {
        testWebAuthn("admin", User.ADMIN, Endpoint.DEFAULT);
    }

    private void testWebAuthn(String username, User user, Endpoint endpoint) {
        Filter cookieFilter = new CookieFilter();
        WebAuthnHardware token = new WebAuthnHardware(url);

        verifyLoggedOut(cookieFilter);

        // two-step registration
        String challenge = WebAuthnEndpointHelper.obtainRegistrationChallenge(username, cookieFilter);
        JsonObject registrationJson = token.makeRegistrationJson(challenge);
        if(endpoint == Endpoint.DEFAULT)
            WebAuthnEndpointHelper.invokeRegistration(username, registrationJson, cookieFilter);
        else {
            invokeCustomEndpoint("/register", cookieFilter, request -> {
                WebAuthnEndpointHelper.addWebAuthnRegistrationFormParameters(request, registrationJson);
                request.formParam("username", username);
            });
        }

        // verify that we can access logged-in endpoints
        verifyLoggedIn(cookieFilter, username, user);

        // logout
        WebAuthnEndpointHelper.invokeLogout(cookieFilter);

        verifyLoggedOut(cookieFilter);

        // two-step login
        challenge = WebAuthnEndpointHelper.obtainLoginChallenge(null, cookieFilter);
        JsonObject loginJson = token.makeLoginJson(challenge);
        if(endpoint == Endpoint.DEFAULT)
            WebAuthnEndpointHelper.invokeLogin(loginJson, cookieFilter);
        else {
            invokeCustomEndpoint("/login", cookieFilter, request -> {
                WebAuthnEndpointHelper.addWebAuthnLoginFormParameters(request, loginJson);
            });
        }

        // verify that we can access logged-in endpoints
        verifyLoggedIn(cookieFilter, username, user);

        // logout
        WebAuthnEndpointHelper.invokeLogout(cookieFilter);

        verifyLoggedOut(cookieFilter);
    }

    private void invokeCustomEndpoint(String uri, Filter cookieFilter, Consumer<RequestSpecification> requestCustomiser) {
        RequestSpecification request = given()
        .when();
        requestCustomiser.accept(request);
        request
        .filter(cookieFilter)
        .redirects().follow(false)
        .log().ifValidationFails()
        .post(uri)
        .then()
        .statusCode(200)
        .log().ifValidationFails()
        .cookie(WebAuthnEndpointHelper.getChallengeCookie(), Matchers.is(""))
        .cookie(WebAuthnEndpointHelper.getMainCookie(), Matchers.notNullValue());
    }

    private void verifyLoggedIn(Filter cookieFilter, String username, User user) {
        // public API still good
        RestAssured.given().filter(cookieFilter)
        .when()
        .get("/api/public")
        .then()
        .statusCode(200)
        .body(Matchers.is("public"));
        // public API user name
        RestAssured.given().filter(cookieFilter)
        .when()
        .get("/api/public/me")
        .then()
        .statusCode(200)
        .body(Matchers.is(username));

        // user API accessible
        RestAssured.given().filter(cookieFilter)
        .when()
        .get("/api/users/me")
        .then()
        .statusCode(200)
        .body(Matchers.is(username));

        // admin API?
        if(user == User.ADMIN) {
            RestAssured.given().filter(cookieFilter)
            .when()
            .get("/api/admin")
            .then()
            .statusCode(200)
            .body(Matchers.is("admin"));
        } else {
            RestAssured.given().filter(cookieFilter)
            .when()
            .get("/api/admin")
            .then()
            .statusCode(403);
        }
    }

    private void verifyLoggedOut(Filter cookieFilter) {
        // public API still good
        RestAssured.given().filter(cookieFilter)
        .when()
        .get("/api/public")
        .then()
        .statusCode(200)
        .body(Matchers.is("public"));
        // public API user name
        RestAssured.given().filter(cookieFilter)
        .when()
        .get("/api/public/me")
        .then()
        .statusCode(200)
        .body(Matchers.is("<not logged in>"));

        // user API not accessible
        RestAssured.given()
        .filter(cookieFilter)
        .redirects().follow(false)
        .when()
        .get("/api/users/me")
        .then()
        .statusCode(302)
        .header("Location", Matchers.is("http://localhost:8081/"));

        // admin API not accessible
        RestAssured.given()
        .filter(cookieFilter)
        .redirects().follow(false)
        .when()
        .get("/api/admin")
        .then()
        .statusCode(302)
        .header("Location", Matchers.is("http://localhost:8081/"));
    }
}
このテストでは、提供されたコールバックエンドポイント (WebAuthnUserProvider 内でユーザーを更新) と、ユーザーを手動で処理する手動の LoginResource エンドポイントの両方をテストするため、scooby ユーザーを更新しない WebAuthnUserProvider にオーバーライドする必要があります。
package org.acme.security.webauthn.test;

import org.acme.security.webauthn.MyWebAuthnSetup;
import org.acme.security.webauthn.WebAuthnCredential;

import io.quarkus.security.webauthn.WebAuthnCredentialRecord;
import io.quarkus.test.Mock;
import io.smallrye.mutiny.Uni;
import jakarta.enterprise.context.ApplicationScoped;
import jakarta.transaction.Transactional;

@Mock
@ApplicationScoped
public class TestUserProvider extends MyWebAuthnSetup {
    @Transactional
    @Override
    public Uni<Void> store(WebAuthnCredentialRecord credentialRecord) {
        // this user is handled in the LoginResource endpoint manually
        if (credentialRecord.getUsername().equals("scooby")) {
            return Uni.createFrom().voidItem();
        }
        return super.store(credentialRecord);
    }

    @Transactional
    @Override
    public Uni<Void> update(String credentialId, long counter) {
        WebAuthnCredential credential = WebAuthnCredential.findByCredentialId(credentialId);
        // this user is handled in the LoginResource endpoint manually
        if (credential.user.username.equals("scooby")) {
        	return Uni.createFrom().voidItem();
        }
        return super.update(credentialId, counter);
    }
}
設定リファレンス
セキュリティー暗号鍵は、セキュリティーガイド で説明されているように、quarkus.http.auth.session.encryption-key 設定オプションで設定できます。
ビルド時に固定される設定プロパティー - 他のすべての設定プロパティーは実行時にオーバーライド可能
Configuration property |
型 |
デフォルト |
|---|---|---|
If the WebAuthn extension is enabled. Environment variable: Show more |
boolean |
|
The origins of the application. The origin is basically protocol, host and port. If you are calling WebAuthn API while your application is located at Environment variable: Show more |
文字列のリスト |
|
Authenticator Transports allowed by the application. Authenticators can interact with the user web browser through several transports. Applications may want to restrict the transport protocols for extra security hardening reasons. By default, all transports should be allowed. If your application is to be used by mobile phone users, you may want to restrict only the
Environment variable: Show more |
list of |
|
The id (or domain name of your server, as obtained from the first entry of Environment variable: Show more |
string |
|
A user friendly name for your server Environment variable: Show more |
string |
|
Kind of Authenticator Attachment allowed. Authenticators can connect to your device in two forms:
For security reasons your application may choose to restrict to a specific attachment mode. If omitted, then any mode is permitted. Environment variable: Show more |
|
|
Load the FIDO metadata for verification. See https://fidoalliance.org/metadata/. Only useful for attestations different from Environment variable: Show more |
boolean |
|
Resident key required. A resident (private) key, is a key that cannot leave your authenticator device, this means that you cannot reuse the authenticator to log into a second computer. Environment variable: Show more |
|
|
User Verification requirements. Webauthn applications may choose
Environment variable: Show more |
|
|
User presence requirements. Environment variable: Show more |
boolean |
|
Non-negative User Verification timeout. Authentication must occur within the timeout, this will prevent the user browser from being blocked with a pop-up required user verification, and the whole ceremony must be completed within the timeout period. After the timeout, any previously issued challenge is automatically invalidated. Environment variable: Show more |
|
|
Device Attestation Preference. During registration, applications may want to attest the device. Attestation is a cryptographic verification of the authenticator hardware. Attestation implies that the privacy of the users may be exposed and browsers might override the desired configuration on the user’s behalf. Valid values are:
Environment variable: Show more |
|
|
Allowed Public Key Credential algorithms by preference order. Webauthn mandates that all authenticators must support at least the following 2 algorithms: Environment variable: Show more |
list of |
|
Length of the challenges exchanged between the application and the browser. Challenges must be at least 32 bytes. Environment variable: Show more |
int |
|
The login page Environment variable: Show more |
string |
|
The inactivity (idle) timeout When inactivity timeout is reached, cookie is not renewed and a new login is enforced. Environment variable: Show more |
|
|
How old a cookie can get before it will be replaced with a new cookie with an updated timeout, also referred to as "renewal-timeout". Note that smaller values will result in slightly more server load (as new encrypted cookies will be generated more often); however, larger values affect the inactivity timeout because the timeout is set when a cookie is generated. For example if this is set to 10 minutes, and the inactivity timeout is 30m, if a user’s last request is when the cookie is 9m old then the actual timeout will happen 21m after the last request because the timeout is only refreshed when a new cookie is generated. That is, no timeout is tracked on the server side; the timestamp is encoded and encrypted in the cookie itself, and it is decrypted and parsed with each request. Environment variable: Show more |
|
|
The cookie that is used to store the persistent session Environment variable: Show more |
string |
|
The cookie that is used to store the challenge data during login/registration Environment variable: Show more |
string |
|
SameSite attribute for the session cookie. Environment variable: Show more |
|
|
The cookie path for the session cookies. Environment variable: Show more |
string |
|
Max-Age attribute for the session cookie. This is the amount of time the browser will keep the cookie. The default value is empty, which means the cookie will be kept until the browser is closed. Environment variable: Show more |
||
Set to Environment variable: Show more |
boolean |
|
Set to Environment variable: Show more |
boolean |
|
WebAuthn authentication mechanism priority. Environment variable: Show more |
int |
|
|
期間フォーマットについて
期間の値を書くには、標準の 数字で始まる簡略化した書式を使うこともできます:
その他の場合は、簡略化されたフォーマットが解析のために
|