QuarkusアプリケーションからのEclipse Vert.x APIの使用
Vert.xは、リアクティブなアプリケーションを構築するためのツールキットです。 Quarkus Reactive Architectureに記載されているように、QuarkusではVert.xを下地に使用しています。

QuarkusのアプリケーションはVert.xのAPIにアクセスして使用することができます。
このガイドでは、Quarkusのアプリケーションで次を使って構築する方法を紹介します。
-
Vert.xのマネージドインスタンス
-
Vert.x イベントバス
-
Vert.x Webクライアント
これは入門ガイドです。 Vert.xリファレンスガイドでは、バーティクルやネイティブトランスポートなど、より高度な機能について説明しています。
アーキテクチャ
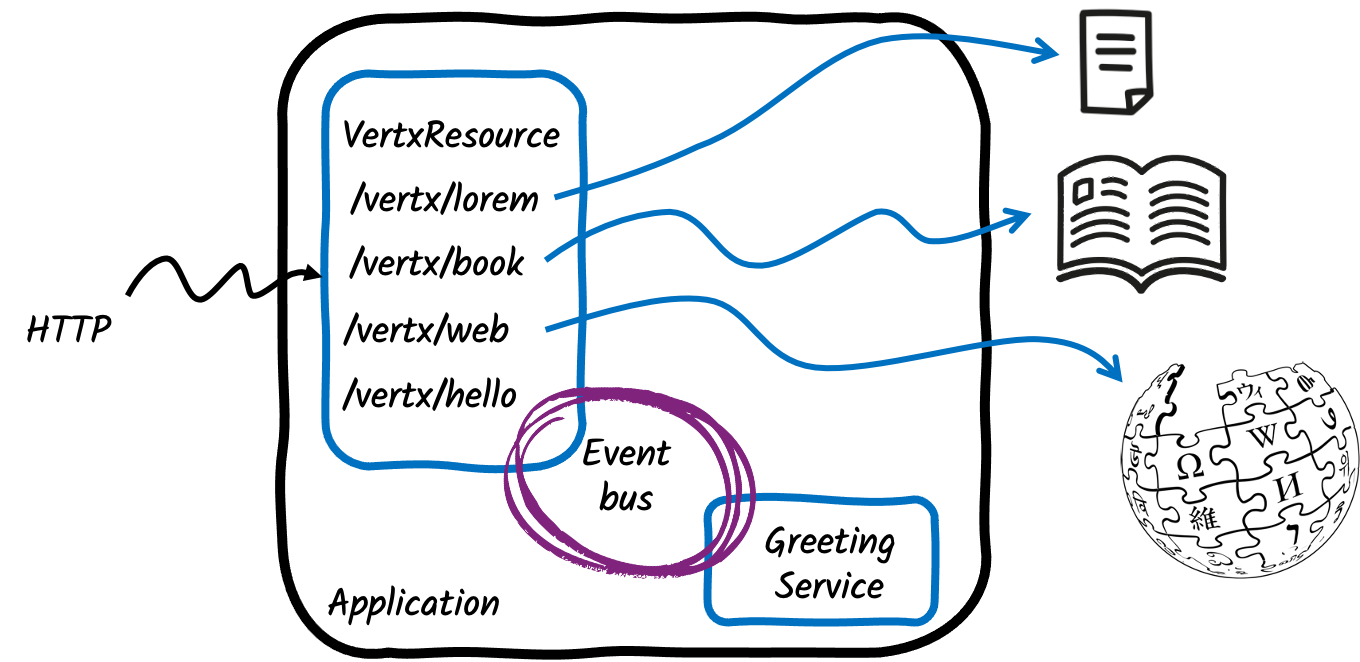
ここでは、4つのHTTPエンドポイントを公開するシンプルなアプリケーションを作成します。
-
/vertx/lorem小さなファイルからコンテンツを返す -
/vertx/book大きなファイル(本)からコンテンツを返す -
/vertx/helloは、Vert.x イベントバスを使用してレスポンスを生成します -
/vertx/webは、Vert.x Web クライアントを使用して Wikipedia からデータを取得します

ソリューション
次の章で紹介する手順に沿って、ステップを踏んでアプリを作成することをお勧めします。ただし、完成した例にそのまま進んでも構いません。
Gitリポジトリをクローン: git clone https://github.com/quarkusio/quarkus-quickstarts.git 、または archive をダウンロードする。
ソリューションは vertx-quickstart ディレクトリ にあります。
|
Mutiny
このガイドでは、Mutiny APIを使用しています。Mutinyに慣れていない方は、 Mutiny - 直感的なリアクティブプログラミングライブラリをご覧ください。 |
アプリケーションの起動
アプリケーションを設定するには、 このリンク をクリックしてください。 いくつかのエクステンションが選択されています:
-
rest-jacksonはrestも持ち込みます。HTTPエンドポイントを公開するためにこれを使用します。 -
vertx、下地となるマネージドVert.xへのアクセスを提供します。
Generate your application ボタンをクリックし、ZIPファイルをダウンロードして解凍します。その後、お好きなIDEでプロジェクトを開いてください。
生成されたビルドファイルを開くと、選択されたエクステンションが表示されます:
<dependency>
  <groupId>io.quarkus</groupId>
  <artifactId>quarkus-rest-jackson</artifactId>
</dependency>
<dependency>
  <groupId>io.quarkus</groupId>
  <artifactId>quarkus-vertx</artifactId>
</dependency>implementation("io.quarkus:quarkus-rest-jackson")
implementation("io.quarkus:quarkus-vertx")ビルドファイルの中で、以下の依存関係を追加してください。
<dependency>
  <groupId>io.smallrye.reactive</groupId>
  <artifactId>smallrye-mutiny-vertx-web-client</artifactId>
</dependency>implementation("io.smallrye.reactive:smallrye-mutiny-vertx-web-client")この依存関係は、Vert.x Web クライアントを提供し、 /web エンドポイントの実装に使用されます。
Vert.xマネージドインスタンスへのアクセス
src/main/java/org/acme/VertxResource.java ファイルを作成します。このファイルには、HTTPエンドポイントが含まれます。
このファイルに、以下のコードをコピーします。
package org.acme;

import io.smallrye.mutiny.Uni;
import io.vertx.mutiny.core.Vertx;

import java.nio.charset.StandardCharsets;

import jakarta.inject.Inject;
import jakarta.ws.rs.GET;
import jakarta.ws.rs.Path;

@Path("/vertx")                        (1)
public class VertxResource {

    private final Vertx vertx;

    @Inject                             (2)
    public VertxResource(Vertx vertx) { (3)
        this.vertx = vertx;             (4)
    }
}| 1 | ルートHTTPパスを宣言します。 |
| 2 | コンストラクタ・インジェクションを使用して、マネージドVert.xインスタンスを受け取ります。フィールド・インジェクションも有効です。 |
| 3 | コンストラクタのパラメータとしてVert.xインスタンスを受け取ります。 |
| 4 | マネージドVert.xインスタンスをフィールドに格納します。 |
これで、エンドポイントの実装を始めることができます。
Vert.x Core APIの使用
インジェクションされたVert.xインスタンスは、利用可能なAPIのセットを提供します。このセクションで使用するのはVert.x File Systemです。これは、ファイルにアクセスするためのノンブロッキングAPIを提供します。
src/main/resources ディレクトリに、以下の内容の lorem.txt ファイルを作成します:
Lorem ipsum dolor sit amet, consetetur sadipscing elitr, sed diam nonumy eirmod tempor invidunt ut labore et dolore magna aliquyam erat, sed diam voluptua. At vero eos et accusam et justo duo dolores et ea rebum. Stet clita kasd gubergren, no sea takimata sanctus est Lorem ipsum dolor sit amet. Lorem ipsum dolor sit amet, consetetur sadipscing elitr, sed diam nonumy eirmod tempor invidunt ut labore et dolore magna aliquyam erat, sed diam voluptua. At vero eos et accusam et justo duo dolores et ea rebum. Stet clita kasd gubergren, no sea takimata sanctus est Lorem ipsum dolor sit amet.そして、 VertxResource ファイルに以下のメソッドを追加します。
@GET                                                                                   (1)
@Path("/lorem")
public Uni<String> readShortFile() {                                                   (2)
    return vertx.fileSystem().readFile("lorem.txt")                                    (3)
            .onItem().transform(content -> content.toString(StandardCharsets.UTF_8));  (4)
}| 1 | このエンドポイントは、パス /lorem に対する HTTP GET リクエストを処理します(そのため、フルパスは vertx/lorem となります)。 |
| 2 | Vert.x APIは非同期なので、このメソッドは Uni を返却します。Uniで表される非同期操作が完了すると、その内容がHTTPレスポンスに書き込まれます。 |
| 3 | Vert.xのファイルシステムAPIを使用して、作成されたファイルを読み取ります。 |
| 4 | ファイルが読み込まれると、その内容がメモリ内のバッファに格納されます。このバッファをStringに変換します。 |
ターミナルで、プロジェクトのルートに移動して次を実行します。
quarkus dev./mvnw quarkus:dev./gradlew --console=plain quarkusDev別の端末で、次を実行します。
> curl http://localhost:8080/vertx/loremコンソールにファイルの内容が表示されるはずです。
| Quarkusは、静的ファイルを提供する他の方法を提供しています。これはガイドのために作られた例です。 |
Vert.x stream の能力の使用
ファイルを読み込んで内容をメモリに保存する方法は、小さなファイルには有効ですが、大きなファイルには使えません。このセクションでは、Vert.xのストリーミング機能をどのように使用するかを説明します。
まず、 戦争と平和をダウンロードして、 src/main/resources/book.txt に保存します。これは3.2Mbのファイルで、巨大ではありませんが、ストリームの目的を説明しています。今回は、ファイルの内容をメモリに蓄積して一括して書き込むのではなく、チャンクごとに読み込んで、そのチャンクを1つずつHTTPレスポンスに書き込んでいきます。
そこで、プロジェクト内に以下のファイルを用意しておきます。
.
├── mvnw
├── mvnw.cmd
├── pom.xml
├── README.md
├── src
│  └── main
│     ├── docker
│     │  ├── ...
│     ├── java
│     │  └── org
│     │     └── acme
│     │        └── VertxResource.java
│     └── resources
│        ├── application.properties
│        ├── book.txt
│        └── lorem.txt
src/main/java/org/acme/VertxResource.java ファイルに次のimportを追加します:
import io.smallrye.mutiny.Multi;
import io.vertx.core.file.OpenOptions;
VertxResource クラスに以下のメソッドを追加します。
@GET
@Path("/book")
public Multi<String> readLargeFile() {                                               (1)
    return vertx.fileSystem().open("book.txt",                                       (2)
                    new OpenOptions().setRead(true)
            )
            .onItem().transformToMulti(file -> file.toMulti())                       (3)
            .onItem().transform(content -> content.toString(StandardCharsets.UTF_8) (4)
                    + "\n------------\n");                                           (5)
}| 1 | 今回は、チャンクをストリーミングしたいので、Multiを返します。 |
| 2 | open メソッドを使ってファイルを開きます。このメソッドは Uni<AsyncFile> を返却します。 |
| 3 | ファイルが開かれると、チャンクを含む Multi が取得できます。 |
| 4 | 各チャンクは、String を生成します。 |
| 5 | レスポンス内のチャンクを視覚的に確認するために、セパレーターを追加します。 |
そして、ターミナルで、次を実行します。
> curl http://localhost:8080/vertx/bookブックの内容を取得します。出力には次のようなセパレータが表示されるはずです。
...
The little princess had also left the tea table and followed Hélène.

“Wait a moment, I’ll get my work.... Now then, what
------------
 are you
thinking of?” she went on, turning to Prince Hippolyte. “Fetch me my
workbag.”
...
イベントバスの使用
Vert.xのコア機能の1つに イベントバス があります。
これは、アプリケーションにメッセージベースのバックボーンを提供します。
そのため、非同期メッセージパッシングを使用して相互作用するコンポーネントを持つことができ、コンポーネントを分離することができます。単一のコンシューマーにメッセージを送信することも、複数のコンシューマーにディスパッチすることも、メッセージ(リクエスト)を送信してレスポンスを期待するリクエスト・リプライ型のインタラクションを実装することもできます。
このセクションではこれを使用します。
VertxResource は、名前を含むメッセージを greetings のアドレスに送信します。
別のコンポーネントがそのメッセージを受け取り、"hello $name "というレスポンスを返します。
VertxResource はレスポンスを受け取り、HTTP レスポンスとして返します。
So, first, add the following imports to the src/main/java/org/acme/VertxResource.java file:
import io.vertx.mutiny.core.eventbus.EventBus;
import jakarta.ws.rs.QueryParam;
次に、 VertxResource クラスを以下のコードで拡張してみましょう:
@Inject
EventBus bus;                                                   (1)

@GET
@Path("/hello")
public Uni<String> hello(@QueryParam("name") String name) {     (2)
    return bus.<String>request("greetings", name)               (3)
            .onItem().transform(response -> response.body());   (4)
}| 1 | イベントバスを注入します。あるいは、 vertx.eventBus() を使うこともできます。 |
| 2 | クエリパラメータとして name を受け取ります。 |
| 3 | request メソッドを使用して、リクエストとリプライのやりとりを開始します。名前を "greetings "アドレスに送信します。 |
| 4 | レスポンスを受信したら、ボディを抽出してHTTPレスポンスとして返します。 |
さて、もう一方が必要です。名前を受け取って返信するコンポーネントです。以下の内容で src/main/java/org/acme/GreetingService.java を作成します:
package org.acme;

import io.quarkus.vertx.ConsumeEvent;

import jakarta.enterprise.context.ApplicationScoped;

@ApplicationScoped                          (1)
public class GreetingService {

    @ConsumeEvent("greetings")              (2)
    public String hello(String name) {      (3)
        return "Hello " + name;             (4)
    }
}| 1 | アプリケーションスコープでCDI Beanを宣言します。Quarkusはこのクラスのインスタンスを1つ作成します。 |
| 2 | コンシューマを宣言するには、 @ConsumeEvent アノテーションを使用します。Vert.x API を 直接 使用することも可能です。 |
| 3 | メッセージのペイロードをメソッドのパラメーターとして受け取ります。返されたオブジェクトがリプライとなります。 |
| 4 | レスポンスを返します。このレスポンスは VertxResource クラスに返されます。 |
試してみましょう。 ターミナルで次を実行します。
> curl "http://localhost:8080/vertx/hello?name=bob"期待通りの Hello bob メッセージが返ってくるはずです。
Vert.x クライアントの使用
ここまでは、Vert.x Core APIを使用してきました。 Vert.xはそれ以上のものを提供しています。 Vert.xは広大なエコシステムを提供します。 このセクションでは、リアクティブHTTPクライアントであるVert.x Web Clientの使用方法について説明します。
Quarkusのエクステンションの中には、Vert.xクライアントをラッピングして管理してくれるものがあります。 これは、リアクティブデータソース、Redis、メールなどの場合です。 Web Clientは対象ではありません。
このガイドの冒頭で、 pom.xml ファイルに smallrye-mutiny-vertx-web-client の依存関係を追加したことを思い出してください。
今がそれを使う番です。
First, add the following imports to the src/main/java/org/acme/VertxResource.java file:
import io.vertx.core.json.JsonArray;
import io.vertx.mutiny.ext.web.client.HttpResponse;
import io.vertx.mutiny.ext.web.client.WebClient;
次に、 WebClient のインスタンスを作成する必要があります。 client フィールドとウェブクライアントの作成をコンストラクタに追加して、 VertxResource クラスを拡張します:
private final Vertx vertx;
private final WebClient client;            (1)

@Inject
public VertxResource(Vertx vertx) {
    this.vertx = vertx;
    this.client = WebClient.create(vertx); (2)
}| 1 | HTTP エンドポイントで使用できるように、 WebClient を保存します。 |
| 2 | WebClient を作成します。必ず io.vertx.mutiny.ext.web.client.WebClient クラスを使用してください。 |
それでは、Wikipedia APIに問い合わせ、Quarkusに関するさまざまな言語のページを取得する新しいHTTPエンドポイントを実装してみましょう。
VertxResource クラスに以下のメソッドを追加します:
private static final String URL = "https://en.wikipedia.org/w/api.php?action=parse&page=Quarkus&format=json&prop=langlinks";

@GET
@Path("/web")
public Uni<JsonArray> retrieveDataFromWikipedia() {                     (1)
    return client.getAbs(URL).send()                                    (2)
            .onItem().transform(HttpResponse::bodyAsJsonObject)         (3)
            .onItem().transform(json -> json.getJsonObject("parse")     (4)
                                        .getJsonArray("langlinks"));
}| 1 | このエンドポイントは、JSON Array を返します。Vert.x は、JSON オブジェクトと配列を操作する便利な方法を提供します。これらの詳細については、 リファレンスガイド を参照してください。 |
| 2 | Wikipedia API に GET リクエストを送信します。 |
| 3 | レスポンスを受信したら、JSONオブジェクトとして取り出します。 |
| 4 | レスポンスから langlinks 配列を取り出します。 |
そして、次のようにエンドポイントを呼び出します:
> curl http://localhost:8080/vertx/web
[{"lang":"de","url":"https://de.wikipedia.org/wiki/Quarkus","langname":"German","autonym":"Deutsch","*":"Quarkus"},{"lang":"fr","url":"https://fr.wikipedia.org/wiki/Quarkus","langname":"French","autonym":"français","*":"Quarkus"}]
応答によると、ウィキペディアには英語のページに加え、ドイツ語とフランス語のQuarkusに関するページがあるとのことです。
ブロッキングスレッドから非同期コードを実行
ブロッキングスレッドから非同期コードを実行する必要がある場合があります。
具体的には、分離/複製されたVert.xコンテキストを持つVert.xスレッドでコードを実行します。
典型的な例は、アプリケーションの起動時にHibernate Reactive APIを活用する必要がある非同期コードです。
Quarkusは、 VertxContextSupport#subscribeAndAwait() メソッドを提供します。このメソッドは、Vert.xの複製されたコンテキスト上で提供された io.smallrye.mutiny.Uni を購読し、現在のスレッドをブロックして結果を待ちます。
void onStart(@Observes StartupEvent event, Mutiny.SessionFactory sf) {
   VertxContextSupport.subscribeAndAwait(() -> {
      return sf.withTransaction(session -> session.persist(new Person()));
   });
}| 必要であれば、CDIリクエストコンテキストは非同期コードの実行中にアクティブ化されます。 |
VertxContextSupport#subscribeAndAwait() をイベントループで呼んではいけません!
|
また、Vert.xの複製されたコンテキストで、提供された io.smallrye.mutiny.Multi を購読することも可能です。
この場合、現在のスレッドはブロックされず、提供されたサブスクリプションロジックがイベントを消費するために使用されます。
void onStart(@Observes StartupEvent event, ExternalService service) {
   VertxContextSupport.subscribeWith(() -> service.getFoos(), foo -> {
     // do something useful with foo
   });
}
さらに詳しく
このガイドでは、QuarkusアプリケーションからVert.x APIを使用する方法を紹介しました。 あくまで簡単な概要です。 もっと詳しく知りたい場合は、 QuarkusのVert.xに関するリファレンスガイド をご覧ください。
これまで見てきたように、イベントバスはVert.xアプリケーションの接続組織です。 Quarkusはこれを統合し、異なるBeanが非同期メッセージでやり取りできるようにします。 この部分については、 イベントバスのドキュメント を参照してください。
Learn how to implement highly performant, low-overhead database applications on Quarkus with the Reactive SQL Clients.
