How to Use Kafka, Schema Registry and Avro with Quarkus

In the Kafka world, Apache Avro is by far the most used serialization protocol. Avro is a data serialization system. Combined with Kafka, it provides schema-based, robust, and fast binary serialization.
In this blog post, we will see how you can use Avro with a schema registry in a Quarkus application. This blog focuses on the JVM mode. We will cover the native mode in another post.
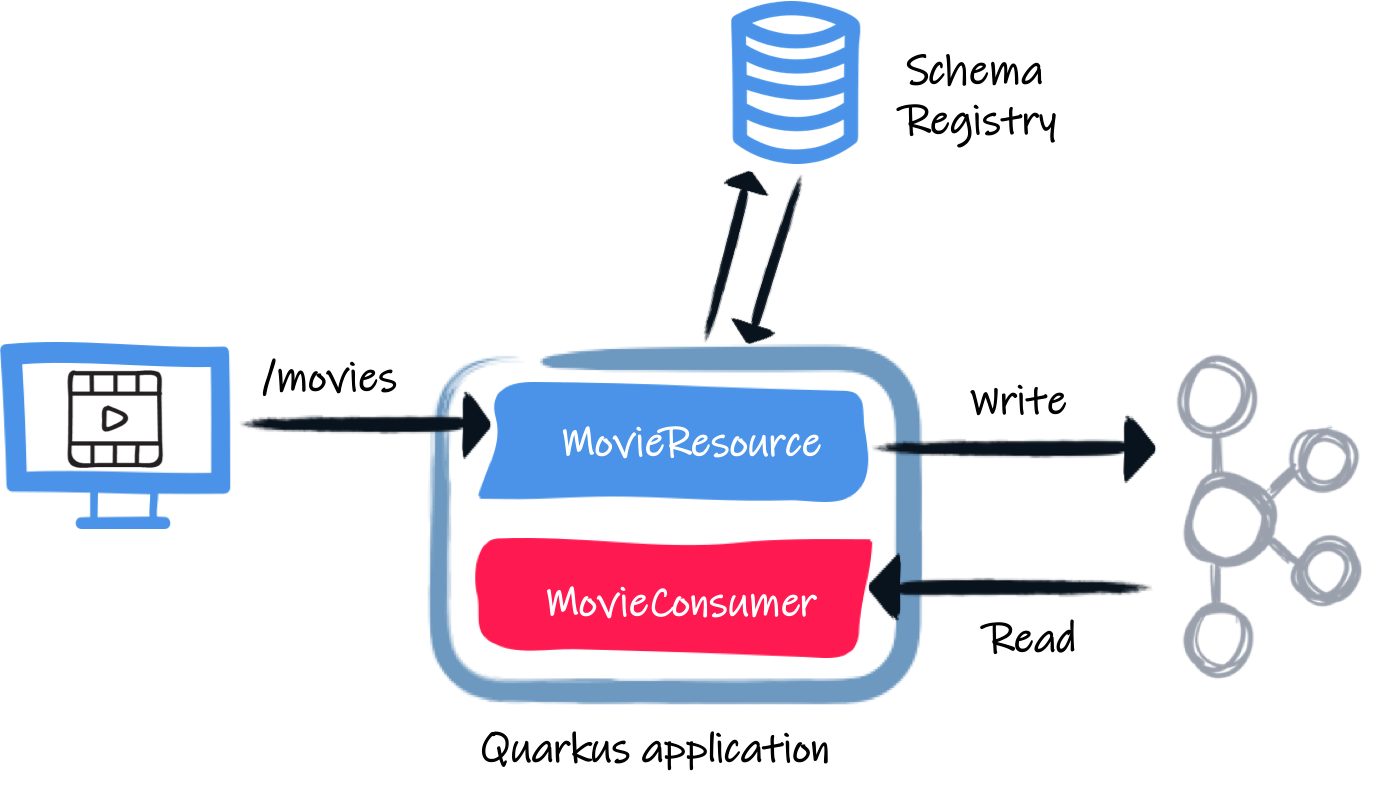
We will write a simple application receiving HTTP requests, writing the payload into Kafka, and reading them from Kafka. For simplicity, the same application will write into Kafka and read from it, but obviously, it would be different applications in the real world.
How to start
Well, let’s start from the beginning. Go to https://code.quarkus.io to create your project, and select the following extension:
-
RESTEasy JSON-B
-
SmallRye Reactive Messaging - Kafka Connector
-
Apache Avro
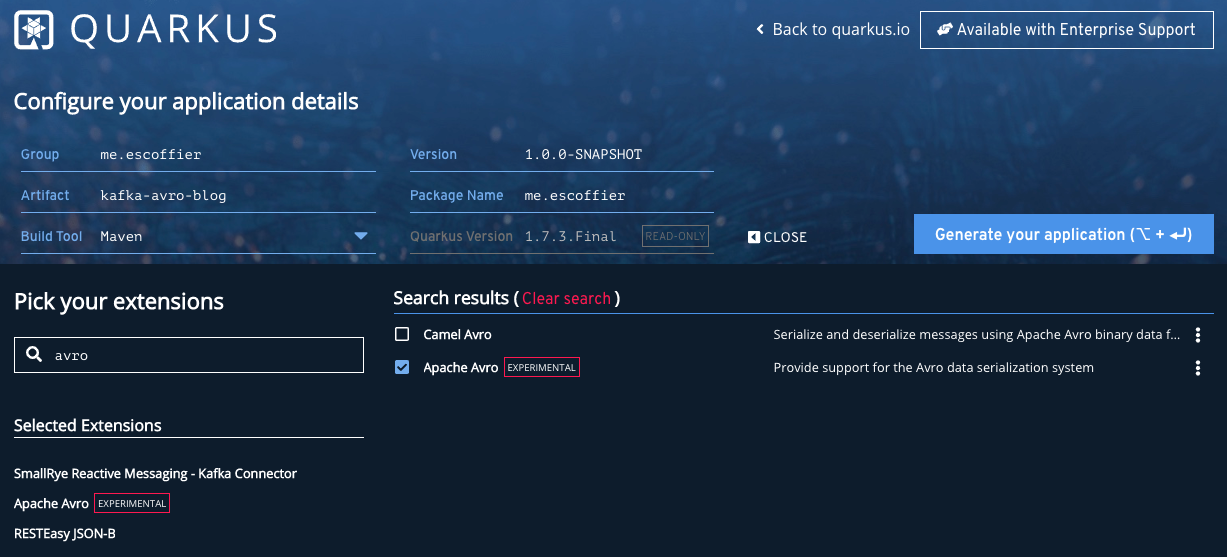
Download the project and open it in your favorite IDE.
We need to add a few more content to the generated pom.xml.
Open the pom.xml file and add the following dependency:
<dependency>
  <groupId>io.apicurio</groupId>
  <artifactId>apicurio-registry-utils-serde</artifactId>
  <version>1.2.2.Final</version>
  <exclusions>
    <exclusion>
      <groupId>org.jboss.spec.javax.interceptor</groupId>
      <artifactId>jboss-interceptors-api_1.2_spec</artifactId>
    </exclusion>
  </exclusions>
</dependency>
This dependency provides Avro serializer and deserializer. There are multiple versions of this serde. In this blog post, we use the ones provided by Apicurio. You can also use Confluent’s one (the artifact is not on Maven Central, so you need to add an extra repository).
We also need to add the avro-maven-plugin.
Under <build><plugins>, add:
<plugin>
  <groupId>org.apache.avro</groupId>
  <artifactId>avro-maven-plugin</artifactId>
  <version>1.9.2</version>
  <executions>
    <execution>
    <phase>generate-sources</phase>
      <goals>
        <goal>schema</goal>
      </goals>
      <configuration>
        <sourceDirectory>src/main/avro</sourceDirectory>
        <outputDirectory>${project.build.directory}/generated-sources</outputDirectory>
        <stringType>String</stringType>
      </configuration>
      </execution>
  </executions>
</plugin>
This plugin generates the code from Avro schema files located in the src/main/avro directory.
With this setup, we can finally start to write some code.
The Avro schema
First, we need to write the schema representing the object we will read and write in Kafka.
Create the src/main/avro/movie.avsc file with the following content:
{
  "namespace": "me.escoffier.quarkus",
  "type": "record",
  "name": "Movie",
  "fields": [
    {
      "name": "title",
      "type": "string"
    },
    {
      "name": "year",
      "type": "int"
    }
  ]
}
The avro-maven-plugin, configured in the pom.xml file, generates the me.escoffier.quarkus.Movie class with the title and year attributes.
To generate the class, run:
mvn generate-sourcesThe Movie Resource
The first class we will write receives HTTP requests and writes the (Movie) payload into Kafka.
Create the src/main/java/me/escoffier/MovieResource.java with the following content:
package me.escoffier;

import me.escoffier.quarkus.Movie;
import org.eclipse.microprofile.reactive.messaging.Channel;
import org.eclipse.microprofile.reactive.messaging.Emitter;
import org.jboss.logging.Logger;

import javax.inject.Inject;
import javax.ws.rs.Consumes;
import javax.ws.rs.POST;
import javax.ws.rs.Path;
import javax.ws.rs.Produces;
import javax.ws.rs.core.MediaType;
import javax.ws.rs.core.Response;

@Path("/movies")
@Consumes(MediaType.APPLICATION_JSON)
@Produces(MediaType.APPLICATION_JSON)
public class MovieResource {

    private static final Logger LOGGER =
        Logger.getLogger("MovieResource");

    @Inject @Channel("movies") Emitter<Movie> emitter;


    @POST
    public Response enqueueMovie(Movie movie) {
        LOGGER.infof("Sending movie %s to Kafka",
            movie.getTitle()
        );
        emitter.send(movie);
        return Response.accepted().build();
    }

}
This JAX-RS resource is straightforward.
It has a single endpoint method, receiving JSON payload on /movies.
RESTEasy maps the JSON document into Movie objects automatically.
As described in the avsc file, the expected JSON contains two fields: title and year.
When using Quarkus with Reactive Messaging, you don’t interact with Kafka directly.
You inject an Emitter, which sends an object (our movie) to a channel.
The application configuration maps this channel to a Kafka topic.
Speaking about configuration, open the src/main/resources/application.properties, and add:
mp.messaging.connector.smallrye-kafka.apicurio.registry.url=http://localhost:8081/api

mp.messaging.outgoing.movies.connector=smallrye-kafka
mp.messaging.outgoing.movies.topic=movies
mp.messaging.outgoing.movies.value.serializer=io.apicurio.registry.utils.serde.AvroKafkaSerializer
mp.messaging.outgoing.movies.apicurio.registry.artifact-id=io.apicurio.registry.utils.serde.strategy.SimpleTopicIdStrategy
mp.messaging.outgoing.movies.apicurio.registry.global-id=io.apicurio.registry.utils.serde.strategy.GetOrCreateIdStrategy
mp.messaging.outgoing.movies.apicurio.registry.avro-datum-provider=io.apicurio.registry.utils.serde.avro.ReflectAvroDatumProvider
This configuration requires a bit of an explanation.
First, mp.messaging.connector.smallrye-kafka.apicurio.registry.url configure the schema registry URL.
If you use the Confluent serde, instead of the Apicurio one, the property is named mp.messaging.connector.smallrye-kafka.schema.registry.url.
The mp.messaging.outgoing.movies configure the movies channel.
The connector attribute indicates that the SmallRye Kafka connector manages the channel.
The topic attribute (which we could omit in this case as it matches the channel name) specifies the topic’s name.
value.serializer sets the serializer to use.
Here we use io.apicurio.registry.utils.serde.AvroKafkaSerializer provided by Apicurio.
The registry.* properties configure how the registry handles the schema.
The movie consumer
The second half of the application is even simpler. It just logs the received movies.
Creates the src/main/java/me/escoffier/MovieConsumer.java with the following content:
package me.escoffier;

import me.escoffier.quarkus.Movie;
import org.eclipse.microprofile.reactive.messaging.Incoming;
import org.jboss.logging.Logger;

import javax.enterprise.context.ApplicationScoped;

@ApplicationScoped
public class MovieConsumer {

    private static final Logger LOGGER =
        Logger.getLogger("MovieConsumer");

    @Incoming("movies-from-kafka")
    public void receive(Movie movie) {
        LOGGER.infof("Received movie: %s (%d)",
            movie.getTitle(), movie.getYear());
    }

}
The @Incoming annotation indicates that the method is called for each Movie object transiting on the movies-from-kafka channel.
In this case, we simply write a log message.
We are almost there.
We need to configure the reception from Kafka.
Re-open the application.properties and add:
mp.messaging.incoming.movies-from-kafka.connector=smallrye-kafka
mp.messaging.incoming.movies-from-kafka.topic=movies
mp.messaging.incoming.movies-from-kafka.value.deserializer=io.apicurio.registry.utils.serde.AvroKafkaDeserializer
mp.messaging.incoming.movies-from-kafka.auto.offset.reset=earliest
mp.messaging.incoming.movies-from-kafka.enable.auto.commit=false
mp.messaging.incoming.movies-from-kafka.apicurio.registry.avro-datum-provider=io.apicurio.registry.utils.serde.avro.ReflectAvroDatumProvider
These properties map the movies-from-kafka to the movies Kafka topic.
It also configures the deserializer (io.apicurio.registry.utils.serde.AvroKafkaDeserializer).
We disable Kafka auto-commit (enable.auto.commit=false), as Reactive Messaging handles the offset commit for you.
| Because the sender and receiver are colocalized in the same application, we cannot use the same channel name. |
A bit of infrastructure
Before running the application, we need:
-
A Kafka broker
-
The Apicurio schema registry
Create the docker-compose.yaml file at the root of your project with the following content:
version: '2'

services:

  zookeeper:
    image: strimzi/kafka:0.11.3-kafka-2.1.0
    command: [
      "sh", "-c",
      "bin/zookeeper-server-start.sh config/zookeeper.properties"
    ]
    ports:
      - "2181:2181"
    environment:
      LOG_DIR: /tmp/logs

  kafka:
    image: strimzi/kafka:0.11.3-kafka-2.1.0
    command: [
      "sh", "-c",
      "bin/kafka-server-start.sh config/server.properties --override listeners=$${KAFKA_LISTENERS} --override advertised.listeners=$${KAFKA_ADVERTISED_LISTENERS} --override zookeeper.connect=$${KAFKA_ZOOKEEPER_CONNECT}"
    ]
    depends_on:
      - zookeeper
    ports:
      - "9092:9092"
    environment:
      LOG_DIR: "/tmp/logs"
      KAFKA_ADVERTISED_LISTENERS: PLAINTEXT://localhost:9092
      KAFKA_LISTENERS: PLAINTEXT://0.0.0.0:9092
      KAFKA_ZOOKEEPER_CONNECT: zookeeper:2181

  schema-registry:
    image: apicurio/apicurio-registry-mem:1.2.2.Final
    ports:
      - 8081:8080
    depends_on:
      - kafka
    environment:
      QUARKUS_PROFILE: prod
      KAFKA_BOOTSTRAP_SERVERS: localhost:9092
      APPLICATION_ID: registry_id
      APPLICATION_SERVER: localhost:9000
This docker-compose file starts everything we need.
You may wonder about some of the properties of the Apicurio registry.
Actually, the Apicurio registry is also a Quarkus application.
Time to run
Alright, let’s get this rolling. First, start the infrastructure with:
docker-compose up -d
Stop the infrastructure with docker-compose down; docker-compose rm
|
Then, start the application:
mvn compile quarkus:devOnce start, open another terminal and post movies:
curl --header "Content-Type: application/json" \
  --request POST \
  --data '{"title":"The Shawshank Redemption","year":1994}' \
  http://localhost:8080/movies

curl --header "Content-Type: application/json" \
  --request POST \
  --data '{"title":"The Godfather","year":1972}' \
  http://localhost:8080/movies

curl --header "Content-Type: application/json" \
  --request POST \
  --data '{"title":"The Dark Knight","year":2008}' \
  http://localhost:8080/movies

curl --header "Content-Type: application/json" \
  --request POST \
  --data '{"title":"12 Angry Men","year":1957}' \
  http://localhost:8080/movies
In the application log, you should see:
2020-09-11 16:42:22,597 INFO  [MovieResource] (executor-thread-1) Sending movie The Shawshank Redemption to Kafka
2020-09-11 16:42:22,619 INFO  [MovieResource] (executor-thread-1) Sending movie The Godfather to Kafka
2020-09-11 16:42:22,624 INFO  [MovieConsumer] (vert.x-eventloop-thread-0) Received movie: The Shawshank Redemption (1994)
2020-09-11 16:42:22,641 INFO  [MovieConsumer] (vert.x-eventloop-thread-0) Received movie: The Godfather (1972)
2020-09-11 16:42:22,644 INFO  [MovieResource] (executor-thread-1) Sending movie The Dark Knight to Kafka
2020-09-11 16:42:22,663 INFO  [MovieConsumer] (vert.x-eventloop-thread-0) Received movie: The Dark Knight (2008)
2020-09-11 16:42:22,669 INFO  [MovieResource] (executor-thread-1) Sending movie 12 Angry Men to Kafka
2020-09-11 16:42:22,688 INFO  [MovieConsumer] (vert.x-eventloop-thread-0) Received movie: 12 Angry Men (1957)
まとめ
Done! In just a few code lines and a bit of configuration, we can integrate Kafka, Avro, and a schema registry in a Quarkus application! You can found the code of this demo on https://github.com/cescoffier/quarkus-kafka-and-avro. The readme file contains the instructions to run it.
Quarkus 1.9 will be a lots of new goodies around messaging and reactive in general. Stay tuned!