RabbitMQを使用したQuarkusメッセージング入門
プレビューこのガイドでは、QuarkusアプリケーションがQuarkus Messagingを利用してRabbitMQとやり取りする方法を示します。
|
この技術は、previewと考えられています。 preview では、下位互換性やエコシステムでの存在は保証されていません。具体的な改善には設定や API の変更が必要になるかもしれませんが、 stable になるための計画は現在進行中です。フィードバックは メーリングリスト や GitHub の課題管理 で受け付けています。 とりうるステータスの完全なリストについては、 FAQの項目 を参照してください。 |
前提条件
このガイドを完成させるには、以下が必要です:
-
約15分
-
IDE
-
JDK 17+がインストールされ、
JAVA_HOMEが適切に設定されていること -
Apache Maven 3.9.16
-
Docker と Docker Compose、または Podman 、および Docker Compose
-
使用したい場合は、 Quarkus CLI
-
ネイティブ実行可能ファイルをビルドしたい場合、MandrelまたはGraalVM(あるいはネイティブなコンテナビルドを使用する場合はDocker)をインストールし、 適切に設定していること
アーキテクチャ
このガイドでは、RabbitMQ ブローカーと通信する 2 つのアプリケーションを開発します。1つ目のアプリケーションは、RabbitMQの 見積要求 エクスチェンジに 見積要求 を送信し、 見積 キューからメッセージを消費します。2 番目のアプリケーションは、 見積要求 を受信し、 見積 を送り返します。
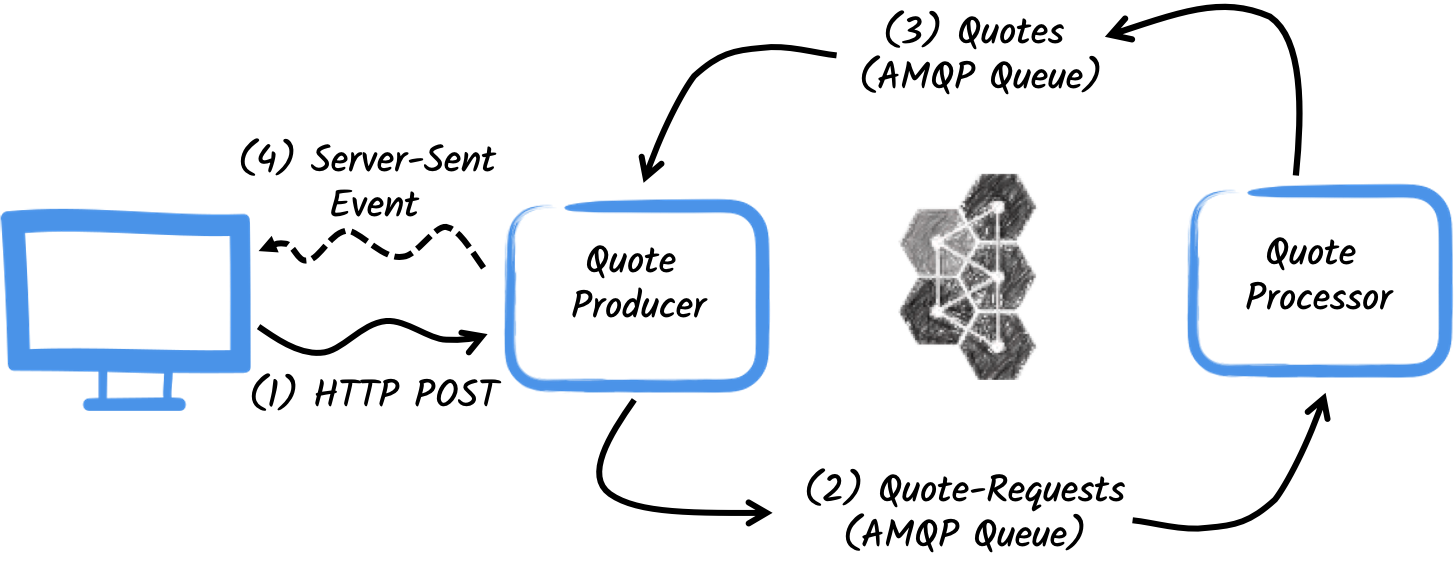
最初のアプリケーションである producer では、ユーザーが HTTP エンドポイントを介していくつかの見積を要求することができます。各見積要求に対して、ランダムな識別子が生成され、ユーザーに返され、見積要求が pending されます。同時に、生成されたリクエストIDは、 quote-requests のエクスチェンジに送信されます。
2 番目のアプリケーションである processor は、 quote-requests のキューから読み取った見積にランダムな価格を付けて、 quotes という名前のエクスチェンジに送信します。
最後に、 producer は見積りを読み取り、サーバーから送信されたイベントを使用してこれらをブラウザーに送信します。したがって、ユーザーには、見積り価格が pending から受信した価格にリアルタイムで更新されていることがわかります。
ソリューション
次の章で紹介する手順に沿って、ステップを踏んでアプリを作成することをお勧めします。ただし、完成した例にそのまま進んでも構いません。
Gitレポジトリをクローンするか git clone https://github.com/quarkusio/quarkus-quickstarts.git 、 アーカイブ をダウンロードします。
ソリューションは rabbitmq-quickstart ディレクトリ にあります。
Mavenプロジェクトの作成
まず、 producer と processor の2つのプロジェクトを作成する必要があります。
producer プロジェクトを作成するには、ターミナルで次のように実行します:
Windowsユーザーの場合:
-
cmdを使用する場合、(バックスラッシュ
\を使用せず、すべてを同じ行に書かないでください)。 -
Powershellを使用する場合は、
-Dパラメータを二重引用符で囲んでください。例:"-DprojectArtifactId=rabbitmq-quickstart-producer"
このコマンドは、プロジェクト構造を作成し、使用する2つのQuarkusエクステンションを選択します:
-
Reactive Messaging RabbitMQコネクター
-
Quarkus REST(旧RESTEasy Reactive)と、そのJacksonサポートによるJSONペイロードの処理
|
Quarkusプロジェクトがすでに設定されている場合は、プロジェクトのベースディレクトリで次のコマンドを実行することで、 コマンドラインインタフェース
Maven
Gradle
これにより、 pom.xml
build.gradle
|
processor プロジェクトを作成するには、同じディレクトリから、次のように実行します:
Windowsユーザーの場合:
-
cmdを使用する場合、(バックスラッシュ
\を使用せず、すべてを同じ行に書かないでください)。 -
Powershellを使用する場合は、
-Dパラメータを二重引用符で囲んでください。例:"-DprojectArtifactId=rabbitmq-quickstart-processor"
この時点では、以下のような構成になっているはずです:
.
├── rabbitmq-quickstart-processor
│  ├── README.md
│  ├── mvnw
│  ├── mvnw.cmd
│  ├── pom.xml
│  └── src
│     └── main
│        ├── docker
│        ├── java
│        └── resources
│           └── application.properties
└── rabbitmq-quickstart-producer
   ├── README.md
   ├── mvnw
   ├── mvnw.cmd
   ├── pom.xml
   └── src
      └── main
         ├── docker
         ├── java
         └── resources
            └── application.properties
2つのプロジェクトをお好みのIDEで開きます。
Quoteオブジェクト
Quote クラスは、 producer と processor の両方のプロジェクトで使用されます。簡単にするために、このクラスを複製します。両方のプロジェクトで、次のような内容の src/main/java/org/acme/rabbitmq/model/Quote.java ファイルを作成します。
package org.acme.rabbitmq.model;

import io.quarkus.runtime.annotations.RegisterForReflection;

@RegisterForReflection
public class Quote {

    public String id;
    public int price;

    /**
    * Default constructor required for Jackson serializer
    */
    public Quote() { }

    public Quote(String id, int price) {
        this.id = id;
        this.price = price;
    }

    @Override
    public String toString() {
        return "Quote{" +
                "id='" + id + '\'' +
                ", price=" + price +
                '}';
    }
}
Quote オブジェクトのJSON表現は、RabbitMQキューに送信されるメッセージや、ブラウザクライアントに送信されるserver-sent eventで使用されます。
QuarkusにはJSONのRabbitMQメッセージを処理する機能が組み込まれています。
|
@RegisterForReflection
|
見積もり依頼の送信
producer プロジェクト内で、生成された src/main/java/org/acme/rabbitmq/producer/QuotesResource.java ファイルを探し、コンテンツを次のように更新します:
package org.acme.rabbitmq.producer;

import java.util.UUID;

import jakarta.ws.rs.GET;
import jakarta.ws.rs.POST;
import jakarta.ws.rs.Path;
import jakarta.ws.rs.Produces;
import jakarta.ws.rs.core.MediaType;

import org.acme.rabbitmq.model.Quote;
import org.eclipse.microprofile.reactive.messaging.Channel;
import org.eclipse.microprofile.reactive.messaging.Emitter;

import io.smallrye.mutiny.Multi;

@Path("/quotes")
public class QuotesResource {

    @Channel("quote-requests") Emitter<String> quoteRequestEmitter; (1)

    /**
     * Endpoint to generate a new quote request id and send it to "quote-requests" channel (which
     * maps to the "quote-requests" RabbitMQ exchange) using the emitter.
     */
    @POST
    @Path("/request")
    @Produces(MediaType.TEXT_PLAIN)
    public String createRequest() {
        UUID uuid = UUID.randomUUID();
        quoteRequestEmitter.send(uuid.toString()); (2)
        return uuid.toString();
    }
}| 1 | Reactive Messaging Emitter を注入して、 quote-requests チャンネルにメッセージを送信します。 |
| 2 | 投稿リクエストで、ランダムなUUIDを生成し、エミッターを使ってRabbitMQのキューに送信します。 |
このチャンネルは、 application.properties ファイルの設定を使用して、RabbitMQ のエクスチェンジにマッピングされます。 src/main/resource/application.properties ファイルを開き、次のように追加します:
# Configure the outgoing RabbitMQ exchange `quote-requests`
mp.messaging.outgoing.quote-requests.connector=smallrye-rabbitmq
mp.messaging.outgoing.quote-requests.exchange.name=quote-requests
指定する必要があるのは、 smallrye-rabbitmq のコネクタだけです。デフォルトでは、リアクティブ・メッセージングは、チャネル名 quote-requests を同じ RabbitMQ のエクスチェンジ名にマッピングします。
見積依頼の処理
それでは、見積依頼を消費して、価格を出してみましょう。 processor プロジェクト内で、 src/main/java/org/acme/rabbitmq/processor/QuoteProcessor.java ファイルを探し、以下を追加します:
package org.acme.rabbitmq.processor;

import java.util.Random;

import jakarta.enterprise.context.ApplicationScoped;

import org.acme.rabbitmq.model.Quote;
import org.eclipse.microprofile.reactive.messaging.Incoming;
import org.eclipse.microprofile.reactive.messaging.Outgoing;

import io.smallrye.reactive.messaging.annotations.Blocking;

/**
 * A bean consuming data from the "quote-requests" RabbitMQ queue and giving out a random quote.
 * The result is pushed to the "quotes" RabbitMQ exchange.
 */
@ApplicationScoped
public class QuoteProcessor {

    private Random random = new Random();

    @Incoming("requests")       (1)
    @Outgoing("quotes")         (2)
    @Blocking                   (3)
    public Quote process(String quoteRequest) throws InterruptedException {
        // simulate some hard-working task
        Thread.sleep(1000);
        return new Quote(quoteRequest, random.nextInt(100));
    }
}| 1 | メソッドが requests チャンネルのアイテムを消費することを示します |
| 2 | メソッドが返すオブジェクトが quotes チャンネルに送信されることを示します |
| 3 | 処理が blocking であり、呼び出し元のスレッドでは実行できないことを示します。 |
process メソッドは、 quote-requests キューからの RabbitMQ のメッセージごとに呼び出され、 Quote オブジェクトを quotes エクスチェンジに送信します。
前述の例と同様に、 application.properties ファイルでコネクタを設定する必要があります。 src/main/resources/application.properties ファイルを開き、次のように追加します:
# Configure the incoming RabbitMQ queue `quote-requests`
mp.messaging.incoming.requests.connector=smallrye-rabbitmq
mp.messaging.incoming.requests.queue.name=quote-requests
mp.messaging.incoming.requests.exchange.name=quote-requests

# Configure the outgoing RabbitMQ exchange `quotes`
mp.messaging.outgoing.quotes.connector=smallrye-rabbitmq
mp.messaging.outgoing.quotes.exchange.name=quotes
この場合、着信側と発信側のコネクタ設定が1つずつあり、それぞれに明確な名前が付けられていることに注意してください。 設定プロパティは以下のような構造になっています:
mp.messaging.[outgoing|incoming].{channel-name}.property=value
channel-name セグメントは、 @Incoming および @Outgoing アノテーションで設定された値と一致する必要があります:
-
quote-requests→ 見積依頼を読み出すRabbitMQのキュー -
quotes→ 見積を書き込むRabbitMQのエクスチェンジ
見積の受け取り
producer プロジェクトに戻ります。引用符を使用するように QuotesResource を変更し、それを HTTP エンドポイントにバインドして、クライアントにイベントを送信しましょう。
import io.smallrye.mutiny.Multi;
//...

@Channel("quotes") Multi<Quote> quotes;     (1)

/**
 * Endpoint retrieving the "quotes" queue and sending the items to a server sent event.
 */
@GET
@Produces(MediaType.SERVER_SENT_EVENTS) (2)
public Multi<Quote> stream() {
    return quotes; (3)
}| 1 | @Channel 修飾子を使用して quotes のチャネルを注入します |
| 2 | Server Sent Events を使用してコンテンツが送信されたことを示します |
| 3 | ストリーム (Reactive Stream) を返します。 |
再度、 producer プロジェクト内で quotes の受信チャンネルを設定する必要があります。 application.properties ファイル内に以下を追加します:
# Configure the outgoing `quote-requests` queue
mp.messaging.outgoing.quote-requests.connector=smallrye-rabbitmq

# Configure the incoming `quotes` queue
mp.messaging.incoming.quotes.connector=smallrye-rabbitmq
HTMLページ
最後に、SSE を使って変換された価格を読み込む HTML ページです。
producer プロジェクト中の src/main/resources/META-INF/resources/quotes.html に以下の内容のファイルを作成します:
<!DOCTYPE html> <html lang="en"> <head> <meta charset="UTF-8"> <title>Quotes</title>
<link rel="stylesheet" type="text/css"
href="https://cdnjs.cloudflare.com/ajax/libs/patternfly/3.24.0/css/patternfly.min.css">
<link rel="stylesheet" type="text/css"
href="https://cdnjs.cloudflare.com/ajax/libs/patternfly/3.24.0/css/patternfly-additions.min.css">
</head>
<body>
<div class="container">
<div class="card">
<div class="card-body">
<h2 class="card-title">Quotes</h2>
<button class="btn btn-info" id="request-quote">Request Quote</button>
<div class="quotes"></div>
</div>
</div>
</div>
</body>
<script src="https://code.jquery.com/jquery-3.6.0.min.js"></script>
<script>
$("#request-quote").click((event) => {
fetch("/quotes/request", {method: "POST"})
.then(res => res.text())
.then(qid => {
var row = $(`<h4 class='col-md-12' id='${qid}'>Quote # <i>${qid}</i> | <strong>Pending</strong></h4>`);
$(".quotes").append(row);
});
});
var source = new EventSource("/quotes");
source.onmessage = (event) => {
var json = JSON.parse(event.data);
$(`#${json.id}`).html(function(index, html) {
return html.replace("Pending", `\$\xA0${json.price}`);
});
};
</script>
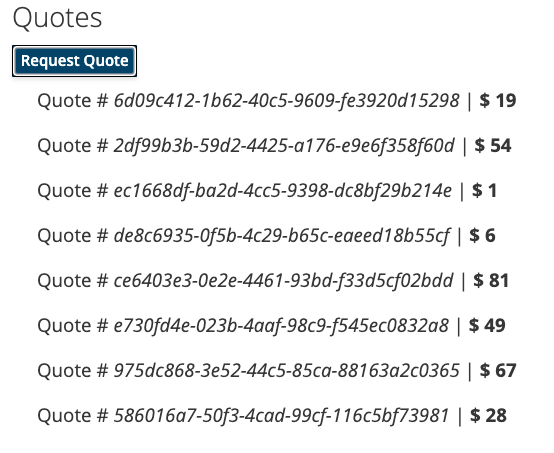
</html>ここでは、特筆すべきものは何もありません。受け取った見積もりごとに、ページが更新されます。
実行
両方のアプリケーションを実行するためには以下コマンドを打つだけです:
mvn -f rabbitmq-quickstart-producer quarkus:devそして、別の端末で以下を実行します:
mvn -f rabbitmq-quickstart-processor quarkus:devQuarkusは、RabbitMQブローカーを自動的に起動し、アプリケーションを構成し、異なるアプリケーション間でブローカーインスタンスを共有します。詳細は、 RabbitMQ用のDev Servicesを参照してください。
http://localhost:8080/quotes.html をブラウザで開き、ボタンをクリックして見積を依頼してください。
JVMまたはNativeモードでの実行
開発モードやテストモードで実行していないときは、RabbitMQブローカーを起動する必要があります。 RabbitMQ Dockerウェブサイトの指示に従うか、以下の内容の docker-compose.yaml ファイルを作成します:
version: '2'

services:

  rabbit:
    image: docker.io/library/rabbitmq:3.12-management
    ports:
      - "5672:5672"
    networks:
      - rabbitmq-quickstart-network

  producer:
    image: quarkus-quickstarts/rabbitmq-quickstart-producer:1.0-${QUARKUS_MODE:-jvm}
    build:
      context: rabbitmq-quickstart-producer
      dockerfile: src/main/docker/Dockerfile.${QUARKUS_MODE:-jvm}
    environment:
      RABBITMQ_HOST: rabbit
      RABBITMQ_PORT: 5672
    ports:
      - "8080:8080"
    networks:
      - rabbitmq-quickstart-network

  processor:
    image: quarkus-quickstarts/rabbitmq-quickstart-processor:1.0-${QUARKUS_MODE:-jvm}
    build:
      context: rabbitmq-quickstart-processor
      dockerfile: src/main/docker/Dockerfile.${QUARKUS_MODE:-jvm}
    environment:
      RABBITMQ_HOST: rabbit
      RABBITMQ_PORT: 5672
    networks:
      - rabbitmq-quickstart-network

networks:
  rabbitmq-quickstart-network:
    name: rabbitmq-quickstart
RabbitMQ ブローカーのロケーションがどのように構成されているかに注意してください。 rabbitmq-host と rabbitmq-port プロパティ( 環境変数だと AMQP_HOST と AMQP_PORT ) でロケーションを設定します。
まず、アプリケーションが停止していることを確認し、両方のアプリケーションをJVMモードでビルドします:
mvn -f rabbitmq-quickstart-producer clean package
mvn -f rabbitmq-quickstart-processor clean package
パッケージ化したら、 docker compose up --build を実行します。UI は http://localhost:8080/quotes.html で公開されています
アプリケーションをネイティブで動作させるには、まず、ネイティブ実行可能ファイルをビルドする必要があります:
mvn -f rabbitmq-quickstart-producer package -Dnative  -Dquarkus.native.container-build=true
mvn -f rabbitmq-quickstart-processor package -Dnative -Dquarkus.native.container-build=true
-Dquarkus.native.container-build=true は、コンテナー内で実行できる Linux 64 ビットのネイティブ実行可能ファイルをビルドするように Quarkus に指示します。次に、以下を使用してシステムを実行します。
export QUARKUS_MODE=native
docker compose up --build
UIは前と同じように http://localhost:8080/quotes.html で公開されます。
さらに詳しく
このガイドでは、Quarkusを使ってRabbitMQと対話する方法を紹介しました。 SmallRye Reactive Messagingを利用して、データストリーミングアプリケーションを構築しています。
Kafkaをやった方は、同じコードであることに気づいたと思います。唯一の違いは、コネクタの設定とJSONのマッピングです。