OpenID Connect authorization code flow mechanism for protecting web applications
ウェブアプリケーションを保護するには、Quarkus OIDCエクステンションが提供する業界標準のOpenID Connect(OIDC)認可コードフローメカニズムを使用できます。
OIDC 認可コードフローメカニズムの概要
Quarkus OpenID Connect (OIDC) エクステンションは、Keycloak などの OIDC 準拠の認可サーバーでサポートされている OIDC 認可コードフローメカニズムを使用して、アプリケーション HTTP エンドポイントを保護できます。
このエクステンションは、OpenID Connect Provider (例: Keycloak) にリダイレクトしてログインさせ、認証が完了したら、認証に成功したことを確認するコードを使って、ウェブアプリケーションのユーザーを簡単に認証することができます。エクステンションは、認可コードグラントを使用して OpenID Connect Provider から ID とアクセストークンを要求し、アプリケーションへのアクセスを承認するためにこれらのトークンを検証します。
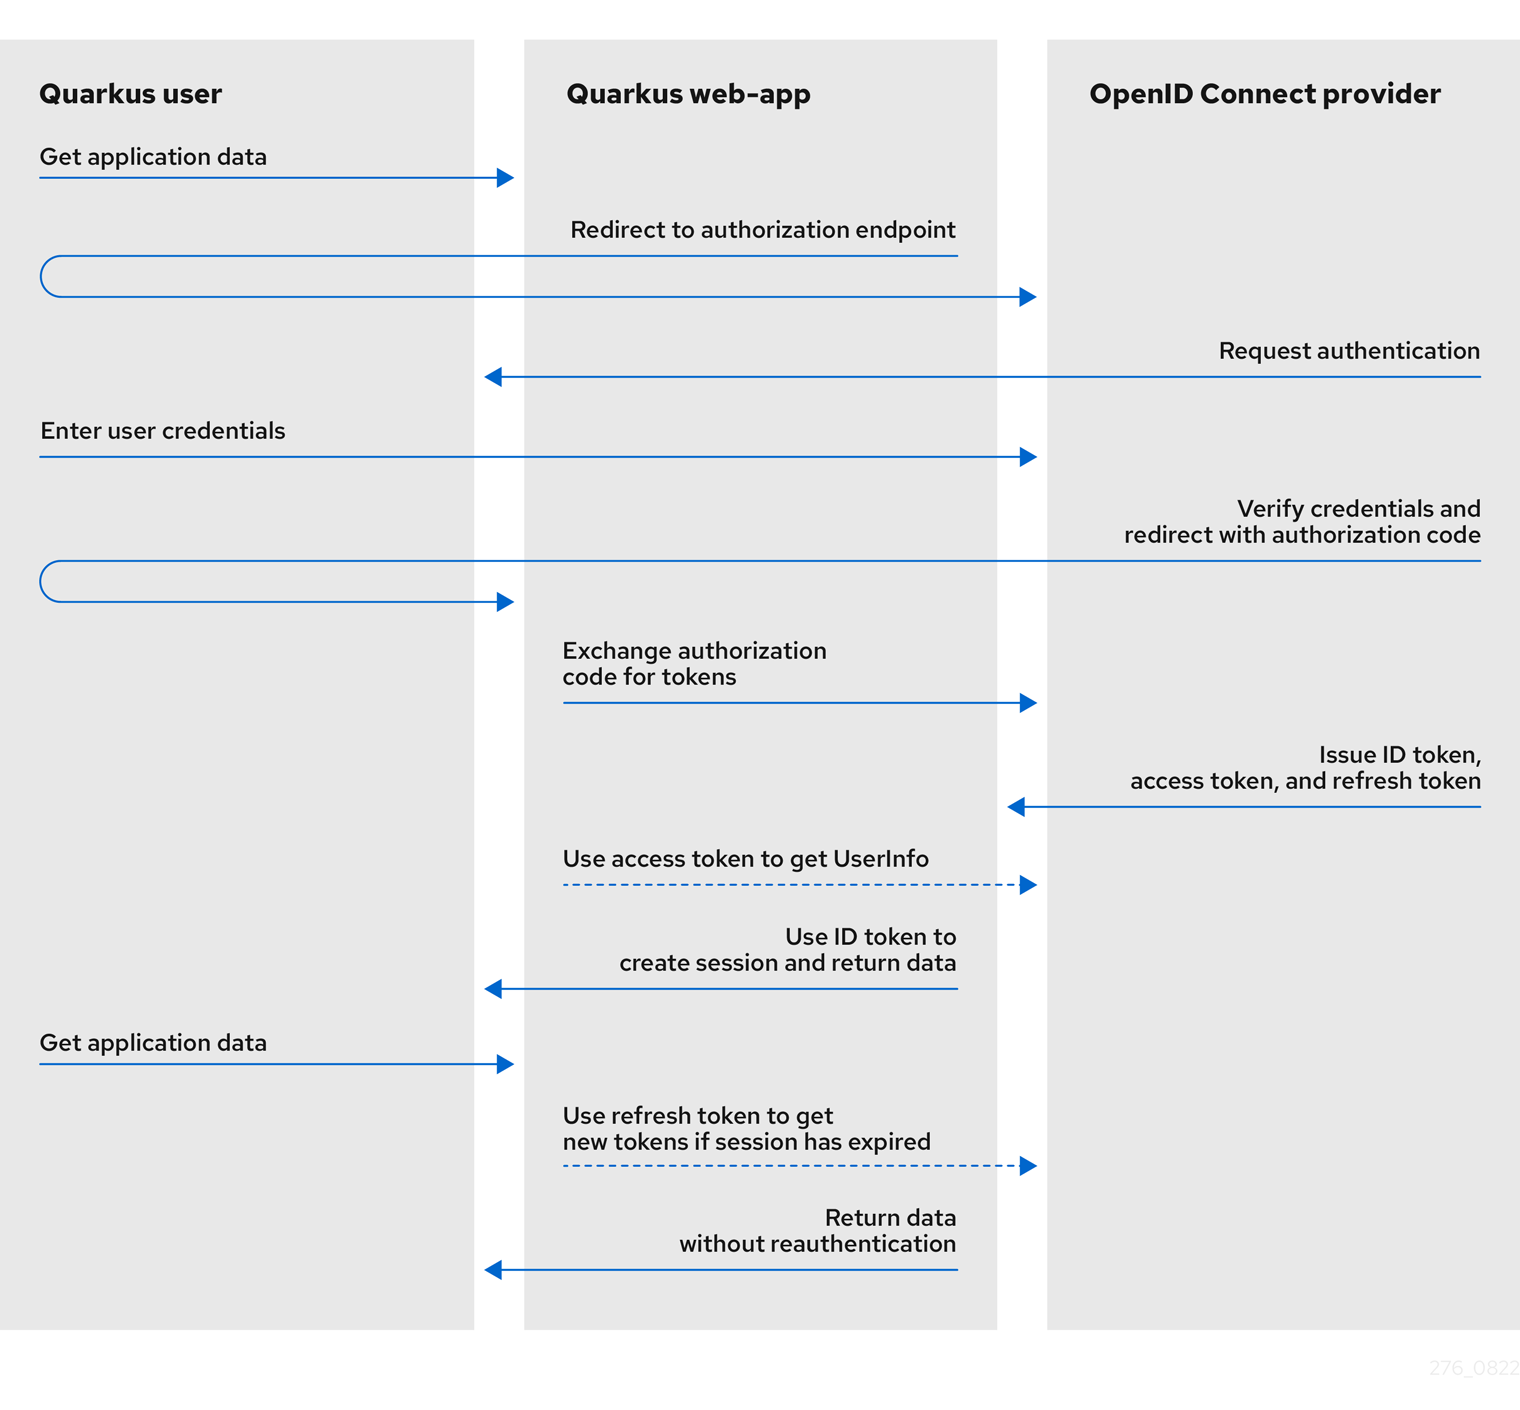
次の図は、Quarkus における認可コードフローメカニズムの概要を示しています。
-
Quarkusユーザーが、Quarkus web-appアプリケーションへのアクセスを要求します。
-
Quarkus web-app は、ユーザーを認可エンドポイント、つまり認証用の OIDC プロバイダーにリダイレクトします。
-
OIDC プロバイダーは、ユーザーをログインと認証のプロンプトにリダイレクトします。
-
プロンプトで、ユーザーは自分のユーザークレデンシャルを入力します。
-
OIDCプロバイダは、入力されたユーザーの資格情報を認証し、成功すると認可コードを発行して、クエリパラメータとしてコードが含まれるQuarkus Web-appにユーザーをリダイレクトします。
-
Quarkus web-app は、この認可コードを OIDC プロバイダーと交換し、ID、アクセス、およびリフレッシュの各トークンを取得します。
認可コードフローが完了し、Quarkus Webアプリは発行されたトークンを使用してユーザーに関する情報にアクセスし、そのユーザーに関連するロールベースの認可を付与します。発行されるトークンは以下の通りです:
-
IDトークン: Quarkus
web-appアプリケーションは、ID トークンのユーザー情報を使用して、認証されたユーザーが安全にログインできるようにし、Web アプリケーションにロールベースのアクセスを提供します。 -
アクセストークン: Quarkus web-app は、アクセストークンを使用して UserInfo API にアクセスし、認証されたユーザーに関する追加情報を取得したり、別のエンドポイントに伝播したりすることがあります。
-
リフレッシュトークン: (オプション) ID およびアクセストークンの有効期限が切れた場合、Quarkus web-app はリフレッシュトークンを使用して新しい ID およびアクセストークンを取得できます。
OIDC設定プロパティ のリファレンスガイドもご参照ください。
OIDC認可コードフローメカニズムを使用してWebアプリケーションを保護する方法については、 OIDC認可コードフローを使用したWebアプリケーション保護 を参照してください。
OIDC ベアラートークン認証を使用してサービスアプリケーションを保護したい場合は、OIDC ベアラートークン認証 を参照してください。
マルチテナントへの対応方法については、 OpenID Connect (OIDC) マルチテナンシーの使用 ガイドをお読みください。
認可コードフローメカニズムの利用について
OIDC プロバイダーエンドポイントへのアクセス設定
OIDC web-app アプリケーションは、OIDC プロバイダーの認可、トークン、 JsonWebKey (JWK)セット、および場合によっては UserInfo 、イントロスペクション、エンドセッション(RP-initiated logout)エンドポイントの URL を必要とします。
規約により、 quarkus.oidc.auth-server-url で設定することで /.well-known/openid-configuration のパスを追加することで検出されます。
あるいは、ディスカバリー・エンドポイントが利用できない場合や、ディスカバリー・エンドポイントのラウンドトリップを減らしたい場合は、エンドポイントのディスカバリーを無効にし、相対パス値などを設定することもできます。例:
quarkus.oidc.auth-server-url=http://localhost:8180/realms/quarkus
quarkus.oidc.discovery-enabled=false
# Authorization endpoint: http://localhost:8180/realms/quarkus/protocol/openid-connect/auth
quarkus.oidc.authorization-path=/protocol/openid-connect/auth
# Token endpoint: http://localhost:8180/realms/quarkus/protocol/openid-connect/token
quarkus.oidc.token-path=/protocol/openid-connect/token
# JWK set endpoint: http://localhost:8180/realms/quarkus/protocol/openid-connect/certs
quarkus.oidc.jwks-path=/protocol/openid-connect/certs
# UserInfo endpoint: http://localhost:8180/realms/quarkus/protocol/openid-connect/userinfo
quarkus.oidc.user-info-path=/protocol/openid-connect/userinfo
# Token Introspection endpoint: http://localhost:8180/realms/quarkus/protocol/openid-connect/token/introspect
quarkus.oidc.introspection-path=/protocol/openid-connect/token/introspect
# End session endpoint: http://localhost:8180/realms/quarkus/protocol/openid-connect/logout
quarkus.oidc.end-session-path=/protocol/openid-connect/logout
一部の OIDC プロバイダは、メタデータディスカバリーをサポートしていますが、認可コードフローを完了したり、ユーザーログアウトなどのアプリケーション機能をサポートしたりするために必要なすべてのエンドポイント URL 値は返しません。 この制限を回避するには、次の例に示すように、不足しているエンドポイント URL 値をローカルで設定します:
# Metadata is auto-discovered but it does not return an end-session endpoint URL

quarkus.oidc.auth-server-url=http://localhost:8180/oidcprovider/account

# Configure the end-session URL locally, it can be an absolute or relative (to 'quarkus.oidc.auth-server-url') address
quarkus.oidc.end-session-path=logout
You can use this same configuration to override a discovered endpoint URL if that URL does not work for the local Quarkus endpoint and a more specific value is required.
For example, a provider that supports both global and application-specific end-session endpoints returns a global end-session URL such as http://localhost:8180/oidcprovider/account/global-logout.
This URL will log the user out of all of the applications that the user is currently logged into.
However, if the requirement is for the current application to log the user out of only the specific application, you can override the global end-session URL, by setting the quarkus.oidc.end-session-path=logout parameter.
OIDC プロバイダーのクライアント認証
OIDC providers typically require applications to be identified and authenticated when they interact with the OIDC endpoints.
Quarkus OIDC, specifically the quarkus.oidc.runtime.OidcProviderClient class, authenticates to the OIDC provider when the authorization code must be exchanged for the ID, access, and refresh tokens, or when the ID and access tokens need to be refreshed or introspected.
Typically, client id and client secrets are defined for a given application when it enlists to the OIDC provider. All the OIDC Client Authentication options are supported, for example:
client_secret_basic:quarkus.oidc.auth-server-url=http://localhost:8180/realms/quarkus/
quarkus.oidc.client-id=quarkus-app
quarkus.oidc.credentials.secret=mysecretあるいは:
quarkus.oidc.auth-server-url=http://localhost:8180/realms/quarkus/
quarkus.oidc.client-id=quarkus-app
quarkus.oidc.credentials.client-secret.value=mysecret次の例は、クレデンシャルプロバイダー から取得したシークレットを示しています。
quarkus.oidc.auth-server-url=http://localhost:8180/realms/quarkus/
quarkus.oidc.client-id=quarkus-app

# This is a key which will be used to retrieve a secret from the map of credentials returned from CredentialsProvider
quarkus.oidc.credentials.client-secret.provider.key=mysecret-key
# Set it only if more than one CredentialsProvider can be registered
quarkus.oidc.credentials.client-secret.provider.name=oidc-credentials-providerclient_secret_postquarkus.oidc.auth-server-url=http://localhost:8180/realms/quarkus/
quarkus.oidc.client-id=quarkus-app
quarkus.oidc.credentials.client-secret.value=mysecret
quarkus.oidc.credentials.client-secret.method=postclient_secret_jwt, where the signature algorithm is HS256:quarkus.oidc.auth-server-url=http://localhost:8180/realms/quarkus/
quarkus.oidc.client-id=quarkus-app
quarkus.oidc.credentials.jwt.secret=AyM1SysPpbyDfgZld3umj1qzKObwVMkoqQ-EstJQLr_T-1qS0gZH75aKtMN3Yj0iPS4hcgUuTwjAzZr1Z9CAowclient_secret_jwt, where the secret is retrieved from a credentials provider:quarkus.oidc.auth-server-url=http://localhost:8180/realms/quarkus/
quarkus.oidc.client-id=quarkus-app
# This is a key which will be used to retrieve a secret from the map of credentials returned from CredentialsProvider
quarkus.oidc.credentials.jwt.secret-provider.key=mysecret-key
# Set it only if more than one CredentialsProvider can be registered
quarkus.oidc.credentials.jwt.secret-provider.name=oidc-credentials-providerPEM 鍵ファイルを使用した private_key_jwt の例。署名アルゴリズムは RS256:
quarkus.oidc.auth-server-url=http://localhost:8180/realms/quarkus/
quarkus.oidc.client-id=quarkus-app
quarkus.oidc.credentials.jwt.key-file=privateKey.pemprivate_key_jwt with the keystore file, where the signature algorithm is RS256:quarkus.oidc.auth-server-url=http://localhost:8180/realms/quarkus/
quarkus.oidc.client-id=quarkus-app
quarkus.oidc.credentials.jwt.key-store-file=keystore.jks
quarkus.oidc.credentials.jwt.key-store-password=mypassword
quarkus.oidc.credentials.jwt.key-password=mykeypassword
# Private key alias inside the keystore
quarkus.oidc.credentials.jwt.key-id=mykeyAliasclient_secret_jwt 、または private_key_jwt 認証方法を使用することで、クライアントシークレットがOIDCプロバイダに送信されないため、「中間者」攻撃によってシークレットが傍受されるリスクを回避できます。
JWT 認証の追加オプション
client_secret_jwt , private_key_jwt の認証方式を使用する場合、または Apple の post_jwt 方式を使用する場合、JWT 署名アルゴリズム、鍵識別子、オーディエンス、サブジェクト、発行者などをカスタマイズすることができます:
# private_key_jwt client authentication

quarkus.oidc.auth-server-url=http://localhost:8180/realms/quarkus/
quarkus.oidc.client-id=quarkus-app
quarkus.oidc.credentials.jwt.key-file=privateKey.pem

# This is a token key identifier 'kid' header - set it if your OpenID Connect provider requires it.
# Note if the key is represented in a JSON Web Key (JWK) format with a `kid` property then
# using 'quarkus.oidc.credentials.jwt.token-key-id' is not necessary.
quarkus.oidc.credentials.jwt.token-key-id=mykey

# Use RS512 signature algorithm instead of the default RS256
quarkus.oidc.credentials.jwt.signature-algorithm=RS512

# The token endpoint URL is the default audience value, use the base address URL instead:
quarkus.oidc.credentials.jwt.audience=${quarkus.oidc-client.auth-server-url}

# custom subject instead of the client id :
quarkus.oidc.credentials.jwt.subject=custom-subject

# custom issuer instead of the client id :
quarkus.oidc.credentials.jwt.issuer=custom-issuer
Apple POST JWT
The Apple OIDC provider uses a client_secret_post method whereby a secret is a JWT produced with a private_key_jwt authentication method but with the Apple account-specific issuer and subject claims.
Quarkus Security では、 quarkus-oidc は、非標準の client_secret_post_jwt 認証方法をサポートされています。この認証方法は、以下のように設定できます。
# Apple provider configuration sets a 'client_secret_post_jwt' authentication method
quarkus.oidc.provider=apple

quarkus.oidc.client-id=${apple.client-id}
quarkus.oidc.credentials.jwt.key-file=ecPrivateKey.pem
quarkus.oidc.credentials.jwt.token-key-id=${apple.key-id}
# Apple provider configuration sets ES256 signature algorithm

quarkus.oidc.credentials.jwt.subject=${apple.subject}
quarkus.oidc.credentials.jwt.issuer=${apple.issuer}
相互 TLS (mTLS)
Some OpenID Connect providers might require that a client is authenticated as part of the mutual TLS authentication process.
次の例は、 mTLS をサポートするように quarkus-oidc を設定する方法を示しています。
quarkus.oidc.tls.verification=certificate-validation

# Keystore configuration
quarkus.oidc.tls.key-store-file=client-keystore.jks
quarkus.oidc.tls.key-store-password=${key-store-password}

# Add more keystore properties if needed:
#quarkus.oidc.tls.key-store-alias=keyAlias
#quarkus.oidc.tls.key-store-alias-password=keyAliasPassword

# Truststore configuration
quarkus.oidc.tls.trust-store-file=client-truststore.jks
quarkus.oidc.tls.trust-store-password=${trust-store-password}
# Add more truststore properties if needed:
#quarkus.oidc.tls.trust-store-alias=certAlias
イントロスペクションエンドポイント認証
Some OIDC providers require authenticating to its introspection endpoint by using Basic authentication and with credentials that are different to the client_id and client_secret.
If you have previously configured security authentication to support either the`client_secret_basic` or client_secret_post client authentication methods as described in the OIDC provider client authentication section, you might need to apply the additional configuration, as follows.
If the tokens have to be introspected and the introspection endpoint-specific authentication mechanism is required, then you can configure quarkus-oidc, as follows:
quarkus.oidc.introspection-credentials.name=introspection-user-name
quarkus.oidc.introspection-credentials.secret=introspection-user-secret
OIDC プロバイダーへのリダイレクトと OIDC プロバイダーからのリダイレクト
When a user is redirected to the OpenID Connect provider to authenticate, the redirect URL includes a redirect_uri query parameter, which indicates to the provider where the user has to be redirected to when the authentication is complete.
In our case, this is the Quarkus application.
Quarkus sets this parameter to the current application request URL by default.
For example, if a user is trying to access a Quarkus service endpoint at http://localhost:8080/service/1 then the redirect_uri parameter is set to http://localhost:8080/service/1.
Similarly, if the request URL is http://localhost:8080/service/2 then the redirect_uri parameter is set to http://localhost:8080/service/2.
Some OIDC providers require the redirect_uri to have the same value for a given application, for example, http://localhost:8080/service/callback, for all the redirect URLs.
In such cases, a quarkus.oidc.authentication.redirect-path property has to be set, for example, quarkus.oidc.authentication.redirect-path=/service/callback, and Quarkus will set the redirect_uri parameter to an absolute URL such as http://localhost:8080/service/callback, which will be the same regardless of the current request URL.
If quarkus.oidc.authentication.redirect-path is set but you need the original request URL to be restored after the user has been redirected back to a unique callback URL, for example, http://localhost:8080/service/callback, set quarkus.oidc.authentication.restore-path-after-redirect property to true.
This will restore the request URL such as http://localhost:8080/service/1.
認証リクエストのカスタマイズ
デフォルトでは、ユーザーが認証のために OpenID Connect プロバイダーにリダイレクトした際に、 response_type (code に設定)、 scope ('openid' に設定)、 client_id、 redirect_uri および state プロパティーのみが HTTP クエリーパメータとして渡されています。
quarkus.oidc.authentication.extra-params を使用して、さらにプロパティーを追加できます。
たとえば、一部の OIDC プロバイダーは、リダイレクト URI のフラグメントの一部として認可コードを返すことを選択する場合があり、これにより認証プロセスが中断されます。
次の例は、この問題を回避する方法を示しています。
quarkus.oidc.authentication.extra-params.response_mode=query認証エラーレスポンスのカスタマイズ
If the user authentication fails at the OIDC authorization endpoint, then the provider will redirect the user back to Quarkus with error and error_description parameters instead of code.
For example, this can happen when an invalid scope or other invalid parameters are included in the redirect to the provider.
In such cases, an HTTP 401`error will be returned by default.
However, you can instead request that a custom public error endpoint is called to return a more user-friendly HTML error page.
To do this, set the `quarkus.oidc.authentication.error-path property, as shown in the following example:
quarkus.oidc.authentication.error-path=/errorEnsure that the property starts with a forward slash (/) character and the path is relative to the base URI of the current endpoint.
For example, if it is set as '/error' and the current request URI is https://localhost:8080/callback?error=invalid_scope then a final redirect will be made to https://localhost:8080/error?error=invalid_scope.
It is important to ensure that this error endpoint is a public resource to prevent the user from being redirected to this page to be authenticated again.
認可データへのアクセス
Let’s first discuss how to access information around authorization.
ID およびアクセストークンへのアクセス
OIDCコード認証メカニズムは、認可コードフローの中で3つのトークンを取得します: IDToken 、Access Token、Refresh Tokenです。
ID Token is always a JWT token and is used to represent a user authentication with the JWT claims.
You can use this to get the issuing OIDC endpoint, the username, and other information called claims.
One can access ID Token claims by injecting JsonWebToken with an IdToken qualifier:
import jakarta.inject.Inject;
import org.eclipse.microprofile.jwt.JsonWebToken;
import io.quarkus.oidc.IdToken;
import io.quarkus.security.Authenticated;

@Path("/web-app")
@Authenticated
public class ProtectedResource {

    @Inject
    @IdToken
    JsonWebToken idToken;

    @GET
    public String getUserName() {
        return idToken.getName();
    }
}
アクセストークンは通常、OIDC web-app アプリケーションが、現在ログインしているユーザーの代わりに他のエンドポイントにアクセスするために使用されます。生のアクセストークンは以下のようにアクセスすることができます。
import jakarta.inject.Inject;
import org.eclipse.microprofile.jwt.JsonWebToken;
import io.quarkus.oidc.AccessTokenCredential;
import io.quarkus.security.Authenticated;

@Path("/web-app")
@Authenticated
public class ProtectedResource {

    @Inject
    JsonWebToken accessToken;

    // or
    // @Inject
    // AccessTokenCredential accessTokenCredential;

    @GET
    public String getReservationOnBehalfOfUser() {
        String rawAccessToken = accessToken.getRawToken();
        //or
        //String rawAccessToken = accessTokenCredential.getToken();

        // Use the raw access token to access a remote endpoint
        return getReservationfromRemoteEndpoint(rawAccesstoken);
    }
}
Note that AccessTokenCredential is used if the access token issued to the Quarkus web-app application is opaque (binary) and can not be parsed to a JsonWebToken or if the inner content is necessary for the application.
JsonWebToken と AccessTokenCredential の注入は、 @RequestScoped と @ApplicationScoped の両方のコンテキストでサポートされています。
RefreshToken is used by Quarkusn OIDC to refresh the current ID and access tokens as part of its session management process.
ユーザー情報
If the ID token does not provide enough information about the currently-authenticated user, you can get more information from the UserInfo endpoint.
Set the quarkus.oidc.authentication.user-info-required=true property for a UserInfo JSON object from the OIDC UserInfo endpoint to be requested.
認可コードグラントのレスポンスで返されるアクセストークンを使ってOpenID Provider UserInfoエンドポイントにリクエストが送られ、 io.quarkus.oidc.UserInfo (シンプルな jakarta.json.JsonObject ラッパー)オブジェクトが作成されます。 io.quarkus.oidc.UserInfo はSecurityIdentity userinfo attributeとして注入またはアクセスすることができます。
OIDC 設定情報へのアクセス
現在のテナントが検出した OpenID Connect 設定メタデータ は io.quarkus.oidc.OidcConfigurationMetadata で表され、 SecurityIdentity configuration-metadata 属性として注入またはアクセスが可能です。
エンドポイントがパブリックの場合、デフォルトのテナントの OidcConfigurationMetadata が注入されます。
Mapping token claims and SecurityIdentity roles
The way the roles are mapped to the SecurityIdentity roles from the verified tokens is identical to how it is done for the Bearer tokens with the only difference being that ID Token is used as a source of the roles by default.
|
If you use Keycloak, set a |
But depending on your OIDC provider, roles might be stored in the access token or the user info.
If the access token contains the roles and this access token is not meant to be propagated to the downstream endpoints then set quarkus.oidc.roles.source=accesstoken.
If UserInfo is the source of the roles then set quarkus.oidc.roles.source=userinfo, and if needed, quarkus.oidc.roles.role-claim-path.
さらに、カスタム SecurityIdentityAugmentor をロールの追加に使用することもできます。詳しくは、 SecurityIdentityのカスタマイズ を参照してください。
トークンと認証データの有効性の確認
A core part of the authentication process is ensuring the chain of trust and validity of the information. This is done by ensuring tokens are trustable.
トークン検証およびイントロスペクション
The verification process of OIDC authorization code flow tokens follows the Bearer token authentication token verification and introspection logic. For more information, see the Token Verification And Introspection section of the "Quarkus OpenID Connect (OIDC) Bearer token authentication" guide.
|
With Quarkus |
トークンのイントロスペクションと UserInfo のキャッシュ
Code flow access tokens are not introspected unless they are expected to be the source of roles.
They will however be used to get UserInfo.
There will be one or two remote calls with the code flow access token, if the token introspection and/or UserInfo are required.
Please see Token Introspection and UserInfo cache for more information about using a default token cache or registering a custom cache implementation.
JSON Web トークンのクレーム検証
Please see JSON Web Token Claim verification section about the claim verification, including the iss (issuer) claim.
It applies to ID tokens but also to access tokens in a JWT format if the web-app application has requested the access token verification.
Proof Key for Code Exchange (PKCE) を使用したセキュリティー強化
Proof Key for Code Exchange (PKCE) は、認可コードの傍受のリスクを最小限に抑えます。
While PKCE is of primary importance to public OpenID Connect clients, such as SPA scripts running in a browser, it can also provide an extra level of protection to Quarkus OIDC web-app applications.
With PKCE, Quarkus OIDC web-app applications are confidential OpenID Connect clients capable of securely storing the client secret and using it to exchange the code for the tokens.
You can enable PKCE for your OIDC web-app endpoint with a quarkus.oidc.authentication.pkce-required property and a 32-character secret, as shown in the following example:
quarkus.oidc.authentication.pkce-required=true
quarkus.oidc.authentication.pkce-secret=eUk1p7UB3nFiXZGUXi0uph1Y9p34YhBU
If you already have a 32-characters client secret then you do not need to set the quarkus.oidc.authentication.pkce-secret property unless you prefer to use a different secret key.
The secret key is required for encrypting a randomly generated PKCE code_verifier while the user is being redirected with the code_challenge query parameter to an OIDC provider to authenticate.
The code_verifier is decrypted when the user is redirected back to Quarkus and sent to the token endpoint alongside the code, client secret, and other parameters to complete the code exchange.
The provider will fail the code exchange if a SHA256 digest of the code_verifier does not match the code_challenge that was provided during the authentication request.
認証のライフタイムの処理と制御
認証のもう一つの重要な要件は、ユーザがリクエストのたびに認証を要求することなく、 セッションの基となるデータが最新であることを保証することです。 また、ログアウトイベントが明示的に要求される状況もあります。 以下のポイントを参考に、Quarkusアプリケーションのセキュリティを確保するための適切なバランスを見つけましょう:
クッキー
OIDC アダプターはクッキーを使用して、セッション、コードフロー、ログアウト後の状態を保持します。 この状態は、認証データの寿命を制御する重要な要素です。
Use the quarkus.oidc.authentication.cookie-path property to ensure that the same cookie is visible when you access protected resources with overlapping or different roots, for example:
-
/index.htmlと/web-app/service -
/web-app/service1と/web-app/service2 -
/web-app1/serviceと/web-app2/service
デフォルトでは、 quarkus.oidc.authentication.cookie-path は / に設定されていますが、必要に応じてこれを /web-app などのより具体的なパスに変更できます。
クッキーパスを動的に設定するには、 quarkus.oidc.authentication.cookie-path-header プロパティーを設定します。
quarkus.oidc.authentication.cookie-path-header プロパティーを設定します。
たとえば、 X-Forwarded-Prefix HTTP ヘッダーの値を使用してクッキーパスを動的に設定するには、プロパティーを quarkus.oidc.authentication.cookie-path-header=X-Forwarded-Prefix に設定します。
quarkus.oidc.authentication.cookie-path-header が設定されているが、現在のリクエストで設定された HTTP ヘッダーが利用できない場合は、 quarkus.oidc.authentication.cookie-path がチェックされます。
アプリケーションが複数のドメインにまたがってデプロイされている場合は、セッションクッキー がすべての保護された Quarkus サービスに表示されるように、 quarkus.oidc.authentication.cookie-domain プロパティーを設定します。
たとえば、次の 2 つのドメインに Quarkus サービスをデプロイしている場合は、 quarkus.oidc.authentication.cookie-domain プロパティーを company.net に設定する必要があります。
-
https://whatever.wherever.company.net/
-
https://another.address.company.net/
Customizing the cookie with TokenStateManager
OIDC CodeAuthenticationMechanism uses the default io.quarkus.oidc.TokenStateManager interface implementation to keep the ID, access, and refresh tokens returned in the authorization code or to refresh grant responses in a session cookie.
This makes Quarkus OIDC endpoints completely stateless.
An access token is only required if the endpoint needs to:
-
UserInfoの取得 -
このアクセストークンを使用したダウンストリームサービスへのアクセス
-
デフォルトでチェックされるアクセストークンに関連付けられたロールの使用
このような場合は、 quarkus.oidc.token-state-manager.strategy プロパティーを使用して、トークン状態ストラテジーを次のように設定します。
| 以下の場合 | プロパティーを以下に設定する |
|---|---|
ID とリフレッシュトークンのみを保存する場合 |
|
ID トークンのみを保存する場合 |
|
If your chosen cookie strategy combines tokens and generates a large session cookie value that is greater than 4KB, some browsers might not be able to handle such cookie sizes.
This can occur when the ID, access, and refresh tokens are JWT tokens and the selected strategy is keep-all-tokens or with ID and refresh tokens when the strategy is id-refresh-token.
To workaround this issue, you can set quarkus.oidc.token-state-manager.split-tokens=true to create a unique session token for each token.
TokenStateManager encrypts the tokens before storing them in the session cookie.
The following example shows how you configure TokenStateManager to split the tokens and encrypt them:
quarkus.oidc.auth-server-url=http://localhost:8180/realms/quarkus
quarkus.oidc.client-id=quarkus-app
quarkus.oidc.credentials.secret=secret
quarkus.oidc.application-type=web-app
quarkus.oidc.token-state-manager.split-tokens=true
quarkus.oidc.token-state-manager.encryption-secret=eUk1p7UB3nFiXZGUXi0uph1Y9p34YhBU
トークンの暗号化シークレットは少なくとも32文字以上でなければなりません。このキーが設定されていない場合、 quarkus.oidc.credentials.secret または quarkus.oidc.credentials.jwt.secret のいずれかがハッシュ化されて暗号化キーが作成されます。
Configure the quarkus.oidc.token-state-manager.encryption-secret property if Quarkus authenticates to the OpenId Connect Provider by using one of the following authentication methods:
-
mTLS
-
private_key_jwtでは、秘密の RSA または EC キーを使用して JWT トークンに署名します。
これ以外の場合は、ランダムなキーが生成されますが、Quarkus アプリケーションがクラウドで実行され、複数の Pod がリクエストを管理している場合、問題が発生する可能性があります。
quarkus.oidc.token-state-manager.encryption-required=false を設定することで、セッションクッキーでのトークン暗号化を無効にすることができます。
Register your own io.quarkus.oidc.TokenStateManager' implementation as an `@ApplicationScoped CDI bean if you need to customize the way the tokens are associated with the session cookie.
For example, you may want to keep the tokens in a database and have only a database pointer stored in a session cookie.
Note that this approach might introduce some challenges if you need to make the tokens available across multiple microservices nodes.
簡単な例を挙げてみます。
package io.quarkus.oidc.test;

import jakarta.annotation.Priority;
import jakarta.enterprise.context.ApplicationScoped;
import jakarta.enterprise.inject.Alternative;
import jakarta.inject.Inject;

import io.quarkus.oidc.AuthorizationCodeTokens;
import io.quarkus.oidc.OidcTenantConfig;
import io.quarkus.oidc.TokenStateManager;
import io.quarkus.oidc.runtime.DefaultTokenStateManager;
import io.smallrye.mutiny.Uni;
import io.vertx.ext.web.RoutingContext;

@ApplicationScoped
@Alternative
@Priority(1)
public class CustomTokenStateManager implements TokenStateManager {

    @Inject
    DefaultTokenStateManager tokenStateManager;

    @Override
    public Uni<String> createTokenState(RoutingContext routingContext, OidcTenantConfig oidcConfig,
            AuthorizationCodeTokens sessionContent, TokenStateManager.CreateTokenStateRequestContext requestContext) {
        return tokenStateManager.createTokenState(routingContext, oidcConfig, sessionContent, requestContext)
                .map(t -> (t + "|custom"));
    }

    @Override
    public Uni<AuthorizationCodeTokens> getTokens(RoutingContext routingContext, OidcTenantConfig oidcConfig,
            String tokenState, TokenStateManager.GetTokensRequestContext requestContext) {
        if (!tokenState.endsWith("|custom")) {
            throw new IllegalStateException();
        }
        String defaultState = tokenState.substring(0, tokenState.length() - 7);
        return tokenStateManager.getTokens(routingContext, oidcConfig, defaultState, requestContext);
    }

    @Override
    public Uni<Void> deleteTokens(RoutingContext routingContext, OidcTenantConfig oidcConfig, String tokenState,
            TokenStateManager.DeleteTokensRequestContext requestContext) {
        if (!tokenState.endsWith("|custom")) {
            throw new IllegalStateException();
        }
        String defaultState = tokenState.substring(0, tokenState.length() - 7);
        return tokenStateManager.deleteTokens(routingContext, oidcConfig, defaultState, requestContext);
    }
}
ログアウトと有効期限
認証情報が期限切れになる主な方法は 2 つあります。トークンの有効期限が切れて更新されなかった場合と、明示的なログアウト操作がトリガーされた場合です。
最初に、明示的なログアウト操作について説明します。
User-initiated logout
ユーザーは、 quarkus.oidc.logout.path プロパティーで設定されたQuarkusエンドポイントのログアウトパスにリクエストを送信することで、ログアウトを要求することができます。たとえば、エンドポイントのアドレスが https://application.com/webapp で、 quarkus.oidc.logout.path が "/logout" に設定されている場合、ログアウト要求は https://application.com/webapp/logout に送信されます。
このログアウト要求により、 RP-Initiated Logout が開始され、ユーザーは OpenID Connect Provider にリダイレクトされ、そこでログアウトできます。ログアウトが実際に意図されていることを確認するように求められます。
quarkus.oidc.logout.post-logout-path プロパティーが設定されている場合、ログアウトが完了すると、ユーザーはエンドポイントのログアウト後ページに戻ります。たとえば、エンドポイントアドレスが https://application.com/webapp で、 quarkus.oidc.logout.post-logout-path が "/signin" に設定されている場合、ユーザーは https://application.com/webapp/signin (この URI は OpenID Connect プロバイダーに有効な post_logout_redirect_uri として登録されている必要があることに注意してください)。
quarkus.oidc.logout.post-logout-path が設定されている場合、 q_post_logout Cookie が作成され、それに一致する state クエリパラメータがログアウトリダイレクト URI に追加され、ログアウトが完了すると OpenID Connect プロバイダはこの state を返します。Quarkus web-app アプリケーションでは、 state クエリパラメータが q_post_logout Cookie の値と一致するかどうかを確認することが推奨されます。これは、例えば Jakarta REST フィルタで実行できます。
OpenID Connect Multi-Tenancy を使用する場合、クッキー名が異なることに注意してください。
たとえば、 tenant_1 ID を持つテナントの場合は q_post_logout_tenant_1 という名前になります。
Here is an example of how to configure a Quarkus app initiated logout flow:
quarkus.oidc.auth-server-url=http://localhost:8180/realms/quarkus
quarkus.oidc.client-id=frontend
quarkus.oidc.credentials.secret=secret
quarkus.oidc.application-type=web-app

quarkus.oidc.logout.path=/logout
# Logged-out users should be returned to the /welcome.html site which will offer an option to re-login:
quarkus.oidc.logout.post-logout-path=/welcome.html

# Only the authenticated users can initiate a logout:
quarkus.http.auth.permission.authenticated.paths=/logout
quarkus.http.auth.permission.authenticated.policy=authenticated

# All users can see the welcome page:
quarkus.http.auth.permission.public.paths=/welcome.html
quarkus.http.auth.permission.public.policy=permit
また、 quarkus.oidc.authentication.cookie-path に、すべてのアプリケーションリソースに共通するパス値(この例では / )を設定する必要がある場合があります。詳しくは、 Cookie の項を参照してください。
|
Some OIDC providers do not support RP-initiated logout specification and do not return an OpenID Connect well-known RP-initiated ログアウト 仕様によれば、 この問題を回避するには、 |
バックチャネルログアウト
The OIDC provider can force the logout of all applications using the authentification data: this is called back-channel logout. In this case the OIDC will call a specific URL from each application to trigger that logout.
バックチャンネルログアウト は、OpenID Connect プロバイダーが、このユーザーが現在ログインしているすべてのアプリケーションから、ユーザーエージェントをバイパスして、現在のユーザーをログアウトするために使用されます。
次のように、バックチャネルログアウトをサポートするように Quarkus を設定できます。
quarkus.oidc.auth-server-url=http://localhost:8180/realms/quarkus
quarkus.oidc.client-id=frontend
quarkus.oidc.credentials.secret=secret
quarkus.oidc.application-type=web-app

quarkus.oidc.logout.backchannel.path=/back-channel-logout
絶対的な back-channel logout URL は、現在のエンドポイント URL に quarkus.oidc.back-channel-logout.path を追加することによって計算されます (例: http://localhost:8080/back-channel-logout)。
この URL は、OIDC プロバイダーの管理コンソールで設定する必要があります。
You will also need to configure a token age property for the logout token verification to succeed if your OpenID Connect Provider does not set an expiry claim in the current logout token.
For example, set quarkus.oidc.token.age=10S to ensure that no more than 10 seconds elapse since the logout token’s iat (issued at) time.
フロントチャネルログアウト
Front-Channel Logout can be used to logout the current user directly from the user agent (e.g. its browser). It is like Back-channel logout but the logout steps are executed by the user agent like the browser and not in the background by the OIDP provider. This option is rarely used.
次のように、フロントチャネルログアウトをサポートするように Quarkus を設定できます。
quarkus.oidc.auth-server-url=http://localhost:8180/realms/quarkus
quarkus.oidc.client-id=frontend
quarkus.oidc.credentials.secret=secret
quarkus.oidc.application-type=web-app

quarkus.oidc.logout.frontchannel.path=/front-channel-logout
このパスは現在のリクエストのパスと比較され、これらのパスが一致する場合、ユーザーはログアウトされます。
ローカルログアウト
User-initiated logout will log the user out of the OIDC provider, if it is used as single sign-on, it might not be what you require. If, for example, your OIDC provider is Google, you will be logged out from Google and its services. Instead the user might just want to log out of that specific application. Another use case might be when the OIDC provider does not have a logout endpoint.
By using OidcSession, you can support a local logout, which means that only the local session cookie is cleared, as shown in the following example:
import jakarta.inject.Inject;
import jakarta.ws.rs.GET;
import jakarta.ws.rs.Path;

import io.quarkus.oidc.OidcSession;

@Path("/service")
public class ServiceResource {

    @Inject
    OidcSession oidcSession;

    @GET
    @Path("logout")
    public String logout() {
        oidcSession.logout().await().indefinitely();
        return "You are logged out".
    }
Using OidcSession for local logout
io.quarkus.oidc.OidcSession is a wrapper around the current IdToken, which can help to perform a Local logout, retrieve the current session’s tenant identifier, and check when the session will expire.
More useful methods will be added to it over time.
セッション管理
By default, logout is based on the expiration time of the ID token issued by the OIDC provider. When the ID token expires, the current user session at the Quarkus endpoint is invalidated and the user is redirected to the OIDC provider again to authenticate. If the session at the OIDC provider is still active, users are automatically re-authenticated without needing to provide their credentials again.
quarkus.oidc.token.refresh-expired プロパティーを有効にすると、現在のユーザーセッションを自動的に延長できます。
true に設定すると、現在の ID トークンの有効期限が切れたときに、リフレッシュトークンの付与を使用して、ID トークンだけでなくアクセストークンとリフレッシュトークンもリフレッシュされます。
|
If you have a single page application for service applications where your OIDC provider script such as |
If you work with a Quarkus OIDC web-app application, then it is the Quarkus OIDC code authentication mechanism that is managing the user session lifespan.
リフレッシュトークンを使用するには、セッションクッキーの有効期間を慎重に設定する必要があります。 セッションの有効期間は、ID トークンの有効期間よりも長く、リフレッシュトークンの有効期間と近いか等しい必要があります。
セッションの有効期間は、現在の ID トークンの有効期間の値と、 quarkus.oidc.authentication.session-age-extension プロパティーおよび quarkus.oidc.token.lifespan-grace プロパティーの値を加算して計算します。
|
You use only the |
現在認証されているユーザーが、保護された Quarkus エンドポイントに戻り、セッションクッキーに関連付けられた ID トークンの有効期限が切れると、デフォルトでは、ユーザーは再認証のために OIDC 認可エンドポイントに自動的にリダイレクトされます。 ユーザーとこの OIDC プロバイダー間のセッションがまだアクティブな場合、OIDC プロバイダーはユーザーに再度チャレンジする可能性があります。これは、セッションが ID トークンよりも長く続くように設定されている場合に発生する可能性があります。
If the quarkus.oidc.token.refresh-expired is set to true, then the expired ID token (as well as the access token) is refreshed by using the refresh token returned with the initial authorization code grant response.
This refresh token might also be recycled (refreshed) itself as part of this process.
As a result, the new session cookie is created and the session is extended.
|
ユーザーがあまりアクティブでない場合は、 |
You can go one step further and proactively refresh ID tokens or access tokens that are about to expire.
Set quarkus.oidc.token.refresh-token-time-skew to the value you want to anticipate the refresh. If, during the current user request, it is calculated that the current ID token will expire within this quarkus.oidc.token.refresh-token-time-skew then it will be refreshed and the new session cookie will be created. This property should be set to a value which is less than the ID token lifespan; the closer it is to this lifespan value the more often the ID token will be refreshed.
You can further optimize this process by having a simple JavaScript function ping your Quarkus endpoint to periodically emulate the user activity, which minimizes the time frame during which the user might have to be re-authenticated.
|
このユーザーセッションを無期限に延長することはできません。 有効期限が切れた ID トークンを持つ復帰ユーザーは、リフレッシュトークンの有効期限が切れると、OIDC プロバイダーエンドポイントで再認証する必要があります。 |
GitHub および OIDC 以外の OAuth2 プロバイダーとのインテグレーション
Some well known providers such as GitHub or LinkedIn are not OpenID Connect but OAuth2 providers which support the authorization code flow, for example, GitHub OAuth2 and LinkedIn OAuth2.
Remember, OIDC is built on top of OAuth2.
The main difference between OpenID Connect and OAuth2 providers is that OpenID Connect providers return an ID Token that represents a user authentication, in addition to the standard authorization code flow access and refresh tokens returned by OAuth2 providers.
GitHub のような OAuth2 プロバイダーは IdToken を返しません。ユーザー認証の事実は暗黙の了解で、認証済みユーザーの代わりに現在の Quarkus web-app アプリケーションがデータにアクセスすることを許可する access トークンで間接的に表現されます。
For OIDC, you validate the ID token as proof of authentication validity whereas in the case of OAuth2, you validate the access token.
This is done by subsequently calling an endpoint that requires the access token and that typically returns user information.
This approach is similar to the OIDC UserInfo approach, with UserInfo fetched by Quarkus OIDC on your behalf.
For example, when working with GitHub, the Quarkus endpoint can acquire an access token which allows the Quarkus endpoint to request a GitHub profile for the current user.
このような OAuth2 サーバーとのインテグレーションをサポートするには、 quarkus-oidc を少し異なる方法で設定して、 IdToken: quarkus.oidc.authentication.id-token-required=false なしで認可コードフローの応答を許可する必要があります。
|
Even though you configure the extension to support the authorization code flows without これにより、複数のOIDCプロバイダをサポートするアプリケーションの取り扱いが簡単になります。 |
The next step is to ensure that the returned access token can be useful and is valid to the current Quarkus endpoint.
The first way is to call the OAuth2 provider introspection endpoint by configuring quarkus.oidc.introspection-path, if the provider offers such an endpoint.
In this case you can use the access token as a source of roles using quarkus.oidc.roles.source=accesstoken.
If no introspection endpoint is present, you can attempt instead to request UserInfo from the provider as it will at least validate the access token.
To do so, specify quarkus.oidc.token.verify-access-token-with-user-info=true.
You also need to set the quarkus.oidc.user-info-path property to a URL endpoint that fetches the user info (or to an endpoint protected by the access token).
For GitHub, since it does not have an introspection endpoint, requesting the UserInfo is required.
|
Requiring UserInfo involves making a remote call on every request.
Therefore, you might want to consider caching あるいは、 |
OAuth2 servers might not support a well-known configuration endpoint. In this case, you must disable the discovery and configure the authorization, token, and introspection and the userinfo endpoint paths manually.
For well-known OIDC or OAuth2 providers, like Apple, Facebook, GitHub, Google, Microsoft, Spotify, and Twitter, Quarkus can help significantly simplify your application’s configuration with the quarkus.oidc.provider property.
Here is how you can integrate quarkus-oidc with GitHub after you have created a GitHub OAuth application. Configure your Quarkus endpoint like this:
quarkus.oidc.provider=github
quarkus.oidc.client-id=github_app_clientid
quarkus.oidc.credentials.secret=github_app_clientsecret

# user:email scope is requested by default, use 'quarkus.oidc.authentication.scopes' to request different scopes such as `read:user`.
# See https://docs.github.com/en/developers/apps/building-oauth-apps/scopes-for-oauth-apps for more information.

# Consider enabling UserInfo Cache
# quarkus.oidc.token-cache.max-size=1000
# quarkus.oidc.token-cache.time-to-live=5M
#
# Or having UserInfo cached inside IdToken itself
# quarkus.oidc.cache-user-info-in-idtoken=true
その他のよく知られたプロバイダーの設定については、 OpenID Connectのプロバイダー を参照してください。
このようなエンドポイントに対して必要なのは、現在認証されているユーザーのプロファイルを GET http://localhost:8080/github/userinfo で返却し、個々の UserInfo のプロパティとしてアクセスすることです:
import jakarta.inject.Inject;
import jakarta.ws.rs.GET;
import jakarta.ws.rs.Path;
import jakarta.ws.rs.Produces;

import io.quarkus.oidc.UserInfo;
import io.quarkus.security.Authenticated;

@Path("/github")
@Authenticated
public class TokenResource {

    @Inject
    UserInfo userInfo;

    @GET
    @Path("/userinfo")
    @Produces("application/json")
    public String getUserInfo() {
        return userInfo.getUserInfoString();
    }
}
OpenID Connect マルチテナンシー の利用で複数のソーシャルプロバイダーをサポートしている場合、例えば OpenID Connect プロバイダーである Google が IdToken を返し、OAuth2 プロバイダーである GitHub が IdToken を返さず UserInfo のみアクセスを許可していれば、エンドポイントには Google と GitHub 両フロー用の SecurityIdentity しか入れられないようにすることができます。GiHub フローがアクティブになると、内部で生成された IdToken で作成されたプリンシパルが UserInfo ベースのプリンシパルに置き換えられるので、 SecurityIdentity を単純に拡張する必要があります。
package io.quarkus.it.keycloak;

import java.security.Principal;

import jakarta.enterprise.context.ApplicationScoped;

import io.quarkus.oidc.UserInfo;
import io.quarkus.security.identity.AuthenticationRequestContext;
import io.quarkus.security.identity.SecurityIdentity;
import io.quarkus.security.identity.SecurityIdentityAugmentor;
import io.quarkus.security.runtime.QuarkusSecurityIdentity;
import io.smallrye.mutiny.Uni;
import io.vertx.ext.web.RoutingContext;

@ApplicationScoped
public class CustomSecurityIdentityAugmentor implements SecurityIdentityAugmentor {

    @Override
    public Uni<SecurityIdentity> augment(SecurityIdentity identity, AuthenticationRequestContext context) {
        RoutingContext routingContext = identity.getAttribute(RoutingContext.class.getName());
        if (routingContext != null && routingContext.normalizedPath().endsWith("/github")) {
	        QuarkusSecurityIdentity.Builder builder = QuarkusSecurityIdentity.builder(identity);
	        UserInfo userInfo = identity.getAttribute("userinfo");
	        builder.setPrincipal(new Principal() {

	            @Override
	            public String getName() {
	                return userInfo.getString("preferred_username");
	            }

	        });
	        identity = builder.build();
        }
        return Uni.createFrom().item(identity);
    }

}
これで、ユーザーが Google または GitHub を使用してアプリケーションにサインインすると、次のコードが機能するようになります。
import jakarta.inject.Inject;
import jakarta.ws.rs.GET;
import jakarta.ws.rs.Path;
import jakarta.ws.rs.Produces;

import io.quarkus.security.Authenticated;
import io.quarkus.security.identity.SecurityIdentity;

@Path("/service")
@Authenticated
public class TokenResource {

    @Inject
    SecurityIdentity identity;

    @GET
    @Path("/google")
    @Produces("application/json")
    public String getUserName() {
        return identity.getPrincipal().getName();
    }

    @GET
    @Path("/github")
    @Produces("application/json")
    public String getUserName() {
        return identity.getPrincipal().getUserName();
    }
}
Possibly a simpler alternative is to inject both @IdToken JsonWebToken and UserInfo and use JsonWebToken when dealing with the providers returning IdToken and UserInfo with the providers which do not return IdToken.
You must ensure that the callback path you enter in the GitHub OAuth application configuration matches the endpoint path where you’d like the user be redirected to after a successful GitHub authentication and application authorization, in this case it has to be set to http:localhost:8080/github/userinfo.
重要な認証イベントのリッスン
You can register the @ApplicationScoped bean which will observe important OIDC authentication events.
When a user logs in for the first time, reauthenticates, or refreshes the session, the listener is updated.
In the future, more events might be reported.
For example:
import jakarta.enterprise.context.ApplicationScoped;
import jakarta.enterprise.event.Observes;

import io.quarkus.oidc.IdTokenCredential;
import io.quarkus.oidc.SecurityEvent;
import io.quarkus.security.identity.AuthenticationRequestContext;
import io.vertx.ext.web.RoutingContext;

@ApplicationScoped
public class SecurityEventListener {

    public void event(@Observes SecurityEvent event) {
        String tenantId = event.getSecurityIdentity().getAttribute("tenant-id");
        RoutingContext vertxContext = event.getSecurityIdentity().getAttribute(RoutingContext.class.getName());
        vertxContext.put("listener-message", String.format("event:%s,tenantId:%s", event.getEventType().name(), tenantId));
    }
}
下流サービスへのトークンの伝播
認可コードフローから下流のサービスへのアクセストークンの伝播については、 トークンの伝播 のセクションを参照してください。
インテグレーションに関する考慮事項
Your application secured by OIDC integrates in an environment where it can be called from single-page applications, needs to work with well-known OIDC providers, run behind HTTP Reverse Proxy, require external and internal access, etc.
このセクションでは、これらの考慮事項について説明します。
シングルページアプリケーション
「OpenID Connect (OIDC) ベアラートークン認証」ガイドの シングルページアプリケーション セクションで提案されている方法でシングルページアプリケーション (SPA) を実装した場合、要件が満たされるか確認できます。
If you prefer to use SPAs and JavaScript APIs such as Fetch or XMLHttpRequest(XHR) with Quarkus web applications, be aware that OpenID Connect providers might not support cross-origin resource sharing (CORS) for authorization endpoints where the users are authenticated after a redirect from Quarkus.
This will lead to authentication failures if the Quarkus application and the OpenID Connect provider are hosted on different HTTP domains, ports, or both.
In such cases, set the quarkus.oidc.authentication.java-script-auto-redirect property to false, which will instruct Quarkus to return a 499 status code and a WWW-Authenticate header with the OIDC value.
You must also update the browser script to set the X-Requested-With header with the JavaScript value and reload the last requested page in case of a 499 status code.
For example:
Future<void> callQuarkusService() async {
    Map<String, String> headers = Map.fromEntries([MapEntry("X-Requested-With", "JavaScript")]);

    await http
        .get("https://localhost:443/serviceCall")
        .then((response) {
            if (response.statusCode == 499) {
                window.location.assign("https://localhost.com:443/serviceCall");
            }
         });
  }
クロスオリジンリソース共有
If you plan to consume this application from a single-page application running on a different domain, you need to configure cross-origin resource sharing (CORS). For more information, see the CORS filter section of the "HTTP reference" guide.
クラウドプロバイダーサービスの呼び出し
Google Cloud
You can have Quarkus OIDC web-app applications access Google Cloud services such as BigQuery on behalf of the currently-authenticated users who have enabled OpenID Connect (Authorization Code Flow) permissions to such services in their Google developer consoles.
Quarkiverse のGoogle Cloud Services で行うのは超簡単で、 最新のタグ サービスの依存関係を追加するだけです。例:
<dependency>
    <groupId>io.quarkiverse.googlecloudservices</groupId>
    <artifactId>quarkus-google-cloud-bigquery</artifactId>
    <version>${quarkiverse.googlecloudservices.version}</version>
</dependency>implementation("io.quarkiverse.googlecloudservices:quarkus-google-cloud-bigquery:${quarkiverse.googlecloudservices.version}")そしてGoogle OIDCプロパティーを設定します。
quarkus.oidc.provider=google
quarkus.oidc.client-id={GOOGLE_CLIENT_ID}
quarkus.oidc.credentials.secret={GOOGLE_CLIENT_SECRET}
quarkus.oidc.token.issuer=https://accounts.google.com
Quarkus アプリケーションのリバースプロキシーの背後での実行
Quarkusアプリケーションがリバースプロキシー/ゲートウェイ/ファイアウォールの背後で実行されている場合、HTTP Host ヘッダーが内部IPアドレスにリセットされたり、HTTPS接続が終了したりした場合などに、OIDC認証メカニズムが影響を受けることがあります。たとえば、認可コードフロー redirect_uri パラメーターが、期待される外部ホストではなく内部ホストに設定されている場合があります。
このような場合、プロキシによって転送された元のヘッダーを認識するようにQuarkusを設定する必要があります。詳細については、 リバースプロキシの背後で実行 Vert.xのドキュメントセクションをご覧ください。
例えば、Quarkus のエンドポイントが Kubernetes Ingress の背後にあるクラスターで実行されている場合、計算された redirect_uri パラメーターが内部のエンドポイントアドレスを指している可能性があるので、OpenID Connect Provider からこのエンドポイントへのリダイレクトは機能しないかもしれません。この問題は、以下のような設定で解決することができます。
quarkus.http.proxy.proxy-address-forwarding=true
quarkus.http.proxy.allow-forwarded=false
quarkus.http.proxy.enable-forwarded-host=true
quarkus.http.proxy.forwarded-host-header=X-ORIGINAL-HOST
ここで、 X-ORIGINAL-HOST は、外部エンドポイントアドレスを表すために Kubernetes Ingress によって設定されます。
quarkus.oidc.authentication.force-redirect-https-scheme プロパティーは、QuarkusアプリケーションがSSL終端リバースプロキシーの後ろで実行されている場合にも使用できます。
OIDC プロバイダーへの外部および内部アクセス
OpenID Connect Provider の外部アクセス可能な認証、ログアウト、その他のエンドポイントは、自動検出された URL や内部 URL quarkus.oidc.auth-server-url に対して設定された URL とは異なる HTTP(S) URL を持つ場合があることに注意してください。このような場合、エンドポイントから発行者確認の失敗が報告され、外部からアクセス可能な接続プロバイダーのエンドポイントへのリダイレクトに失敗する可能性があります。
このような場合、Keycloak を使用する場合は、外部からアクセス可能なベース URL に設定された KEYCLOAK_FRONTEND_URL システムプロパティーで起動してください。他の Openid Connect プロバイダーと連携している場合は、プロバイダーのドキュメントを確認してください。
テスト
Testing is often tricky when it comes to authentification to a separate OIDC like server. Quarkus offers several options from mocking to a local run of an OIDC provider.
テストプロジェクトに以下の依存関係を追加することから始めます。
<dependency>
    <groupId>net.sourceforge.htmlunit</groupId>
    <artifactId>htmlunit</artifactId>
    <exclusions>
        <exclusion>
            <groupId>org.eclipse.jetty</groupId>
            <artifactId>*</artifactId>
       </exclusion>
    </exclusions>
    <scope>test</scope>
</dependency>
<dependency>
    <groupId>io.quarkus</groupId>
    <artifactId>quarkus-junit5</artifactId>
    <scope>test</scope>
</dependency>testImplementation("net.sourceforge.htmlunit:htmlunit")
testImplementation("io.quarkus:quarkus-junit5")Wiremock
次の依存関係を追加します。
<dependency>
    <groupId>io.quarkus</groupId>
    <artifactId>quarkus-test-oidc-server</artifactId>
    <scope>test</scope>
</dependency>testImplementation("io.quarkus:quarkus-test-oidc-server")RESTテストエンドポイントを用意し、 application.properties を以下のように設定します。
# keycloak.url is set by OidcWiremockTestResource
quarkus.oidc.auth-server-url=${keycloak.url}/realms/quarkus/
quarkus.oidc.client-id=quarkus-web-app
quarkus.oidc.credentials.secret=secret
quarkus.oidc.application-type=web-app
最後に、例えば次のようにテストコードを書きます。
import static org.junit.jupiter.api.Assertions.assertEquals;

import org.junit.jupiter.api.Test;

import com.gargoylesoftware.htmlunit.SilentCssErrorHandler;
import com.gargoylesoftware.htmlunit.WebClient;
import com.gargoylesoftware.htmlunit.html.HtmlForm;
import com.gargoylesoftware.htmlunit.html.HtmlPage;

import io.quarkus.test.common.QuarkusTestResource;
import io.quarkus.test.junit.QuarkusTest;
import io.quarkus.test.oidc.server.OidcWiremockTestResource;

@QuarkusTest
@QuarkusTestResource(OidcWiremockTestResource.class)
public class CodeFlowAuthorizationTest {

    @Test
    public void testCodeFlow() throws Exception {
        try (final WebClient webClient = createWebClient()) {
            // the test REST endpoint listens on '/code-flow'
            HtmlPage page = webClient.getPage("http://localhost:8081/code-flow");

            HtmlForm form = page.getFormByName("form");
            // user 'alice' has the 'user' role
            form.getInputByName("username").type("alice");
            form.getInputByName("password").type("alice");

            page = form.getInputByValue("login").click();

            assertEquals("alice", page.getBody().asText());
        }
    }

    private WebClient createWebClient() {
        WebClient webClient = new WebClient();
        webClient.setCssErrorHandler(new SilentCssErrorHandler());
        return webClient;
    }
}
OidcWiremockTestResource は alice と admin ユーザーを認識します。ユーザー alice にはデフォルトで user ロールしかありませんが、 quarkus.test.oidc.token.user-roles システムプロパティーでカスタマイズできます。ユーザー admin にはデフォルトで user と admin ロールがありますが、 quarkus.test.oidc.token.user-roles システムプロパティーでカスタマイズできます。
さらに、 OidcWiremockTestResource はトークン発行者と視聴者を https://service.example.com に設定します。これは quarkus.test.oidc.token.issuer と quarkus.test.oidc.token.audience システムのプロパティーでカスタマイズすることができます。
OidcWiremockTestResource は、すべての OpenID Connect プロバイダーをエミュレートするために使用することができます。
Dev services for Keycloak
Keycloak に対する統合テストには、Dev Services for Keycloak を使用することをお勧めします。 Dev Services for Keycloak は、テストコンテナーを起動して初期化します。これにより、 quarkus レルム、 quarkus-app クライアント (secret シークレット) が作成され、 alice (admin および user ロール) および bob (user ロール) ユーザーが追加されます。これらのプロパティーはすべてカスタマイズできます。
まず、 application.properties を準備します。 Dev Services for Keycloak が実行中のテストコンテナを指す quarkus.oidc.auth-server-url を登録し、 quarkus.oidc.client-id=quarkus-app と quarkus.oidc.credentials.secret=secret も登録するので、完全に空の application.properties で始めることができます。
ただし、必要なすべての quarkus-oidc プロパティーがすでに設定されている場合は、 quarkus.oidc.auth-server-url を Dev Services for Keycloak の prod プロファイルに関連付けるだけでコンテナーを起動できます。以下に例を示します。
%prod.quarkus.oidc.auth-server-url=http://localhost:8180/realms/quarkusテストを実行する前にカスタムレルムファイルを Keycloak にインポートする必要がある場合は、次のように Dev Services for Keycloak を設定できます。
%prod.quarkus.oidc.auth-server-url=http://localhost:8180/realms/quarkus
quarkus.keycloak.devservices.realm-path=quarkus-realm.json
最後に、 Wiremock のセクションで説明したのと同じ方法でテストコードを書きます。唯一の違いは、 @QuarkusTestResource が不要になったことです:
@QuarkusTest
public class CodeFlowAuthorizationTest {
}
KeecycloakTestResourceLifecycleManager の使用
Dev Services for Keycloak を使用しない正当な理由がある場合のみ、テストに KeycloakTestResourceLifecycleManager を使用してください。Keycloakに対する統合テストを行う必要がある場合は、 Dev services For Keycloak で行うことが推奨されます。
以下の依存関係を追加することから始めます。
<dependency>
    <groupId>io.quarkus</groupId>
    <artifactId>quarkus-test-keycloak-server</artifactId>
    <scope>test</scope>
</dependency>testImplementation("io.quarkus:quarkus-test-keycloak-server")これは、Keycloak コンテナーを開始する io.quarkus.test.common.QuarkusTestResourceLifecycleManager の実装である io.quarkus.test.keycloak.server.KeycloakTestResourceLifecycleManager を提供します。
そして、Maven Surefire プラグインを次のように設定します。
<plugin>
    <artifactId>maven-surefire-plugin</artifactId>
    <configuration>
        <systemPropertyVariables>
            <!-- or, alternatively, configure 'keycloak.version' -->
            <keycloak.docker.image>${keycloak.docker.image}</keycloak.docker.image>
            <!--
              Disable HTTPS if required:
              <keycloak.use.https>false</keycloak.use.https>
            -->
        </systemPropertyVariables>
    </configuration>
</plugin>
(ネイティブイメージでテストする場合は同様に Maven Failsafe プラグインを使用します)。
そして、 Wiremock のセクションで説明したのと同じように設定を行い、テストコードを記述します。唯一違うのは、 QuarkusTestResource の名前です:
import io.quarkus.test.keycloak.server.KeycloakTestResourceLifecycleManager;

@QuarkusTest
@QuarkusTestResource(KeycloakTestResourceLifecycleManager.class)
public class CodeFlowAuthorizationTest {
}
KeycloakTestResourceLifecycleManager は alice と admin ユーザーを登録します。ユーザー alice にはデフォルトで user ロールしかありませんが、 keycloak.token.user-roles システムプロパティーでカスタマイズできます。ユーザー admin にはデフォルトで user と admin ロールがありますが、 keycloak.token.admin-roles システムプロパティーでカスタマイズできます。
デフォルトでは、 KeycloakTestResourceLifecycleManager は HTTPS を使用して Keycloak インスタンスを初期化しますが、 keycloak.use.https=false で無効にできます。デフォルトのレルム名は quarkus で、クライアント ID quarkus-web-app は、必要に応じて値をカスタマイズするために keycloak.realm および keycloak.web-app.client システムプロパティーを設定します。
TestSecurity アノテーション
See Use TestingSecurity with injected JsonWebToken section for more information about using @TestSecurity and @OidcSecurity annotations for testing the web-app application endpoint code which depends on the injected ID and access JsonWebToken as well as UserInfo and OidcConfigurationMetadata.
ログでのエラー確認
トークン検証エラーの詳細を確認するには、 io.quarkus.oidc.runtime.OidcProvider の TRACE レベルのロギングを有効にする必要があります。
quarkus.log.category."io.quarkus.oidc.runtime.OidcProvider".level=TRACE
quarkus.log.category."io.quarkus.oidc.runtime.OidcProvider".min-level=TRACE
OidcProvider クライアントの初期化エラーの詳細を確認するには、 io.quarkus.oidc.runtime.OidcRecorder の TRACE レベルのロギングを有効にしてください。
quarkus.log.category."io.quarkus.oidc.runtime.OidcRecorder".level=TRACE
quarkus.log.category."io.quarkus.oidc.runtime.OidcRecorder".min-level=TRACE
You can also from quarkus dev console hit j to change the application global log level.

