Quarkus native running on a Raspberry Pi

イントロ
When I’ve been introduced to Quarkus, back in December 2018, I suddenly had the feeling the Quarkus runtime has the potential of covering ~95% of the software use-cases. My friend Sanne demoed Quarkus on his laptop when the runtime was still in an alpha state, far from being the large, extended and mature framework everybody knows nowadays. And still, I could experience a new way of think, implement and deploy java apps.
I’ve been recently working on a Hackfest for Red Hat EMEA partners to spread awareness about the potential and the performance of the Quarkus framework. My main technical goal was to demonstrate Quarkus can run everywhere and thanks to its performance capabilities coming from the native compilation process it definitely is the runtime of choice for IoT devices (a.k.a. Far Edge).
To achieve the above goal, I’ve picked up a single-board computer with an integrated ARM-compatible central processing unit and made a Quarkus native app running into a container on top of a Linux based operating system. Here is how:
前提条件
-
Single-board computer: The ARM-compatible CPU integrated into the single-board computer must support 64-bit mode.
-
Operating system:
-
To make a Quarkus native container image run in a container, a 64-bit Linux OS is required;
-
The OS must support aarch64 CPUs, which leads us to the need for an aarch64-base distribution available for that OS;
-
Nice to have: the target OS should fully support the target single-board computer.**
-
-
Container technology: surprise, surprise! an OCI standard container engine is compulsory to run containers on Linux :-)
-
Build tools: as per the large amount of resources required by the GraalVM to compile Quarkus in native mode, an additional we need an ARM server / Virtual machine to achieve that goal. The server should meet the following minimum requirements:
-
CPU: same ARM model as the one embedded in the target single-board computer
-
Cores: 4
-
Ram: 8Gb
-
Disk space: 20Gb
-
-
Container registry: In order to be able to deploy onto the single-board computer the container image containing the Quarkus native app built in the ARM server, an account on a remote container registry is required.
Technology
Single-sensor board
Choosing the target single-board computer model has been quite an easy task: I already had a Raspberry Pi meeting the requirements above:
-
Model: Raspberry Pi 3 B+
-
SOC: Broadcom BCM2837B0, Cortex-A53 (ARMv8) 64-bit SoC
-
CPU: 1.4GHz 64-bit quad-core ARM Cortex-A53 CPU
-
RAM: 1GB LPDDR2 SDRAM
-
WIFI: Dual-band 802.11ac wireless LAN (2.4GHz and 5GHz ) and Bluetooth 4.2
-
Ethernet: Gigabit Ethernet over USB 2.0 (max 300 Mbps). Power-over-Ethernet support (with separate PoE HAT). Improved PXE network and USB mass-storage booting.
-
Thermal management: Yes
-
Video: Yes – VideoCore IV 3D. Full-size HDMI
-
Audio: Yes
-
USB 2.0: 4 ports
-
GPIO: 40-pin
-
Power: 5V/2.5A DC power input
-
Operating system support: Linux and Unix
OS
I’ve tried a few operating system meeting the requirements listed above. The two possible solutions were Fedora Internet of Things Edition and Gentoo. After some tests, I’ve picked up Fedora IoT for the following reasons:
-
Full, native support to 64-bit architecture (aarch64)
-
Stability
-
ユーザービリティー
-
Maturity
-
ライフサイクル
-
Full support on RPi 3 B+
Container technology
This one has been an easy task as well: Podman. Podman is a daemonless container engine for developing, managing, and running OCI Containers on your Linux System. Containers can either be run as root or in rootless mode. Moreover, there’s no need for installing additional components/layers to Fedora IoT basic installation as the Podman container engine is already available in the OS distribution.
Moreover, from a deeper technical perspective, due to the fact cgroups on fedora is now v2 using Docker would force you to appy several tweeks and to downgrade the cgroups versio to v1 in order to avoid getting warning and eventually failures.
The reason why Podman is the contained of choice is very well explained in the following article. I’m quoting the quick explanation:
The crun command is the runtime the allows for cgroup V2 support and is supplied starting with Fedora 31. Other container systems use the runc runtime. However, runc only supports cgroup V1. The cgroup kernel feature allows you to allocate resources such as CPU time, network bandwidth and system memory to a container. Version 1 of cgroup only supports containers that are run by root, while version 2 supports containers that are run by root or a non-privileged user.
The output from the command "podman info" on the RPi related to the OCI runtime is the following:
...
ociRuntime:
    name: crun
    package: crun-0.14.1-4.fc32.aarch64
    path: /usr/bin/crun
    version: |-
      crun version 0.14.1
      commit: 598ea5e192ca12d4f6378217d3ab1415efeddefa
      spec: 1.0.0
      +SYSTEMD +SELINUX +APPARMOR +CAP +SECCOMP +EBPF +YAJL
...
Meaning the Podman version already included in Fedora IoT 31 and later fully supports cgroup v2 thanks to the fact it uses "crun" runtime rather than the classic "runc" runtime, embedded in the other linux distributions and in the fedora releases before v31.
Build tools
There are multiple ways of provisioning an aarch64 server shipped with enough resources to build quarkus in native mode nowadays:
-
Spend a reasonable, but not small, budget to purchase a physical ARM server (don’t do this at home);
-
Spend a very small budget to provision an ARM VM on the public cloud (fastest, recommended if you are not running a Linux os on your host);
-
Provision a VM on your host machine using QEmu (cheapest);
-
Run QEmu within a container, emulating the quarkus container images (still under investigation and tests).
As I’m running Fedora Workstation on my desktop, I’ve picked up the 3rd option.
Container registry
The remote container registry of choice is Quay.io. More details about setting up the account created on quay.io will be shared in a dedicated section of this article.
Implementation
This section will guide you through the following
-
Setting up the VM
-
Setting up the RPi and Fedora IoT
-
Connecting the container engine to the quay.io account
-
Compiling and deploying your Quarkus native app on Podman
-
Outcome
1. Setting up the VM
This goal can be achieved using VM technology based on QEmu. QEmu plays an important role in this task, cause that’s the best upstream tool to use to make a virtual machine emulating the target cpu architecture.
Setup a Virtual machine using QEmu
On a linux distro, the use of VMM (Virtual Machine Manager is highly recommended):
$ sudo dnf groupinstall virtualization
$ sudo dnf install qemu-system-aarch64
The minimum requirements for the virtual machine are the following:
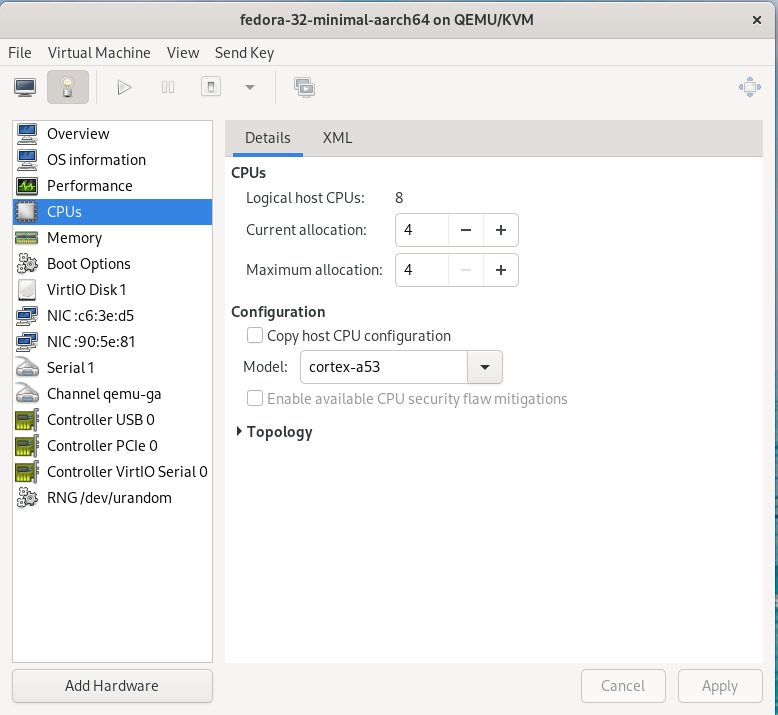
As a side note, please consider increasing the disk sizing of the VM in case you want to reuse it for additional builds and tests.
Setup the GraalVM environment
On your VM, you will need GCC, and the glibc and zlib headers. Examples for common distributions:
$ sudo dnf install gcc glibc-devel zlib-devel libstdc++-staticInstall OpenJdk:
$ sudo dnf install -y java-11-openjdkDownload the latest version of graalvm for your architecture (aarch64) from here and unpack it. Detailed instructions here.
Move the graalvm content into /usr/lib/graalvm and set the environment variables adding the following code snippet into /etc/profile:
#JAVA_HOME
JAVA_HOME=/usr/lib/jvm/java-11-openjdk-11.0.6.10-0.fc32.aarch64
PATH=$PATH:$HOME/bin:$JAVA_HOME/bin
export JAVA_HOME
export PATH
#GRAALVM_HOME
GRAALVM_HOME=/usr/lib/graalvm/graalvm-ce-java11-19.3.1
PATH=$PATH:$HOME/bin:$GRAALVM_HOME/bin
export GRAALVM_HOME
export PATH

(Optional) Set the JAVA_HOME environment variable to the GraalVM installation directory.
export JAVA_HOME=${GRAALVM_HOME}
(Optional) Add the GraalVM bin directory to the path
export PATH=${GRAALVM_HOME}/bin:$PATH
例:
...

#JAVA_HOME
JAVA_HOME=/usr/lib/jvm/java-11-openjdk-11.0.8.10-0.fc32.x86_64
PATH=$PATH:$HOME/bin:$JAVA_HOME/bin
export JAVA_HOME
export PATH
#GRAALVM_HOME
GRAALVM_HOME=/usr/lib/graalvm/graalvm-ce-java11-20.2.0
PATH=$PATH:$HOME/bin:$GRAALVM_HOME/bin
export GRAALVM_HOME
export PATH
export JAVA_HOME=${GRAALVM_HOME}
export PATH=${GRAALVM_HOME}/bin:$PATH
2. Setting up the RPi and Fedora IoT
Download the latest Fedora IoT distro
Download the stable and fully supported version of Fedora IoT for Raspberry Pi from here. Pick up the raw image for aarch64.
Flash the operating system on the SD card
Non-Linux OS
If you are not running any linux based OS on hour host, in order to easily, safely and quickly install the OS image on the MicroSD card I highly recommended to download the official Raspberry Imager tool from here. The Raspberry Pi Imager how-to can be found here. The good news is that we have already gone through the creation of the ARM-based virtual machine, so you already have a linux distro to use to flash the Fedora IoT OS on the SD card!
On a Linux distro
Fedora OS linux distro provides a tool that dramatically simplifies the task: fedora-arm-installer. Let’s add the tool to the OS:
$ dnf install -y fedora-arm-installerAn example of how to setup the DS card if you are running fedora:
$ sudo fedora-arm-image-installer -y --image=/home/<<user_home>>/Fedora-IoT-32-20200429.0.aarch64.raw.xz --target=rpi3 --media=/dev/sde --resizefs --addkey=/home/<<user_home>>/.ssh/id_rsa.pub --norootpass --addconsoleplease refer to the official tool guide to get additional insights about it. The tool is described here.
As a side note, the resulting SD card will contain 3 partitions:
-
BIOS (U-Boot) - 1.1 Gb
-
Boot - 525 Mb
-
Root - Occupies the remaining unallocated space in the SD card
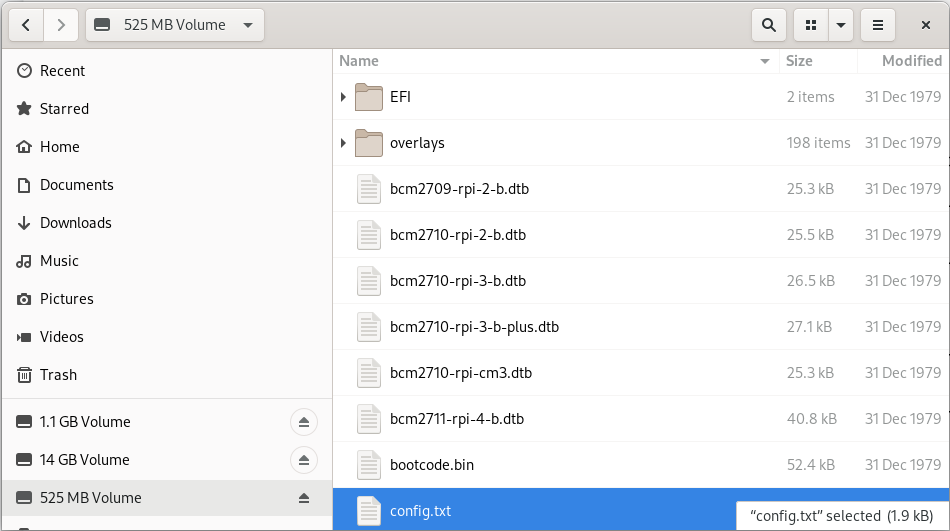
Enabling 64bit on RPi cpu
After the flashing operation has completed successfully, it’s important to have a look at the config file of the operating system. edit the file config.txt and make sure the section [all] starts with the following key-value pairs: arm_control=0x200, arm_64bit=1
e.g.:
...

# Default Fedora configs for all Raspberry Pi Revisions
[all]
# Put the RPi into 64 bit mode
arm_control=0x200
arm_64bit=1

...
After first boot
The following steps may not be necessary if you are happy with the fault keyboard layout or if you are connecting your RPi to the network with aLAN cable…
Keyboard Layout
Find your keymap of choice in the list obtained by issuing the following command:
$ localectl list-keymaps | grep your-localeAnd set it into the system config:
$ localectl set-keymap _map_Enable internet access through WiFi connection
Get the list of available networks
$ nmcli device wifi listAnd connect to the Wi-Fi network of choice
$ nmcli device wifi connect SSID password PASSWORDDisable firewall
Only because it is a demo!!! :-)
$ systemctl disable firewalld
$ systemctl stop firewalld
Create a new user for the device
Thanks to the fedora-arm-installer tool, we’ve added out public key to the root user. Using root user on a linux system is never a good idea or, let’s say, a good practice. For this reason, we’re going to add a new administrative user with wheel privileges to our OS:
$ useradd edge
$ passwd edge
$ usermod edge -a -G wheel
3. Connecting the container engine to the quay.io account
If you haven’t got it yet, create a free account on quay.io.
4. Compiling and deploying your Quarkus native app on Podman
Back on the VM side.
Building the executable
You’ll need git to download the source code and execute it:
$ sudo dnf install -y gitClone the quarkus quickstarts repository and pick up the quarkus quickstart of choice.
$ git clone https://github.com/quarkusio/quarkus-quickstarts.git ~/git/quarkus-quickstartsEnter the root directory of the quickstart of choice (e.g. getting-started) and start the build:
$ ./mvnw package -PnativeThe whole Maven process takes roughly 40 mins. Blease be aware that this could take longer in case of a sarvice with more features (i.e. importing and using more modules):
[edge@localhost getting-started]$ ./mvnw package -Pnative
...
[INFO] --- quarkus-maven-plugin:1.8.1.Final:native-image (default) @ getting-started ---
[INFO] [org.jboss.threads] JBoss Threads version 3.1.1.Final
[INFO] [io.quarkus.deployment.pkg.steps.JarResultBuildStep] Building native image source jar: /home/edge/quarkus-quickstarts/getting-started/target/getting-started-1.0-SNAPSHOT-native-image-source-jar/getting-started-1.0-SNAPSHOT-runner.jar
[INFO] [io.quarkus.deployment.pkg.steps.NativeImageBuildStep] Building native image from /home/edge/quarkus-quickstarts/getting-started/target/getting-started-1.0-SNAPSHOT-native-image-source-jar/getting-started-1.0-SNAPSHOT-runner.jar
[INFO] [io.quarkus.deployment.pkg.steps.NativeImageBuildStep] Running Quarkus native-image plugin on GraalVM Version 20.2.0 (Java Version 11.0.8)
[INFO] [io.quarkus.deployment.pkg.steps.NativeImageBuildStep] /usr/lib/graalvm/graalvm-ce-java11-20.2.0/bin/native-image -J-Dsun.nio.ch.maxUpdateArraySize=100 -J-Djava.util.logging.manager=org.jboss.logmanager.LogManager -J-Dvertx.logger-delegate-factory-class-name=io.quarkus.vertx.core.runtime.VertxLogDelegateFactory -J-Dvertx.disableDnsResolver=true -J-Dio.netty.leakDetection.level=DISABLED -J-Dio.netty.allocator.maxOrder=1 -J-Duser.language=en -J-Dfile.encoding=UTF-8 --initialize-at-build-time= -H:InitialCollectionPolicy=com.oracle.svm.core.genscavenge.CollectionPolicy\$BySpaceAndTime -H:+JNI -jar getting-started-1.0-SNAPSHOT-runner.jar -H:FallbackThreshold=0 -H:+ReportExceptionStackTraces -H:-AddAllCharsets -H:EnableURLProtocols=http -H:NativeLinkerOption=-no-pie --no-server -H:-UseServiceLoaderFeature -H:+StackTrace getting-started-1.0-SNAPSHOT-runner
[getting-started-1.0-SNAPSHOT-runner:2012]    classlist:  82,587.50 ms,  0.96 GB
[getting-started-1.0-SNAPSHOT-runner:2012]        (cap):  25,485.45 ms,  0.96 GB
[getting-started-1.0-SNAPSHOT-runner:2012]        setup:  62,730.91 ms,  0.94 GB
15:15:03,073 INFO  [org.jbo.threads] JBoss Threads version 3.1.1.Final
[getting-started-1.0-SNAPSHOT-runner:2012]     (clinit):   9,087.82 ms,  2.24 GB
[getting-started-1.0-SNAPSHOT-runner:2012]   (typeflow): 392,638.79 ms,  2.24 GB
[getting-started-1.0-SNAPSHOT-runner:2012]    (objects): 300,849.30 ms,  2.24 GB
[getting-started-1.0-SNAPSHOT-runner:2012]   (features):   9,611.94 ms,  2.24 GB
[getting-started-1.0-SNAPSHOT-runner:2012]     analysis: 729,428.50 ms,  2.24 GB
[getting-started-1.0-SNAPSHOT-runner:2012]     universe:  37,544.86 ms,  2.24 GB
[getting-started-1.0-SNAPSHOT-runner:2012]      (parse): 135,120.27 ms,  2.24 GB
[getting-started-1.0-SNAPSHOT-runner:2012]     (inline): 314,244.72 ms,  3.25 GB
[getting-started-1.0-SNAPSHOT-runner:2012]    (compile): 817,352.63 ms,  4.08 GB
[getting-started-1.0-SNAPSHOT-runner:2012]      compile: 1,304,395.09 ms,  4.08 GB
[getting-started-1.0-SNAPSHOT-runner:2012]        image: 102,001.77 ms,  4.10 GB
[getting-started-1.0-SNAPSHOT-runner:2012]        write:  16,216.90 ms,  4.10 GB
[getting-started-1.0-SNAPSHOT-runner:2012]      [total]: 2,342,173.85 ms,  4.10 GB
[INFO] [io.quarkus.deployment.pkg.steps.NativeImageBuildStep] Execute [objcopy, --strip-debug, /home/edge/quarkus-quickstarts/getting-started/target/getting-started-1.0-SNAPSHOT-runner]
[INFO] [io.quarkus.deployment.QuarkusAugmentor] Quarkus augmentation completed in 2394526ms
[INFO] ------------------------------------------------------------------------
[INFO] BUILD SUCCESS
[INFO] ------------------------------------------------------------------------
[INFO] Total time:  45:25 min
[INFO] Finished at: 2020-09-30T15:46:11+02:00
[INFO] ------------------------------------------------------------------------
The native quarkus executable must be packaged into a container image in order to be able to run it on a container runtime. To achieve this goal, let’s ask the container runtime already installed into your VM to build the container image:
$ sudo podman build -f src/main/docker/Dockerfile.native -t quay.io/$myusername/quarkus-getting-started:1-aarch64 .Push the container image to the container registry of choice to share it with the edge device:
$ sudo podman push quay.io/$myusername/quarkus-getting-started:1-aarch64Deploying the executable
On the RPi:
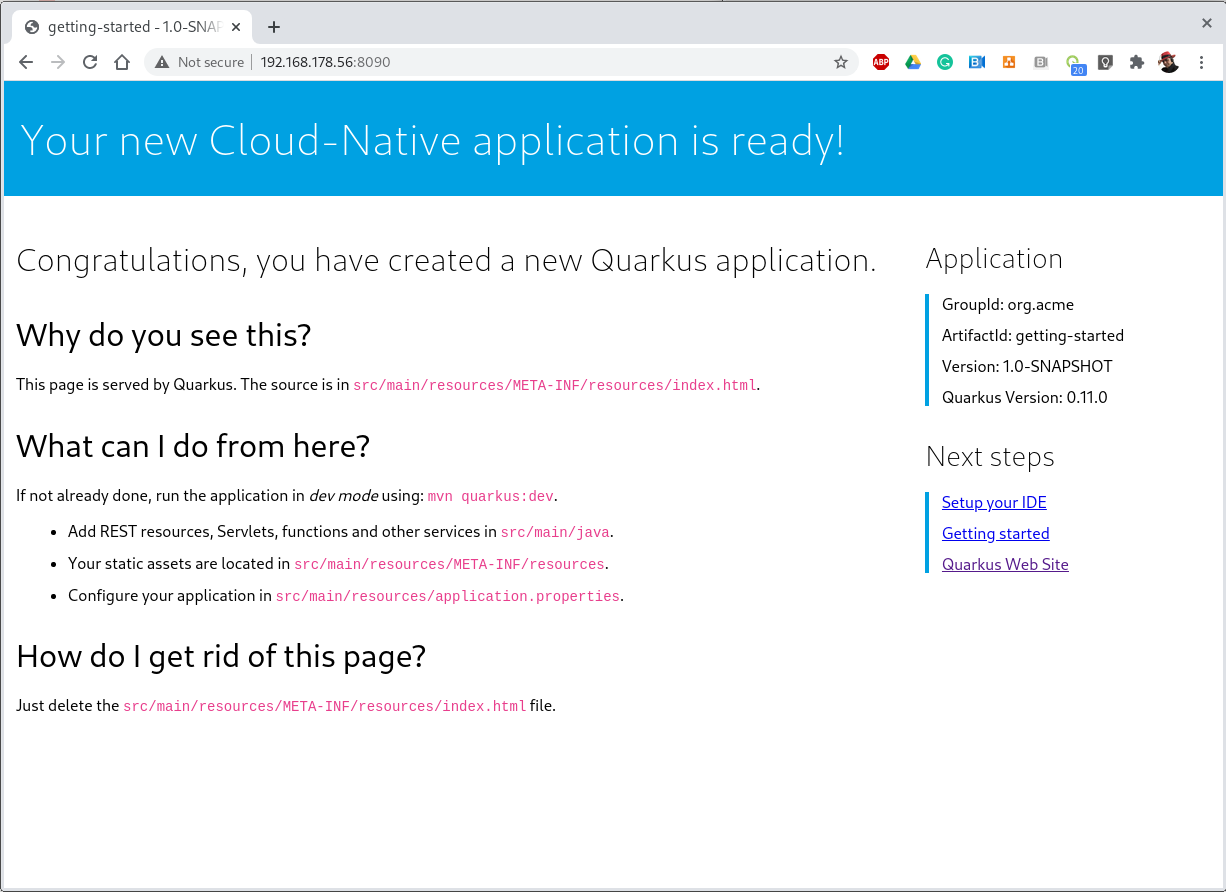
$ sudo podman run -it --rm -p 8090:8080 --name quarkus-getting-started quay.io/$myusername/quarkus-getting-started:1-aarch64Outcome
This paragraph shows the outcome produced by the above steps:
Startup/Stop time:
[edge@localhost ~]$ sudo podman run -it --rm -p 8090:8080 --name quarkus-getting-started quay.io/abattagl/quarkus-getting-started:1-aarch64
Trying to pull quay.io/abattagl/quarkus-getting-started:1-aarch64...
Getting image source signatures
Copying blob d44f88e7704f done
Copying blob 8c4861605060 done
Copying blob c5a0fdbc0d7a done
Copying blob 5dd9a2ffef88 done
Copying config f08559ac50 done
Writing manifest to image destination
Storing signatures
__  ____  __  _____   ___  __ ____  ______
 --/ __ \/ / / / _ | / _ \/ //_/ / / / __/
 -/ /_/ / /_/ / __ |/ , _/ ,< / /_/ /\ \
--\___\_\____/_/ |_/_/|_/_/|_|\____/___/
2020-10-01 08:49:34,566 INFO  [io.quarkus] (main) getting-started 1.0-SNAPSHOT native (powered by Quarkus 1.8.1.Final) started in 0.055s. Listening on: http://0.0.0.0:8080
2020-10-01 08:49:34,566 INFO  [io.quarkus] (main) Profile prod activated.
2020-10-01 08:49:34,566 INFO  [io.quarkus] (main) Installed features: [cdi, resteasy]
^C
2020-10-01 08:49:49,061 INFO  [io.quarkus] (Shutdown thread) getting-started stopped in 0.007s
The application starts in 55 ms and stops in 7 ms. This is impressive if you consider the Quarkus native app is running on the RPi3 cpu (Please have another look at the cpu specs at the very beginning of this article)!
Conclusions
Big Picture
This article reproduces the steps to compile and run a Quarkus native app on a Raspberry Pi cpu. This process is potentially valid for all the cpus belonging to the ARM v8 family, with some potential exceptions due to the fact the architecture of few ARM based cpus may differ from the standard one for that version.
Building tools
For this PoC I’ve used a QEmu-base VM. That promotes reusability, but it’s still expensive in terms of usability (QEmu works like a charm on linux OS, but not on Windows and MacOS). As stated at the beginning of this article, a more flexible, portable and scalable solution still based on cpu emulation and container technology is under investiogation at the moment. That would help the delegation and scalability of build process.
Be aware that QEmu-based tools are still a workaround. GraalVM is missing the cross-compile feature and it will take a while to release it.
Quarkus everywhere
It’s clear that Quarkus can potentially run everywhere. It is, of course, a matter of supportability from GraalVM to the underlying architecture.
So far I feel comfortable in stating that this is just the beginning and lots more features and capabilities are yet to come.
It would very nice to have a distribution of Mandrel for aarch64. Mandrel is aligned with the native-image capabilities from GraalVM with OpenJDK and Red Hat Enterprise Linux libraries to improve maintainability. Looking forward to testing it ;-)